From Scratch Farmstead
  • About
  • Homestead How-to’s
    • Family Milk Cow
    • Gardening
    • Chickens
    • Small Scale Farming
    • Buying A Homestead
    • Homestead Living
  • Nourishing Recipes
    • Food Preservation
    • Home Dairy
    • Breakfast
    • Main Course
    • Sides
    • Dessert
    • Sauces & Condiments
  • Natural Living
    • Skin Care
    • Living On A Budget
    • Our Healing Journey
    • Homestead Skills
    • DIY
    • AGA Stove
Tag:

farmhouse kitchen

tung oil for butcher block turorial
DIYNatural Living

We Chose Tung Oil For Butcher Block And Love It!

by From Scratch Farmstead December 15, 2022

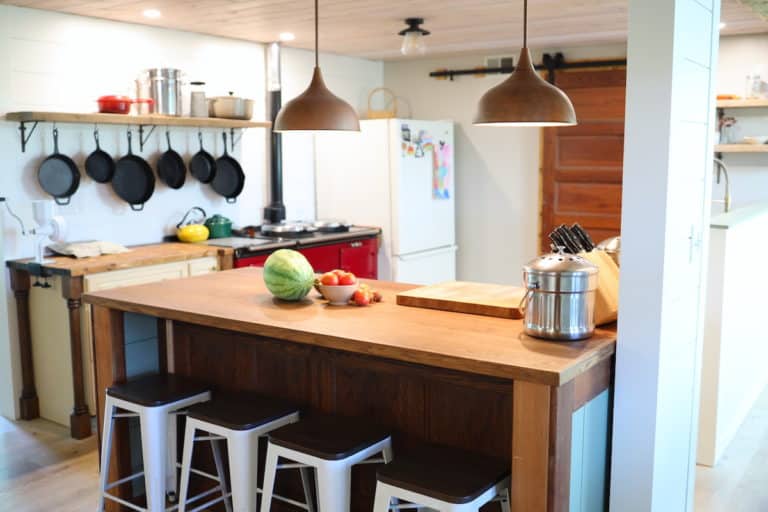
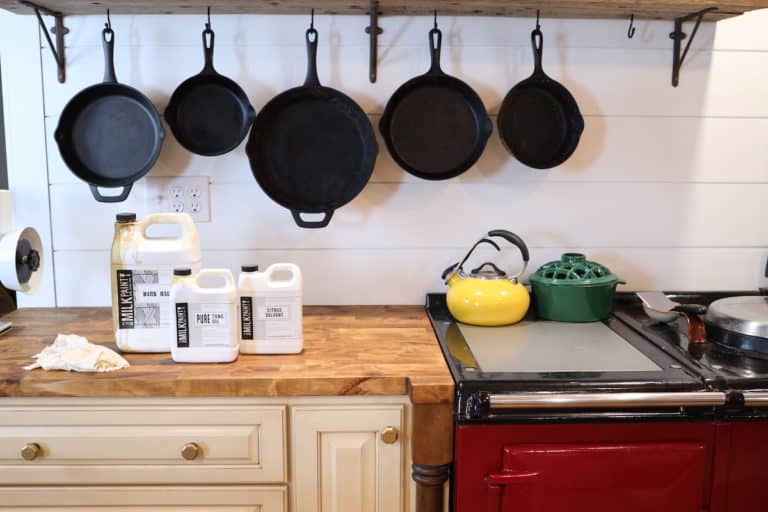
Kitchen countertops take a beating! When it comes to sealing your butcher block countertops you don’t want to settle for any run-of-the-mill sealer. Trust us – we’ve tried! When it comes to sealing, Tung Oil for butcher block is your best bet! 

After two years of heavy use, our countertops finished with 100% Pure Tung Oil from Real Milk Paint Co. still look AMAZING! Here’s what you need to know.

Use Promo Code FROMSCRATCH for 10% off your Real Milk Paint Co. purchase.

A case for butcher block countertops

Somehow in our decade plus of marriage we’ve owned 4 different homes and done 3 pretty involved kitchen remodels.

Plus, all of them were done on a very tight budget. You can read more about our cost saving tips in our post – How to Create Your Dream Kitchen Remodel on a Budget | 5 DIY Ideas to Save Thousands.

If there’s one thing we’re sold for life on, it’s butcher block countertops. Here’s just a few reasons why:

They’re inexpensive. You can buy standard lengths of raw butcher block from most major hardware stores at very affordable costs as compared to even the most entry level countertops, like laminate.

They’re DIY friendly. You don’t need to be a pro to install them. With just a circular saw and some other basic tools you can easily install your own butcher block countertops.

butcher block countertops finished in dark tung oil

They’re forgiving. Yes, butcher block is not impenetrable like other countertop options. But with just a light sanding and reapplying your finish they can always look brand new!

They’re natural. When it comes to food prep you want a toxic-free surface. Many countertops are industrially produced from plastic that continually give off toxic fumes. Even stone options often require a toxic sealer or conditioner be applied regularly to the surface. What’s more natural than wood?

They’re beautiful! Butcher block countertops provide a warm and friendly feel in any space. They can be modern, quaint, or rustic. And they just stand out! They’ve been the perfect compliment to our farmhouse kitchen.

But we’ve definitely learned a thing or two about how to finish them.

How NOT to seal your butcher block countertops

After excitedly installing butcher block countertops in our first kitchen remodel we soon realized we overlooked one important detail; how to seal them?

So we hopped over to our local hardware store and checked out the options. We found a bottle of butcher block sealer made with a blend of beeswax and mineral oil. It sounded natural enough so we went with it!

farmhouse kitchen with painted used cabinets

It was easy to apply – looked great – even smelled great. But after a couple months of routine kitchen use we were feeling uneasy about what we got ourselves into.

What, another ring from leaving a water glass out on the counter overnight?

We learned quickly that leaving a drying towel down for any amount of time when doing dishes was just a bad idea.

And I’ll never forget the day I came home after a mishap with some beets and a blender and realized I’d be staring at those purple spots for along time.

The kitchen is not the place to be on pins and needles about making a mess. We sold that house but resolved that should we ever have butcher block countertops again we would do a bit more research.

What is the Best Tung Oil? – Why we chose Real Milk Paint Co.

A year or so later I decided to make Joelle a cutting board out of one of the cutoff butcher block pieces we still had from that kitchen remodel.

And that cutting board would get some daily use and abuse! Time to research a more impenetrable finish option.

Polyurethane? Nope. Yes, it would make them waterproof. But coating natural wood in plastic just didn’t seem right. And refinishing them would be a nightmare. Why even have butcher block then?

There were plenty of oil options out there for a sealer. Each with their own set of pros and cons. But one repeatedly stood out: Tung Oil.

butcher block cutting board finished with tung oil
This butcher block cutting board finished with Tung Oil looks great after 4 years of HEAVY use!

We had previously been introduced to Real Milk Paint Co. through their milk paints. We loved the transparency and commitment to quality, natural products this small business offered. And their 100% Pure Tung Oil finish for butcher block really caught our attention.

So, I ordered up a bottle, sealed the cutting board, and loved the end result. Four years later that same cutting board is still looking beautiful and holding up incredibly well!

Lo and behold, a little over two years ago we bought our foreclosed, 5-acre homestead property that once again needed a complete kitchen overhaul. Did we go with butcher block countertops? You bet!

And this time, sealing them with Tung Oil from Real Milk Paint Co. was a no-brainer!

What is Tung Oil and how is it used?

Tung oil (or Chinawood Oil) is 100% natural and made by crushing the seeds from the nuts of tung trees. It has been used for centuries, often nautically as a dependable waterproofer for boats and ships. More recently the uses of tung oil have expanded to the home. Particularly on surfaces that come in contact with food because of its non-toxic nature. 

real milk paint co tung oil for butcher block review

Tung Oil is thick and needs to be thinned for deep penetration. To thin, it’s commonly paired with a Citrus Solvent. Citrus Solvent is also a natural, food-safe product derived from orange peels. Plus, you can’t beat the aroma it leaves! Mineral spirits is another option to thin Tung Oil with, but is less natural being derived from petroleum. 

Mixing Tung Oil and Citrus Solvent at a 1:1 ratio allows for a deep and penetrating finish on your wood. Real Milk Paint Co. sells a pre-mixed blend called Half & Half, which is a 50/50 blend of Tung Oil and Citrus Solvent. 

The seal Tung Oil provides is hard and waterproof, yet flexible and easily allows for refinishing. Tung oil gives a clear, matte finish to wood that does not yellow wood to the extreme of other oil finishes like linseed oil. 

Real Milk Paint Co. also offers a Dark Tung Oil that provides a beautiful and rich dark wood color. Many stains contain toxic ingredients, but the natural resin used to stain wood in Dark Tung Oil holds true to the companies commitment of a truly natural product. You can also purchase Dark Half, which is the dark version of their 50/50 Half & Half blend. This is what we used for our countertops!

Benefits of 100% Pure Tung Oil for butcher block

Food Safe

Real Milk Paint Co. guarantees their Tung Oil to be 100% pure. No additives, preservatives, or petroleum derived ingredients. There are only two things; oil from the tung tree and citrus solvent from orange peels. It doesn’t get more simple than that! And this matters when it comes to the surfaces your food will come in contact with. 

cutting butternut squash into cubes for roasting

Waterproof

There are few, if any marks on our countertops from liquids after a couple years of heavy use. Water literally pools on top like it would on granite. We do try to be conscious and wipe up wet spots when we see them. But we don’t have to live in constant fear that one slip up or forgotten water glass will produce an everlasting ring. And we even have our butcher block around our sink!

Easy To Apply

Seriously, you don’t have to be any sort of woodworker pro to produce a stunning end result! The application process is as simple and forgiving as it comes. You can really WOW your guests when you let them know you finished your own countertops!

Non-toxic

Tung Oil has zero VOC’s (volatile organic compounds) and is safe to contact skin during and after application. Just like in the food industry, you have to do your homework and read labels these days as to what’s inside building materials and products. As a former construction manager, one of my main reasons for leaving the industry was how cheap and toxic many standard materials have become. Stains and sealers are often atop of that list.

open farmhouse kitchen remodel

Gorgeous

Tung Oil does an amazing job at preserving the natural beauty within wood. Many oil sealers continue to darken or yellow wood over time. Tung Oil only provides a slight coloration that holds true over time. And the Dark Tung Oil applies evenly and leaves deep, stunning wood tones.

Disadvantages of Tung Oil for butcher block

Every oil will have its disadvantages. Our experience with Tung Oil has been so positive though that it seems like a bit of stretch to come up with any cons. However, here’s a couple things to consider.

Curing Time

Tung Oil can take up to 30 days to fully cure. This can easily be remedied with setting up temporary kitchen prep surfaces for a time while curing. Honestly though, we started using our countertops pretty quickly after we first finished them and they still help up shockingly well. The curing time is a minor disadvantage but it’s worth mentioning so you can plan for lighter use during that period.

Maintenance

When going with butcher block, regardless of sealer selection, maintenance comes with the territory. Tung Oil is no different. The “set it and forget it” option doesn’t exist. All butcher block sealers need to be reapplied occasionally. The good news is that reapplying Tung Oil to keep them looking new is really simple, which we’ll talk more about.

How to finish butcher block countertops and cutting boards with Tung Oil

I will always recommend you check out the manufactures recommendations when it comes to application. Real Milk Paint Co. has a helpful butcher block tutorial post.

But here are the simple steps we followed when applying Tung Oil to our butcher block countertops:

Step 1: Prep Surfaces

Assuming you are starting with raw butcher block, provide a light sanding first to remove any bumps or imperfections. Start with a 80-100 grit sandpaper for larger flaws, then finish with 120-150 grit sandpaper. It’s important to not finish finer than 150 grit as the oils will not be able to penetrate as deeply. Wiping the surface with a moist rag will raise the grain allowing for a smoother finish when sanding. Wipe away any dust or debris when satisfied with the surface.

Butcher block countertops for farmhouse kitchen

Step 2: Mix

Unless you’ve bought the half Tung Oil, half Citrus Solvent mixture you’ll want to mix them to a 1:1 ratio. We typically just used something that can be disposed of after like an old yogurt or ice cream container. And if using Dark Tung Oil or Dark Half, don’t forget to thoroughly stir the oil before pouring so the pigment applies consistently.

Step 3: Apply

You’ll want your first coat of Tung Oil to be heavy. Raw wood soaks up oils rapidly. Pour the oil directly onto surface and work it into the wood grains with a rag, sponge, or brush. We usually used an old t-shirt or sock. Continue to apply coats allowing at least 30 minutes for absorptions between each coat. Be sure to apply coats of Tung Oil around the edges of the countertop along with at least 2 thick coats on the bottom side for an even finish and protection. Once wood appears fully saturated and to no longer be absorbing oil, move on to the next step.

butcher block countertops finished with dark tung oil

Step 4: Wipe Away

Let the final layer of Tung Oil sit for at least 30 minutes, then wipe any excess away with a fresh, clean rag. Wipe smoothly with the grain to leave a uniform finish.

Step 5: Cure

Tung Oil will take 15-30 days to fully cure. Use your countertop surfaces minimally during this period. Especially for the first 10 days following application. Some residual oil may continue to rise to the surface and can be wiped away. I’ll be honest that we didn’t follow the curing procedure to a T, but still have been very happy with the look and longevity of our countertops!

Refinishing butcher block countertops with Tung Oil

The beauty of butcher block is that they can always be new again! A quick refinish (and sanding if necessary) and any flaws can instantly vanish.

But when do you refinish them? That’s really up to you and how much wear and tear you’re ok with. You might have something more catastrophic happen – a gouge or gash, spill or stain. Or you might just have minor scuffs and marks that add up over time.

We didn’t refinish ours until after two years of heavy use. Really they still looked great, but we were happy to lightly sand out any minor imperfections, reapply some fresh Tung Oil, and be setup again for at least a couple more years.

butcher block countertops after 2 years of use
kitchen island butcher block countertops needing to be refinished
Our countertops prior to refinishing after 2 years of use.

So you’ll need to decide when is the right time to refinish your countertops. It might be every 6 months. It might be every 6 years! But whatever you decide, the steps are simple and vey similar to the original finish process.

Step 1

First I went through and gave a light sanding with 100-150 grit sandpaper to any spots, ridges, scratches, or other flaws I found. Then wipe the surfaces clean with a moist rag.

Step 2

This time, mix at a 2:1 ratio of Citrus Solvent to Tung Oil then apply the same as above. This thinner ratio of Tung Oil allows for deeper penetration. I found another 2 or 3 coats did the trick.

real milk paint co dark tung oil for butcher block
applying dark tung oil on butcher block countertops

Step 3

Wipe away any excess and allow some time for curing before use.

What other uses does Tung Oil have?

Beyond countertops and cutting boards, we’ve found Tung Oil to be an incredibly helpful product to keep extra of around the house.

We used the same Dark Half from our butcher blocks to finish the trim we installed throughout our home.

wood pine trim finished with dark tung oil

I’ve even used it reseal wood handled garden tools like hoes and rakes.

And while we didn’t use it for this, a common application is to use Tung Oil for wood floors. Non-toxic finish options for flooring are difficult to come by. We researched the gamete when checking out options for our white oak floors we installed. We ended up choosing to soap finish them, but Tung Oil was a close second, and still may be the finish we switch to in the future.

Indoor to outdoors use. Furniture making to spoon carving. Cutting boards to trim. Even concrete countertops! Tung Oil truly has a broad range of applications.

Where to buy Tung Oil?

We’ve had a really positive experience ordering directly through the Real Milk Paint Co. website.

And if you use the promo code – FROMSCRATCH – you can get an additional 10% off your order!

Other brands of Tung Oil exist, but Real Milk Paint Co. is the only brand we trust for 100% Pure Tung Oil without any added junk. We have promoted products from them for years and are happy to do so now as an affiliate earning a small commission from sales at no extra cost to you.

It’s worth also checking the Store Locator on the Real Milk Paint Co. website for retail locations! We were pleased to find that a local woodworking store in our area carries their products.

tung oil for butcher block review

December 15, 2022 0 comment
0 FacebookTwitterPinterestEmail
farmhouse kitchen remodel on a budget
DIYLiving On A BudgetNatural Living

How to Create Your Dream Kitchen Remodel on a Budget | 5 DIY Ideas to Save Thousands

by From Scratch Farmstead September 18, 2022

The kitchen is the heartbeat of your home. So don’t settle for anything other than making it your dream space! These 5 big picture DIY ideas will bring your dream kitchen remodel on a budget within reach.

Our Kitchen Remodel on a Budget Story

We spent A LOT of time in the kitchen. Hence, From Scratch Farmstead.

We’ve also owned three different houses in the past several years. If we were going to invest time and money into remodeling any part of those homes, the kitchen was the obvious winner. So, all three got a major kitchen remodel!

farmhouse kitchen before remodel on a budget
foreclosed farm kitchen before remodel
BEFORE pictures of our current farmhouse kitchen

Yes, they were all DIY projects that took a fair amount of work. But we were also able to tackle all three on very tight budgets. All while adding thousands of dollars in value to our home and creating a kitchen space that we loved.

Why Remodel Your Kitchen on a Budget?

When it comes to remodeling your kitchen, there are two streams of logic: Consumer Logic & Values Logic.

Consumer Logic

Consumerism is deeply engrained into our culture. Companies spend thousands, even millions of dollars implementing the best tactics and strategies to get you to believe you can’t live without their product. Buy new. Buy now. Buy more.

Values Logic

Values based thinking and decision making moves you from passive consumption to active and intentional results. This mentality allows you to get creative, scrappy, frugal, and unleash your inner DIY spirit to create a beautiful and functional space while living within your means. 

Am I saying to never buy anything new? Not in the least. But don’t just buy something new because that’s what the cultural message and expectations around you are. We looked around for alternative kitchen sink options, but in the end decided that the farmhouse kitchen sink from Home Depot was the right purchase.

open farmhouse kitchen remodel

So, you mean everything I end up with is going to be cheap and low quality? Again, not at all. Spending less doesn’t need to equate to cheap. In our experience we often end up with significantly higher quality purchases when buying used or secondhand items than we could have afforded new.

We’ll break down our 5 kitchen remodel on a budget tips below. But in order to be successful at it you need to adopt values-based logic. This can take some rewiring of our brains to not believe that everything needs to be spotless and new.

But if you can “see through” the marketing and sales ads vying for your dollars, there’s a whole new world of options and opportunities out there that can fit within any budget.

5 DIY Ideas to Remodel Your Kitchen On A Budget

1. Appliances

Like clockwork, you can bank on every box store near you having a “big” appliance sale around just about every holiday. But so many other appliance options exist other than buying new!

Here’s something to think about. My wife’s parents have had the same appliances in their house for her entire life. Fridge, oven, washer & dryer. They’ve worked with only minor repair needed for over 30 years!

Compare that to modern appliances. I can point to handfuls of examples of friends and family who have purchased new appliances with high price tags only to have them fail within a couple years just outside the warranty period. Yes, it’s new. But are you really buying something “better” and getting your money’s worth?

We have only ever bought used appliances. Even if they don’t last long, you’re not out very much money. But most have worked just fine and been higher quality than we could have afforded new.

underside of farmhouse shelf hanging cast irons
Our used Aga Stove. The find of the century! New: ~$18,000. We paid $1,200.

Here’s some ways to save on appliances:

Look Used on Facebook Marketplace and Craigslist

Plenty of people sell their slightly outdated, yet perfectly functional appliances when updating their home. We scored a matching fridge, range, dishwasher set for $150 that really wasn’t that old and has worked out great. Check listings regularly, be patient, and have a plan in place to pick something up right away when the right option comes up.

Buy Scratch and Dent

Many brand-new appliances never make it to the showroom because of minor cosmetic flaws in manufacturing or shipping. Some retailers have outlet stores, or even some larger secondhand stores like a Habitat for Humanity Resale Store, stock many scratch and dent appliance options. Yes, you may forgo the warranty and be taking that risk. But you’ll end up with a brand-new appliance and save hundreds.

Keep what you have!

Sometimes adopting the “if it ain’t broke don’t fix it” mindset is the best and most budget friendly option. We did a complete remodel on our first kitchen and assumed at the start that the appliances would be replaced. But once we cleaned them up a bit and fit them into the updated space, suddenly they looked great and even fit the classic farmhouse theme we had going on!

remodeled farmhouse kitchen with used appliances

2. Cabinets

New kitchen cabinets can easily cost as much or even more than you would spend on the entire rest of your kitchen. So, avoid new cabinets!

On all 3 kitchens we remodeled we’ve been able to give the space an entirely new and vibrant feel with spending little money on cabinets. Here are some ideas:

  • Buy used cabinets. Entire kitchen makeovers are frequent. Often in nice homes with lightly used cabinets. To avoid the landfill, many of these complete kitchen cabinet sets end up on resale sites. In our first home, we bought used cabinets from a HUGE kitchen for a few hundred dollars. We installed them, painted them, and in the end sold the leftover cabinets we didn’t use and made some of the money back!
  • Paint your cabinets. The construction and style of cabinets really doesn’t change all that much. But the finish and color options are endless! Painting your existing cabinets or “new” used cabinets can make them feel fresh and new and fit perfectly within any kitchen design.
farmhouse kitchen with painted used cabinets
  • Update cabinet doors or hardware. One strategy is to leave your existing cabinet boxes and just update the cabinet doors. Or even simpler is to just add new hardware. This can save money, reduce the scope of the project, and give your space an entirely new look and feel.
  • Buy Showroom cabinets. We purchased cabinets that came from the showroom of a cabinet retailer for our current kitchen. To give the full story, we actually bought them at a garage sale where the seller bought them from a showroom and never ended up using them. They were practically brand new, very high quality, and we estimate we spent about 1/5 of what they would have cost us new.

Kitchen Layout and Design with Used Cabinets

A quick note on used cabinets. When buying cabinets new, you first design your kitchen space and then fill it with the exact right size of cabinets. It doesn’t always work that seamlessly when buying used cabinets.

We’ve found that it’s most helpful to have a general idea of your cabinet layout ahead of time, while keeping an open mind to adapt the layout based on what you find. You want to be patient and find the right cabinets in sizes you can work with. But you’ll likely end up modifying your plan to get them to work.

3. Countertops

The initial cost per lineal foot of new countertops may not send you into shock, but the total cost for your whole kitchen just might! Even for lower-end options, custom countertops can run you thousands of dollars.

We have fallen in love with butcher block countertops! They look great, make for an easy DIY project, and are durable and forgiving. If anything ever does happen to them, just give them a light sanding, refinish, and they’re as good as new!

wondermill junior deluxe clamped to countertop

Large hardware stores carry standard butcher block sizes that will fit most kitchens and only cost a few hundred dollars. You can typically find them in 8’ and 4’ lengths, or a 4’ x 36” option for an island or breakfast bar. We have fit these into two kitchens and they have looked great!

What if you need a custom butcherblock countertop size?

I built a custom island in our current kitchen that is very large. We looked into getting a custom butcherblock countertop made and requested quotes from a couple local lumber stores. The numbers we received made us gasp, beginning in the 3-5k range at a minimum.

laminating wood flooring to make custom countertops
custom wood floor countertop ready to be sanded

Instead, I was able to make a quality looking custom island countertop utilizing leftover unfinished wood flooring and a sheet of ¾” plywood. I laminated the wood flooring pieces onto the plywood with wood glue and nails, and then ripped down some of the wood flooring to 1-1/2” trim pieces along the edge. Aside from time, it didn’t cost me a thing since all the pieces were leftover!

custom butcherblock for kitchen island made with wood flooring
Custom butcher block countertops made from leftover wood flooring pieces

What do you use to finish butcherblock countertops?

We used a beeswax finish on the butcherblocks in our first home. This worked fine. But in our current home we switched to pure tung oil from Real Milk Paint Co. Their Half n Half oil (half tung oil, half citric solvent) works great for butcherblock. We used Dark Half, which adds a beautiful dark pigment to your countertops and helped contrast our cream-colored cabinets.

Butcherblock countertops for farmhouse kitchen
butcherblock countertops finished with dark tung oil

4. Reclaimed or Repurposed Materials

Using reclaimed or repurposed materials in your kitchen can add lots of character and help keep that budget minimal.

We have found reclaimed or repurposed materials several ways:

  • Searching on Facebook Marketplace or Craigslist
  • Salvaging from old homes before they are demolished
  • Utilizing scraps from another project
  • And yes, dumpster diving or pulling items off a curb

There are hundreds of ways to be creative when repurposing materials. To offer inspiration, here are some of the ways we’ve incorporated reclaimed or repurposed materials into our kitchen.

aintique sliding barn door in farmhouse kitchen
  • Reusing antique doors for a sliding barn door between our kitchen and mudroom.
  • Finding scrap pieces of tongue and groove beadboard wood on FB Marketplace that fit perfectly on the half wall behind our sink.
  • Using another antique door, along with other salvaged trim pieces to finish out our kitchen island.

custom kitchen island in farmhouse kitchen remodel
  • Finding hand hewn barn beams from an old barn that span our kitchen and dining space, which give an authentic farmhouse feel and pull the whole space together.
  • Using boards salvaged off a rotting hay feeder to build our farmhouse kitchen shelving where we store our cast iron pots and pans on.
  • Instead of tossing the hideous purple cabinet pulls that came with our kitchen cabinets, we decided to paint them the gold color we were wanting giving them an entirely new life!

5. Second Hand Furnishings

Once your space is mostly complete, those few final furnishings can really bring it all together. But again, don’t default to new! Second hand options can add a lot of character and function to your space at a fraction of the cost.

Here’s some examples of second hand finds we came across and absolutely love.

  • Lighting. Three separate light fixtures in our kitchen/dining space we bought used. They were really affordable. We get compliments on the chandelier above our dining room table all the time and it literally cost us $15!
  • Hutch/Buffet. New furniture pieces can be expensive. But we found that perfect hutch on FB Marketplace, picked it up locally, and we couldn’t be happier with how it fits our space.
second hand chandalier over dining room table
second hand kitchen hutch with antique finish
  • Barstools. Our custom kitchen island had a breakfast bar built in needing 4 barstools. Again, FB Marketplace came through and we found a set of 4 that looks great and were $10 apiece.

Just like when buying used cabinets, the key to second hand furnishings is to be patient and flexible. The right thing for the right price will almost always pop up. It might just take some time and searching.

Your Dream Kitchen Remodel on a Budget

The tips, tricks and tactics above can bring the kitchen remodel you’ve always dreamed of within reach. But it will take a different mindset and approach than you may be used to.

Remember:

  • Adopt values logic over consumer logic.
  • Don’t make buying new your default and see what other options exist.
  • Focus on quality, new or used, above cost.

So set your budget. Take your time. Assemble the right pieces. Be flexible. And create the kitchen space you’ve always wanted while staying within your means.

Happy kitchen remodeling!

September 18, 2022 0 comment
0 FacebookTwitterPinterestEmail

About Us

About Us

So Glad You're Here!

Hi! We are Jim and Joelle. We love sharing homestead how-to’s, from scratch recipes, and natural do-it-yourself projects to help you nourish your family. To learn about our story, click the image above!

Stay Up-To-Date

Popular Posts

  • How Many Cows Per Acre On A Small Farm

    May 26, 2022
  • Chicken Tractor Plans for 25 Chickens

    May 1, 2022
  • How Eating Liver Changed My Life

    March 31, 2022
  • Easy Farmhouse Cheddar Hard Cheese Recipe

    July 17, 2022
  • Easy DIY Heated Chicken Waterer

    January 2, 2022

Follow Along!

  • Email
  • Facebook
  • Instagram
  • YouTube

Instagram

  • Facebook
  • Instagram
  • Youtube
  • Email

© 2021-2022 From Scratch Farmstead | As an Amazon Associate we earn from qualifying purchases.


Back To Top
From Scratch Farmstead
  • About
  • Homestead How-to’s
    • Family Milk Cow
    • Gardening
    • Chickens
    • Small Scale Farming
    • Buying A Homestead
    • Homestead Living
  • Nourishing Recipes
    • Food Preservation
    • Home Dairy
    • Breakfast
    • Main Course
    • Sides
    • Dessert
    • Sauces & Condiments
  • Natural Living
    • Skin Care
    • Living On A Budget
    • Our Healing Journey
    • Homestead Skills
    • DIY
    • AGA Stove