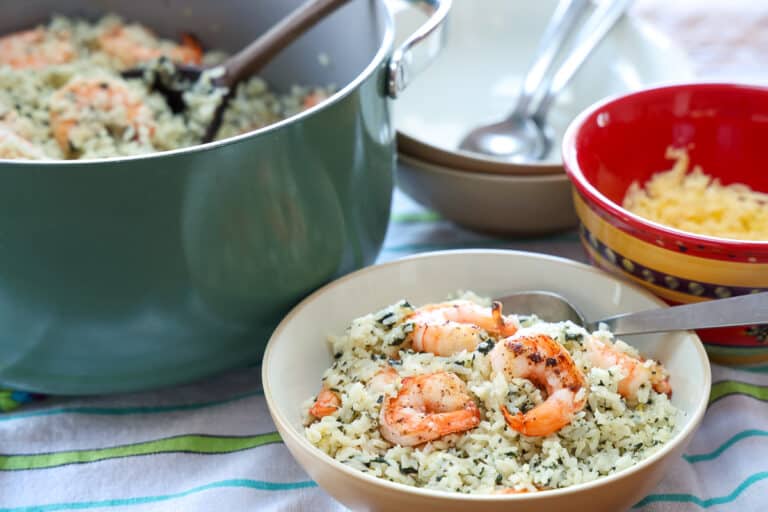
From Scratch Farmstead
  • About
  • Homestead How-to’s
    • Family Milk Cow
    • Gardening
    • Chickens
    • Small Scale Farming
    • Buying A Homestead
    • Homestead Living
  • Nourishing Recipes
    • Home Dairy
    • Food Preservation
    • Breakfast
    • Main Course
    • Sides
    • Dessert
    • Sauces & Condiments
  • Natural Living
    • Skin Care
    • Home Essentials
    • Living On A Budget
    • Our Healing Journey
    • Homestead Skills
    • DIY
    • AGA Stove
Tag:

gluten free

gluten free fudgy buckwheat brownies
DessertNourishing Recipes

Fudgy Pumpkin Buckwheat Brownies (Gluten Free)

by From Scratch Farmstead April 7, 2023

These fudgy pumpkin buckwheat brownies have it all! They are nutritious and gluten-free, yet still taste delicious with a dense brownie texture.

Buckwheat Brownies – A Staple in Our Home

We are in the thick of it at our house. Joelle is recovering from a broken leg and the birth of our new baby all happening in the last few weeks! That being said, we haven’t been doing a lot of cooking and have been incredibly grateful for tons of friends and family dropping off so many meals for our family. 

healthy pumpkin buckwheat brownies recipe

But, one of the few things that has remained stocked in our fridge, even in the midst of the crazy last few weeks has been these delicious pumpkin buckwheat brownies.

We love them because they:

  • Come together in just a few minutes but make a large pan to last us several days!
  • Pack in way more nutrients than your standard brownie.
  • Are made with naturally gluten-free and grain free buckwheat flour.
  • Satisfy any sweet tooth.
9x13 pan of homemade buckwheat brownies

Buckwheat – A New Favorite

Honestly, until a few years ago, I had never even heard of buckwheat flour.

When we began our real food journey, we began experimenting with all sorts of gluten and grain free flours, fermenting grains, and sourdough. Somewhere along the way, we were introduced to buckwheat flour when a friend dropped off an extra bag that she had.

I had heard of buckwheat pancakes. So, we tried those first and were big fans!

Then, we wanted to explore more of what this nutritious flour had to offer. More experimenting occurred and these buckwheat muffins became another family favorite with these pumpkin buckwheat brownies following close behind.

gluten free buckwheat muffins

What is Buckwheat Flour?

While it sounds like it should be closely related to standard wheat flour, buckwheat flour is actually completely different and considered a pseudocereal. It is the ground version of buckwheat which is not a grain at all but actually a fruit closely related to wild rhubarb.

Buckwheat grows easily, even in harsh conditions. It also has a robust nutrient profile. For these reasons, it has become popular to grow around the world. 

Once the plant has matured and dried, the inner fruit is what is ground and turned into flour. Depending on how much of the dark hull is left on will determine whether the flour is light colored or speckled with dark flecks. 

Nutritional Benefits of Buckwheat Flour

Buckwheat flour offers more nutrients than most standard grains. While buckwheat is not known for being particularly high in vitamins, it is rich in minerals: manganese, copper, magnesium, iron, phosphorus. 

Also, as compared to most seeds and grains, buckwheat is low in phytic acid which blocks the absorption of vitamins and minerals. This means that the abundant minerals present in buckwheat flour are more easily absorbed.

Buckwheat is also particularly high in health promoting antioxidants and fiber. 

tartary buckwheat flour for fudgy brownies

There are two main varieties of buckwheat: Tartary Buckwheat and Common Buckwheat. When it comes to nutritional benefits, Tartary Buckwheat surpasses common buckwheat handily.

Another benefit of buckwheat is that it’s heat safe and perfect to bake with. Instead of losing nutrients when it is cooked, buckwheat actually increases the nutrient values that it provides when heated.

How to Use Buckwheat

Depending on where you are in the world, buckwheat has varied uses. It is commonly made into soba noodles in Japan. In many places around the world buckwheat is turned into pancakes or blinis. Galettes, yeast rolls, and other uses in baked goods are standard uses for buckwheat flour.

How to Store Buckwheat Flour

As with other flours, it is best to store buckwheat in the freezer to preserve freshness and retain nutrients.

Ingredients in Pumpkin Buckwheat Brownies:

Buckwheat flour

Our favorite sources of buckwheat flour are either this common buckwheat flour from Janie’s Mill or for a more nutrient dense splurge, this Himalayan Tartary Buckwheat is a great option!

pumpkin buckwheat browny ingredients

Cocoa Powder (or cacao powder)

Either cocoa or cacao powder can be used in this recipe. Cacao is the raw and unprocessed form of chocolate. Cocoa powder is the heated form of cacao that is much more standard on grocery store shelves. While cocoa powder is inferior in nutrients to cacao powder, it still retains antioxidants despite its heating. When buying cocoa powder, be sure to look for a product with cocoa powder being the only ingredient as mixes often contain added sugar. Dutch-processed cocoa powder is a cocoa powder that has been treated with an alkalized solution making it less acidic and richer in taste than regular cocoa powder.

Brown Sugar

Alternatively coconut sugar can be used in place of brown sugar if preferred. We generally source organic brown sugar at Costco.

Pumpkin Puree

We substitute butternut squash puree for pumpkin puree in this recipe and it works perfectly. You can learn how to make your own butternut squash puree in our post—How To Roast Butternut Squash Two Ways.

how to roast butternut squash and make puree

Eggs

Dense, fudgy brownies are preferred to cake like brownies in our house so we’ve found that 2 eggs is the perfect amount for this recipe.

Milk

We use whole, raw milk but any milk or dairy milk alternative will work.

Chocolate Chips

Semi-sweet chocolate chips are our favorite but dark or milk would work too! Save a few extra for sprinkling over the top of your brownies.

Baking Powder

Always look for aluminum-free baking powder. Bob’s Red Mill is our favorite brand. Or you can make your own using this baking powder recipe.

Salt

A bit of sea salt compliments chocolate perfectly. Redmond Real Salt is our go to favorite.

Pumpkin Buckwheat Brownies Recipe

Ingredients:

1 Cup Buckwheat Flour
1 Cup Cocoa Powder (or cacao powder)
1 Cup Brown Sugar (or coconut sugar)
2 tsp Baking Powder
½ tsp Salt
2 Eggs
2 Cups Pumpkin Puree (or butternut squash puree)
1 Cup Milk
1 Cup Chocolate Chips

pumpkin buckwheat brownies in 9x13 pan

Directions:

1. Mix dry ingredients (buckwheat flour, cocoa powder, brown sugar, baking powder and salt).

2. Add wet ingredients (eggs, pumpkin puree, and milk) and mix thoroughly.

3. Stir in chocolate chips, reserving a few for sprinkling over the top if desired.

4. Pour into greased 9×13 baking pan. Sprinkle with additional chocolate chips if desired.

5. Bake at 350 for 20-25 minutes until cooked through.

Notes:

We store these brownies in the fridge for up to 5 days. They also freeze very well.

Some of the above links are affiliate links. This means we earn a small commission on qualifying purchases at no cost to you. We are so appreciative of your support!


Similar Recipes:

  • Easy Buckwheat Muffins
  • Fresh Mint Brownies
  • Gluten Free Butternut Squash Muffins
dense fudgy buckwheat brownies

Fudgy Pumpkin Buckwheat Brownies

Yield: 9x13 pan
Prep Time: 5 minutes
Cook Time: 20 minutes
Total Time: 25 minutes

Ingredients

  • 1 Cup Buckwheat Flour

  • 1 Cup Cocoa Powder (or cacao powder)

  • 1 Cup Brown Sugar (or coconut sugar)

  • 2 tsp Baking Powder
  • 
½ tsp Salt

  • 2 Eggs
  • 
2 Cups Pumpkin Puree (or butternut squash puree)
  • 
1 Cup Milk

  • 1 Cup Chocolate Chips

Instructions

    1. Mix dry ingredients (buckwheat flour, cocoa powder, brown sugar, baking powder and salt).
    2. Add wet ingredients (eggs, pumpkin puree, and milk) and mix thoroughly.
    3. Stir in chocolate chips, reserving a few for sprinkling over the top if desired.
    4. Pour into greased 9x13 baking pan. Sprinkle with additional chocolate chips if desired.
    5. Bake at 350 for 20-25 minutes until cooked through.

Notes

We store these brownies in the fridge for up to 5 days. They also freeze very well.

© From Scratch Farmstead
April 7, 2023 4 comments
0 FacebookTwitterPinterestEmail
gluten free buckwheat muffins
BreakfastNourishing Recipes

Easy Buckwheat Muffins (Gluten Free and Dairy Free)

by From Scratch Farmstead January 28, 2023

Whenever I begin getting groans over too many days of scrambled eggs in a row, I know it’s time for something different for breakfast. These simple and delicious buckwheat muffins are a family favorite for just this occasion. They are gluten and grain free, filled with protein and healthy fats, and naturally sweetened. Let’s dive into how you can make these buckwheat muffins and all the reasons why you would want to!

Jump To Recipe

A Perfect Way to Start the Day Off Right

We are huge proponents of nutrient dense and real foods for all the meals we eat. But, there’s extra effort to make sure we serve a nutritious breakfast filled with protein, healthy fats, and carbs. 

fresh baked buckwheat muffins

Most “breakfast” foods marketed toward kids are not much more than sugary carbs filled with many unwanted ingredients and lacking in protein and healthy fats. Because of this, we make an extra effort to teach and model the importance of a well-balanced, nutrient dense breakfast. This is hugely helpful to start the day off right and keep little bellies and growing brains satisfied!

Buckwheat – A New Favorite

Honestly, until a few years ago, I had never even heard of buckwheat flour. When we began our real food journey, we began experimenting with all sorts of gluten and grain free flours, fermenting grains and sourdough. Somewhere along the way, we were introduced to buckwheat flour when a friend dropped off an extra bag that she had.

I had heard of buckwheat pancakes so we tried those first and were big fans. Then, we wanted to explore more of what this nutritious flour had to offer. More experimenting occurred and these buckwheat muffins became another family favorite.

What is Buckwheat Flour?

While it sounds like it should be closely related to standard wheat flour, buckwheat flour is actually completely different and considered a pseudocereal. It is the ground version of buckwheat which is not a grain at all but actually a fruit closely related to wild rhubarb.

ground buckwheat flour

Buckwheat grows easily, even in harsh conditions. It also has a robust nutrient profile. For these reasons, it has become popular to grow around the world. Once the plant has matured and dried, the inner fruit is what is ground and turned into flour. Depending on how much of the dark hull is left on will determine whether the flour is light colored or speckled with dark flecks. 

Nutritional Benefits of Buckwheat Flour

Buckwheat flour offers more nutrients than most standard grains. While buckwheat is not known for being particularly high in vitamins, it is rich in minerals: manganese, copper, magnesium, iron, phosphorus. Also, as compared to most seeds and grains, buckwheat is low in phytic acid which blocks the absorption of vitamins and minerals. This means that the abundant minerals present in buckwheat flour are more easily absorbed.

organic buckwheat flour with the hull

Buckwheat is also particularly high in health promoting antioxidants and fiber. There are two main varieties of buckwheat: Tartary Buckwheat and Common Buckwheat. When it comes to nutritional benefits, Tartary Buckwheat surpasses common buckwheat handily. 

How to Use Buckwheat

Depending on where you are in the world, buckwheat has varied uses. It is commonly made into soba noodles in Japan. In many places around the world buckwheat is turned into pancakes or blinis. Galettes, yeast rolls, and other uses in baked goods are standard uses for buckwheat flour.

Buckwheat Muffin Ingredients

Buckwheat flour is commonly used in combination with wheat flour to help give it an appealing taste and texture. However, for those avoiding gluten, there are common ways to pair alternative flours with buckwheat and still have a delicious result. These buckwheat muffins pair buckwheat flour with almond flour for a hearty and delicious muffin.

Buckwheat Flour: For a common buckwheat flour, our favorite source is from Janie’s mill. If you are looking for the extra nutritious Tartary Buckwheat flour, this is a great option.

stone ground organic buckwheat flour from janies mill
himalayan tartary buckwheat flour from big bold health

Almond Flour: Another grain free flour made from ground almonds adds some protein and extra nutrition to these muffins. The almond flour works really well with the buckwheat flour to give the muffins 

The other ingredients you’ll need to make these buckwheat muffins are: coconut oil, baking powder, salt, maple syrup or honey, eggs, and fresh or frozen blueberries.

buckwheat flour muffins ingredients

Buckwheat Muffins: Frequently Asked Questions

How do you serve buckwheat muffins?

We generally serve these muffins alongside yogurt and hard-boiled eggs for an easy breakfast. But the options are endless. They’d go perfectly with a complete brunch with friends or family or can be used as a quick breakfast or snack on-the-go. For an extra special treat, we like to make a quick frosting of our cultured cream with a drizzle of honey or maple syrup.

buckwheat muffins in silicone muffine cups

Can you freeze buckwheat muffins?

Yes! These freeze and thaw perfectly. To thaw just set out on the counter a few hours before serving or warm in a hot oven until thawed. In fact, I always try to make at least a double or triple batch of these muffins whenever we are making them to have extra for the freezer.

Can you substitute other flours?

If you are not concerned about gluten, you could substitute a wheat or all-purpose flour for the almond flour in this buckwheat muffin recipe.

Buckwheat Muffin Recipe

Yield: 12 Muffins

Ingredients:

1 cup buckwheat flour
1 cup almond flour
1/3 cup of melted coconut oil
3 eggs
1/3 cup of honey or maple syrup
1/3 cup water
1 tsp baking powder
½ tsp salt
1 cup fresh or frozen blueberries

gluten free blueberry buckwheat muffins

Directions: 

1. Preheat oven to 350 degrees and grease muffin tin or use silicone muffin cups.

2. Mix buckwheat flour, almond flour, baking powder, and salt.

3. Add coconut oil, honey or maple syrup, water, and eggs. Mix wet ingredients into dry ingredients.

4. Mix in fresh or frozen berries.

5. Spoon muffin mixture into muffin cups until the cups are roughly 2/3 full.

6. Bake at 350 for 18-20 minutes.

Enjoy!


For more of our favorite gluten free breakfast recipes check out our:

Soaked and Baked Oatmeal
Gluten and Nut Free Granola
Butternut Squash Muffins
Potato Crusted Quiche

Some of the above links are affiliate links. This means we earn a small commission on qualifying purchases at no cost to you. We are so appreciative of your support!

gluten free buckwheat muffin recipe

Easy Buckwheat Muffins (Gluten Free and Dairy Free)

Yield: 12 muffins
Prep Time: 10 minutes
Cook Time: 18 minutes
Total Time: 28 minutes

Whenever I begin getting groans over too many days of scrambled eggs in a row, I know it’s time for something different for breakfast. These simple and delicious buckwheat muffins are a family favorite for just this occasion. They are gluten and grain free, filled with protein and healthy fats, and naturally sweetened. Let’s dive into how you can make these buckwheat muffins and all the reasons why you would want to!

Ingredients

  • 1 cup buckwheat flour

  • 1 cup almond flour

  • 1/3 cup of melted coconut oil
  • 
3 eggs
  • 
1/3 cup of honey or maple syrup
  • 
1/3 cup water
  • 
1 tsp baking powder
  • 
½ tsp salt

  • 1 cup fresh or frozen blueberries

Instructions

    1. Preheat oven to 350 degrees and grease muffin tin or use silicone muffin cups.

    2. Mix buckwheat flour, almond flour, baking powder, and salt.

    3. Add coconut oil, honey or maple syrup, water, and eggs. Mix wet ingredients into dry ingredients.

    4. Mix in fresh or frozen berries.

    5. Spoon muffin mixture into muffin cups until the cups are roughly 2/3 full.

    6. Bake at 350 for 18-20 minutes.

© From Scratch Farmstead
January 28, 2023 6 comments
0 FacebookTwitterPinterestEmail
easy butternut squash chili slow cooker recipe
Main CourseNourishing Recipes

The Best Slow Cooker Butternut Squash Chili

by From Scratch Farmstead December 18, 2022

There are hundreds of different variations on making a mean chili. But, in our opinion, this butternut squash chili in the slow cooker trumps all. The thick and creamy texture that comes with pureed butternut squash paired with traditional chili ingredients makes it a hearty, sweet yet savory chili that can’t be beat!

Jump To Recipe

Why Butternut Squash in Chili?

If you search around our website for any time at all, you will quickly learn that we are big fans of winter squash. They are easy to grow, they store well for many months, and they are nutrient dense while still being energy packed to fill you up. With some of our other favorites being our butternut squash lasagna, enchilada casserole, and baked goods like butternut squash muffins, it’s clearly a staple ingredient in our home.

Most recipes out there call for peeling and cubing the butternut squash to add to chili. We actually prefer to add pureed butternut squash (or you could substitute pumpkin). We talk all about how to puree butternut squash in our post How to Roast Butternut Squash Two Ways. The pureed butternut squash gives chili a thick and creamy texture that is hard to get from anything else.

how to roast butternut squash and make puree

Pureeing the butternut squash before adding it to your slow cooker chili also greatly enhances the flavor. This provides a subtle sweetness that perfectly complements the spice and salty flavors of the chili seasonings.

Slow Cooker Butternut Squash Chili – Hearty and Nutritious

When it comes to a filling and nutritious meal, it’s hard to beat this butternut squash chili in the slow cooker. Brimming with nutritious and hearty vegetables, fiber rich beans, and protein filled meat and broth, this recipe has a little bit of everything.

We like to serve it with diced avocado, some shredded farmhouse cheddar, and a dollop of cultured cream. These add to both the deliciousness and the nutrition in this chili. Alongside a slice of cornbread, this meal is great for a quick and easy make-ahead lunch or dinner. Or, double it to serve a large crowd!

butternut squash chili in the slow cooker

What’s in Slow Cooker Butternut Squash Chili?

When it comes to cooking, our style is pretty straightforward – simple and nutrient dense ingredients, easy to make for a busy family, and great taste! This butternut squash chili in the slow cooker fits the bill perfectly.

Between keeping up with the homestead, homeschooling and raising little ones, and keeping up with our business, simple meals that are ready to go and relatively hands off are my jam! I love getting up early while everyone is still asleep and getting a meal going in the slow cooker. That way, when lunch or dinner rolls around, everything is ready to go without even having to think about it!

The beauty of this recipe is that there are plenty of options and flexibility depending on your preferences and what you have on hand.

butternut squash chili ingredients

The staples are onion, garlic, beans, ground beef (or other ground meat), tomato sauce, pureed butternut squash or pumpkin, and spices.

There are many optional ingredients that can be added if desired, like additional veggies (carrots, zucchini, diced tomatoes, mushrooms, etc), spices, and more or less broth or water depending on how thick you like your chili.

How to Prepare Garlic to Maximize Nutrition

Garlic is a must in almost all of our entrees. In this slow cooker butternut squash chili, that is no exception. Garlic is that it is extremely beneficial for health but those benefits are only present when one very important step is followed.

veggies, garlic, and spices for chili

Garlic is praised for being high in antioxidants, as well as being anti-microbial, anti-viral, and anti-inflammatory. However, the main compound, allicin, that is responsible for these health benefits, is destroyed when heating, unless one rule is followed. 

The garlic must first be chopped, smashed, or chewed and then either eaten raw or allowed to sit for at least ten minutes before cooking. Leaving the garlic for at least 10 minutes, allows that allicin content to be fully created. Then it will not be destroyed, even when cooked, allowing you to get the maximum health benefits that garlic is known for.

Slow Cooker Butternut Squash Chili Recipe

Serves 6

Ingredients:

1 Onion, chopped
3 Cloves garlic, finely chopped or smashed
2 cups pureed butternut squash (or pumpkin)
1 cup soaked, dried beans (or 2 cups of cooked beans or one can)
3 cups of tomato sauce
1.5 cups broth or water (omit for a very thick chili)
1 tbsp fat/oil for cooking
1 pound of ground beef
2 tbsp chili powder
1 tsp cumin
1 tsp oregano
1-2 tsp salt
Optional Add In’s: carrots, peppers, diced tomatoes, mushrooms, zucchini, or other veggies.

butternut squash chili in dutch oven

Directions:

1. Chop garlic, onion, and any other veggies you want to add to your chili.

2. Heat oil in cast iron pan, Dutch oven, or large skillet.

3. Sauté onion then add garlic after onion is beginning to soften. Add ground beef and brown with onions and garlic.

4. Once browned, transfer garlic, onion, and ground beef to your slow cooker. Add the rest of ingredients: pureed butternut squash, beans, tomato sauce, broth/water, and spices.

5. Once everything is mixed together, let cook on low for 6-8 hours or high for 4 hours.

slow cooker butternut squash chili

Notes:

If you’d prefer not to cook in a slow cooker or crock pot, after cooking onion, garlic and group beef, add the rest of your ingredients directly into a large stock pot or Dutch oven. Mix everything together, bring to a boil and let simmer until all of the veggies and beans are soft and fully cooked.

Some of the above links are affiliate links. This means we earn a small commission on qualifying purchases at no cost to you. We are so appreciative of your support!


Like other soups or stews, this slow cooker butternut squash chili only gets better with age. We often like to make it a day or two before serving and then reheat for the most flavorful chili.

The chili will last in the fridge for up to five days and reheats well. For long term storage, this chili freezes very well.

For more of our favorite entrees with butternut squash, you might also like our butternut squash enchilada casserole or butternut squash lasagna.

easy butternut squash chili slow cooker recipe

The Best Slow Cooker Butternut Squash Chili

Yield: Serves 6
Prep Time: 15 minutes
Cook Time: 6 hours
Total Time: 6 hours 15 minutes

There are hundreds of different variations on making a mean chili. But, in our opinion, this butternut squash chili in the slow cooker trumps all. The thick and creamy texture that comes with pureed butternut squash paired with traditional chili ingredients makes it a hearty, sweet yet savory chili that can’t be beat!

Ingredients

  • 1 Onion, chopped
  • 
3 Cloves garlic, finely chopped or smashed
  • 
2 cups pureed butternut squash (or pumpkin)
  • 
1 cup soaked, dried beans (or 2 cups of cooked beans or one can)

  • 3 cups of tomato sauce
  • 
1.5 cups broth or water (omit for a very thick chili)
  • 
1 tbsp fat/oil for cooking
  • 
1 pound of ground beef

  • 2 tbsp chili powder

  • 1 tsp cumin
  • 
1 tsp oregano
  • 
1-2 tsp salt
  • 
Optional Add In’s: carrots, peppers, diced tomatoes, mushrooms, zucchini, or other veggies.

Instructions

    1. Chop garlic, onion, and any other veggies you want to add to your chili.
    2. Heat oil in cast iron pan, Dutch oven, or large skillet.
    3. Sauté onion then add garlic after onion is beginning to soften. Add ground beef and brown with onions and garlic.
    4. Once browned, transfer garlic, onion, and ground beef to your slow cooker. Add the rest of ingredients: pureed butternut squash, beans, tomato sauce, broth/water, and spices.
    5. Once everything is mixed together, let cook on low for 6-8 hours or high for 4 hours.

Notes

If you’d prefer not to cook in a slow cooker or crock pot, after cooking onion, garlic and group beef, add the rest of your ingredients directly into a large stock pot or Dutch oven. Mix everything together, bring to a boil and let simmer until all of the veggies and beans are soft and fully cooked.f

© From Scratch Farmstead
December 18, 2022 0 comment
0 FacebookTwitterPinterestEmail
simple gluten free butternut squash muffins
BreakfastDessertNourishing Recipes

Simple Gluten Free Butternut Squash Muffins

by From Scratch Farmstead December 1, 2022

There are cheers all around when these gluten free butternut squash muffins show up for breakfast or a quick snack. You can whip them up in just a few minutes and they freeze very well. And, as far a gluten free baking recipes go, the texture is excellent and they only require a few staple ingredients.

Similar to our gluten free apple bread, these gluten free butternut squash muffins are a staple around here, especially in these fall months.

cultured cream frosting on butternut squash muffins

Why Butternut Squash

It’s no secret that butternut squash are one of our favorite crops to grow and eat. For the last couple of years, we harvested well over one hundred butternut squash and other winter squash. The great thing about butternut squash is that they store extremely well for months. When allowed to properly cure and be kept in a cool environment, we’ve successfully stored butternut squash for as long as a whole year.

roasted butternut squash for puree

Butternut squash are also extremely versatile. From peeling and cubing as a side. To pureeing to use in baking or as a side. To blending into soups, stews, or ground meat dishes such as meat loaf or meatballs. Or, even adding them to a casserole like our butternut squash lasagna or butternut squash enchilada casserole as a replacement for noodles or tortillas respectively. We share all about the many uses of butternut squash in our post, How To Roast Butternut Squash.

Nutrition of Butternut Squash

The deep orange color of butternut squash is indicative of excellent nutrition and being an excellent source of vitamins and minerals. It is a great source of vitamin A, vitamin C, thiamin, niacin, vitamin B6, folate, pantothenic acid, calcium, iron, phosphorus, potassium, magnesium, and manganese.

Can you Substitute Butternut Squash for Pumpkin?

Yes! In fact, I recently learned that canned pumpkin from the store is actually often made with winter squashes like butternut squash instead of actual pumpkin.

how to roast butternut squash and make puree

While butternut squash makes a perfect one-to-one substitute with the puree of a pie pumpkin, we actually strongly prefer butternut squash to pumpkin.

The creamy texture of butternut squash is ideal for baking and pies. We also find it to be thicker and less watery than pie pumpkins. And, there is no comparison when it comes to the vibrant orange of butternut squash.

Gluten Free Butternut Squash Muffins – The Ingredients

Gluten free baking can be tricky. My goal when baking with gluten free ingredients is always to make the recipes as simple as possible with minimal ingredients. But, to still have an excellent taste and texture. 

After a lot of experimentation with different flours and ratios, my go-to starting place for a lot of baked goods is to use a one-to-one ratio of coconut flour and arrowroot or tapioca flour (they can be used interchangeably with one another). I’ve found this combo to generally work very well and now these two ingredients are a staple in our pantry.

gluten free butternut squash muffins ingredients

The ingredients:

Eggs

This is the one common allergen that these muffins do contain and I’ve never tried making it with an egg substitute. But I love that there are 4 eggs in these gluten free butternut squash muffins to give it a boost of protein meaning it’s more satisfying and will keep you fuller longer than a lot of sweet muffins.

Coconut Oil

I normally use melted coconut oil as the fat in this recipe but have substituted leaf lard or melted butter with great results if dairy is an option for you.

Maple Syrup or Honey

Maple syrup is my favorite sweetener to use in this recipe because it pairs perfectly with the butternut squash puree. But honey is a great choice as well. In a pinch I have substituted brown sugar or even cane sugar and they worked ok too.

Butternut Squash Puree

What would a butternut squash muffin be without butternut squash puree. Roasting and pureeing your own butternut squash at home is super easy, and the texture, flavor, and color cannot be beat! You could use pureed pumpkin or any other sort of winter squash as a replacement if needed.

butternut squash puree for muffins

Coconut flour

As I mentioned above, this recipe contains a 1:1 ration of coconut flour and tapioca starch. Coconut flour is known for being incredibly absorbent, hence why there are 4 eggs needed for this recipe.

Tapioca Starch

Tapioca starch or arrowroot powder can be used interchangeably in most recipes. It is also very absorbent and is my go-to thickener for soups and sauces like our homemade enchilada sauce.

Baking Soda

We usually have Bob’s Red Mill Baking Soda on hand at all times to give our baked goods the perfect rise.

Cinnamon

You can feel free to go crazy here with the fall spices like nutmeg, ginger, or cardamom. But we have found that a heaping teaspoon of cinnamon in these gluten free pumpkin muffins does the trick!

Gluten Free Butternut Squash Muffins – 3 Ways

The base gluten free butternut squash muffin recipe is the same, but there are several variations that are possible to fit any occasion.

1. Gluten Free Butternut Squash Muffins with Cinnamon Sugar – After batter has been spooned into muffin cups, sprinkle a mixture of cinnamon and brown sugar (or white sugar) over your muffins before baking.

gluten free butternut squash muffins

2. Chocolate Chip Gluten Free Butternut Squash Muffins – After you finish whisking in your dry ingredients with your wet ingredients, add ½ cup (or more) of chocolate chips to your batter. For an extra treat, throw a few chocolate chips on top of your muffins after spooning them into your muffin cups.

3. Gluten Free Butternut Squash Muffins with Cultured Cream Frosting – When muffins have finished baking, mix a few tablespoons of cultured cream (or cream cheese) with a bit of honey, maple syrup, or dulce de leche. Spoon over cooled muffins for a treat more reminiscent of a cupcake.

homemade cultured cream frosting on butternut squash muffins

Gluten Free Butternut Squash Muffins Recipe

Ingredients:

4 eggs
1/3 cup coconut oil, melted
1/3 cup maple syrup or honey
½ tsp apple cider vinegar
1 cup butternut squash puree
½ cup coconut flour
½ cup tapioca flour (or arrowroot starch)
½ tsp baking soda
1 heaping teaspoon of cinnamon

gf butternut squash muffins with cinnamon sugar topping

Some of the above links are affiliate links. This means we earn a small commission on qualifying purchases at no cost to you. We are so appreciative of your support!

Directions:

1. Mix wet ingredients (eggs, melted coconut oil, maple syrup or honey, apple cider vinegar, and butternut squash puree) together.

2. Add dry ingredients (coconut flour, arrowroot starch, baking soda, and cinnamon).

3. Whisk well to combine. 

4. If adding chocolate chips mix in now, otherwise, spoon into muffin cups.

5. Sprinkle on cinnamon sugar if desired.

6. Bake at 350 degrees for 18-20 minutes.


For another gluten free muffin, our gluten free chocolate beet muffins are another family favorite.

gluten free butternut squash muffins

Gluten Free Butternut Squash Muffins

Yield: 12 muffins
Prep Time: 10 minutes
Cook Time: 20 minutes
Total Time: 30 minutes

There are cheers all around when these gluten free butternut squash muffins show up for breakfast or a quick snack. You can whip them up in just a few minutes and they freeze very well. And, as far a gluten free baking recipes go, the texture is excellent and they only require a few staple ingredients.

Ingredients

  • 4 eggs
  • 1/3 cup coconut oil, melted
  • 1/3 cup maple syrup or honey
  • ½ tsp apple cider vinegar
  • 1 cup butternut squash puree
  • ½ cup coconut flour
  • ½ cup tapioca flour (or arrowroot starch)
  • ½ tsp baking soda
  • 1 heaping teaspoon of cinnamon

Instructions

    1. Mix wet ingredients (eggs, melted coconut oil, maple syrup or honey, apple cider vinegar, and butternut squash puree) together.
    2. Add dry ingredients (coconut flour, arrowroot starch, baking soda, and cinnamon).
    3. Whisk well to combine.
    4. If adding chocolate chips mix in now, otherwise, spoon into muffin cups.
    5. Sprinkle on cinnamon sugar if desired.
    6. Bake at 350 degrees for 18-20 minutes.
© From Scratch Farmstead
December 1, 2022 0 comment
0 FacebookTwitterPinterestEmail
smooth and creamy homemade cooking lard
Food PreservationSauces & CondimentsSides

Cooking With Lard and How to Render Lard Yourself

by From Scratch Farmstead November 20, 2022

When it comes to cooking fats, there are a lot of options and even conflicting information about which one(s) are the best to use. We’ve been experimenting with different cooking fats for years and our favorite for its properties, versatility, and health benefits is cooking with lard.

In this post we will give you a complete breakdown of everything to know about cooking with lard and how to render it yourself.

When we began down this homesteading path, we were compelled by the idea of eating nose to tail, letting no part of the animal be wasted. Then as we began raising animals ourselves for meat, this became even more important to us. Part of eating nose to tail meant putting to use the animal fat and learning to cook with things like lard and tallow.

As we began using lard in our home kitchen, we really began to appreciate lard in cooking and understand why this traditional fat was so prized.

What is Lard?

Lard is the fat from a pig taken from the fattiest portions of the animal, usually the butt, belly, and shoulder. It is white, solid but soft, and when heated it melts down to a rendered lard for common use in home kitchens. 

When talking about lard, you will likely hear the term leaf lard. Leaf lard is lard taken from the leaf shaped fat around the pig’s kidneys. This is a particularly prized form of lard as it is generally smoother and creamier than lard taken from other parts of the animal and is especially good for use in baking.

pork leaf lard sourced from a local farm

History of Lard

For hundreds of years, lard has been the primary cooking fat. This made sense. 

Lard was easy to access and is an extremely stable fat meaning it could keep for long periods of time without spoiling. It was kept in pantries and used for everything. Centuries ago, lard was even used to preserve raw meat by covering the meat in lard for long term storage. This is where the term ‘larder’ originated.

So, how did this traditional fat go out of style? In the early 20th century, Upton Sinclair wrote “The Jungle.” While fictional, this story shared grotesque descriptions of the meat processing industry including the procurement of lard.

how to render your own lard at home

Then in 1907, hydrogenated cottonseed oil (Crisco) was invented. It looked and acted exactly like lard but without coming from a pig. Ads were run touting the purity of Crisco while slandering the making and use of lard. In the decades that followed lard was out and Crisco and other lab made hydrogenated vegetable oils were in. You can read more about that story from this npr article. 

Only in recent history is lard making a comeback. The benefits of this traditional fat are being resurrected and the truth about the negative health implications of hydrogenated oils are coming out.

Is Cooking with Lard Healthy?

Cooking with lard can without a doubt be part of a healthy diet and lifestyle.

Lard (like all fats) are a combination of monounsaturated, polyunsaturated, and saturated fats. But lard, like other fats that are solid at room temperature, is higher in saturated fats. Saturated fats have been demonized for being artery clogging, cholesterol raising, and heart disease causing. But new evidence is revealing that the saturated fat in lard might actually be the more healthful choice.

The role of cholesterol is to reduce inflammation in the body. And actually, about 75% of cholesterol is produced from the body itself, and not from food consumption. Therefore, if the body is not intaking enough cholesterol that is needed, it will just make more itself.

cooking with lard and rendering it at home

The saturated fat in lard is responsible for raising HDL (high density lipoproteins, aka the “good” cholesterol) and changing LDL (low density lipoproteins) from small and dense (which are the type that can cause issues in the body) with larger LDL. Because of the way saturated fat is interacting with cholesterol in the body, it is not responsible for causing the damage that was previously believed. If you are interested in digging deeper in the science and current research around the topic of saturated fats, check out this article.

One important thing to point out here is that the health of the pig matters. Toxins are generally stored in fat tissue so making sure to know how your pig is raised and their diet can make a big difference in the health of the lard from the animal.

Benefits of Using Lard for Cooking

Lard is Heat Stable

The smoke point of lard is around 370°F. This means that it is a great fat for using in frying or cooking in high heat. When cooking with fats with lower smoke points, they are much more likely to form free radicals if burned or heated too high, which is known to be cancer causing.

Lard has a Neutral Flavor

One might think that lard would taste and smell porky, but in reality, the flavor is quite neutral. This makes it an excellent choice for cooking a variety of foods and even baking with. From frying chicken, sautéing eggs, roasting vegetables, or making the best pie crust out there, lard is the perfect choice.

Lard is a Great Local and Affordable Option

Unlike coconut oil, olive oil, or avocado oil that could never be purchased locally where we live in the Midwest US, lard is readily available from many farms. Not only is it easy to come by, it’s also generally very affordable and you may even be able to find a farm giving it away.

how to render your own lard

Cooking with Lard

There is very little that is different about cooking with lard versus any other type of fat. As we talked about above, because it is a very stable fat with a high smoke point, it’s a great option of stir frying, frying, or roasting with.

cooking with lard on cast iron pan

We like to reserve leaf lard for baking because it tends to be smoother and creamier. In our opinion, leaf lard is the best fat, especially if you are looking to make the flakiest pie crust or biscuit.

The back fat or fat taken from other parts of the pig is ideal for other cooking purposed like cooking vegetables, eggs, or meat.

How to Render Lard

While it may sound intimidating, I promise that rendering your own lard at home is quite simple.

You can slow cook your lard in a crockpot. But my preferred method is to do it in a Dutch oven on the stove.

strained pork cracklings from making lard

Ingredients:

3-5 pounds of pork fat

Directions:

1. Chop pork fat into small pieces (I aim for around 1”).

2. Place fat in large, heavy bottomed pot or crockpot.

cutting pork fat to render lard at home
pot of leaf lard for rendering lard

3. Cook on low-med heat or a low setting on your crockpot.

4. Let cook until your fat has all been cooked down to a liquid.

lard being rendered on stove top
lard just about finished rendering on stove top

5. Strain out the remaining bits (cracklings)* and pour liquid lard into jars.

straining cracklings from lard
pouring leaf lard into mason jars

6. Store in cool, dark place. We usually store in the fridge for several months.

*The cracklings are one of the tastiest parts of rendering lard! Our favorite way to use cracklings is to stir fry them into some cooked greens or vegetables.


For more of our staple homestead recipes, check out our posts:

How to Make Butter from Raw Milk In a Blender
Easy Farmhouse Cheddar Hard Cheese Recipe

November 20, 2022 4 comments
0 FacebookTwitterPinterestEmail
how to roast butternut squash and make puree
BreakfastNourishing RecipesSides

How to Roast Butternut Squash Two Ways

by From Scratch Farmstead November 13, 2022

After harvesting well over a hundred butternut squash this fall, we have been experimenting with all of the ways to cook it. By far our favorite, though, is roasting butternut squash. Roasting butternut squash is so easy and results in a smooth, creamy, and almost caramelized butternut squash that’s second to none. We’ll share all of our tips for how to roast butternut squash perfectly for any application. 

Jump To Recipe

Benefits of Butternut Squash

Of all of the winter squashes, butternut squash is our favorite. We have found butternut squash to grow more robustly and store better than most other varieties. In fact, in October of this year we just devoured the final butternut squash from the crop that we had grown the previous year.

the perfect roasted butternut squash fall side dish
Toasted Walnut & Vanilla Roasted Butternut Squash Side Dish. Recipe below.

Butternut squash also has a deep orange color with a really smooth and creamy texture. This deep orange color is a sign of it being an excellent source of vitamins and minerals. It is a great source of vitamin A, vitamin C, thiamin, niacin, vitamin B6, folate, pantothenic acid, calcium, iron, phosphorus, potassium, magnesium, and manganese. 

How to Choose the Perfect Butternut Squash

Whether or not you grew your own butternut squash in the garden, the fall is a great time to stock up. Farmer’s and farmer’s markets are usually offering them in abundance at lower costs this time of year. Because they store so well for many months, purchasing squash from your local farmer to use in the months ahead is a great investment!

butternut squash storage crop on cutting board

When choosing butternut squash, look for a squash that is a light tan color. Green is an indication that it is not yet ripe. However, those green squash will continue to ripen over time even off the vine. The biggest factor to look for is a squash that is completely firm with no visible blemishes or squishy spots. Butternut squash with soft or bad spots tend to rot quickly and not store well.

Butternut Squash is a Perfect Substitute for Pumpkin

The beauty of butternut squash is that is substitutes beautifully one-for-one with pumpkin puree. So, any recipe that calls for canned pumpkin or pumpkin puree, we like to use pureed butternut squash instead. This makes butternut squash a great choice for using in baked goods like our butternut squash muffins, pies, or other tasty treats. 

butternut squash muffins made with butternut squash puree

In our opinion, the thicker and less watery consistency of butternut squash makes it tastier with a better texture than pumpkin anyways. The thicker flesh also makes it easier to work with since you don’t have to worry about draining off the liquid mess that you often have on your hands when making puree from a pie pumpkin. We’ve also found the color of the vibrant orange butternut squash to be more appealing in baked goods and pies.

HOW TO ROAST A BUTTERNUT SQUASH – 2 Ways

When it comes to butternut squash, there are many ways to prepare them. Boiled, sautéed, roasted, mashed, cubed, sliced, you name it. Our favorite ways, and two of the most common ways, to eat butternut squash for the best taste and texture are to either:

1) roast them whole and mash or puree them, or
2) peel and cube them and then roast them.

Both ways are delicious! But, as discussed, each can serve a very different purpose.

How to Roast a Butternut Squash in Halves to Make Pureed Butternut Squash

Roasting a butternut squash is quick and easy to do. Make sure you have a large cutting board and a sharp knife on hand. Because of the large and a bit awkward shape of the squash along with the firm texture, they can be a little tricky to work with. 

Step one

Slice your butternut squash in half.

Step two

Scoop out your seeds. Make sure not to waste those seeds, they are a delicious and nutritious bonus the squash provides – you can roast them up or we tend to give them to our chickens and consume them in the form of nutrient dense eggs.

Step three

Place your halved and seeded squash flesh side down on a large rimmed baking sheet or dish. The rim is important because a little liquid may come out in the roasting process so you don’t want a mess on your hands.

roasted butternut squash in half

Step four

Roast at 400 degrees for 30-60 minutes depending on the size of your squash. I’ve found that most average, medium size squash will need about 40-45 minutes. Smaller squash can likely be done in 30 minutes and larger squash may need up to an hour or more. You can tell your squash is finished when the outside skin is soft and will easily give when pushed with a finger or a utensil.

Step five

Once finished, remove from oven and flip your squash over so the flesh is up. This is especially important if you are in a hurry so that your squash will cool much more quickly than if you leave it flesh down.

Step six

Using a spoon, scoop your roasted butternut squash flesh out of the skins making sure to not scoop up any skin with your flesh. This can be a bit tedious and a little messy but the end result is well worth it!

roasted butternut squash for puree

Step seven

Mash your butternut squash with a fork, potato masher, or immersion blender.

Now your beautiful, orange roasted mashed squash is ready to be used as the perfect side dish with some butter, cinnamon and salt, or transformed into a delicious squash or “pumpkin” treat.

How to Roast Cubed Butternut Squash

If you are looking to use your butternut squash as a side dish or in some sort of soup, stir fry, or hash, this is our go-to method.

Step one

Slice your butternut squash in half.

Step two

Scoop out your seeds. As mentioned above, the seeds are great for roasting or feeding to animals.

Step three

Peel butternut squash.

peeling butternut squash before roasting

Step four

Cube butter nut squash into ½ inch – 1-inch sized cubes, depending on your preference.

Step five

Lay butternut squash cubes in a single layer on a large rimmed baking sheet or dish with a tablespoon or two of desired cooking fat. We prefer to use butter, lard, coconut oil, or olive oil for this. Sprinkle with salt.

cutting butternut squash into cubes for roasting
cubed butternut squash ready to be roasted

Step six

Roast at 425 degrees for 25-30 minutes.

Step seven

Remove from heat and test by piercing with a fork to make sure you squash are fully cooked.

Toasted Walnut and Vanilla Butternut Squash Side Dish

Roasted squash are delicious eaten just like this or ready to be added to your favorite stir fry or other side dish.

One of our absolute favorite ways to eat this roasted butternut squash is in this toasted walnut and vanilla butternut squash side dish.

roasted butternut squash with toasted walnuts and vanilla

To make, toast your walnuts while your squash is in the last 5-10 minutes of cooking by placing walnuts on a pan over med-high heat. Stir walnuts regularly so they don’t burn and once they begin to be a toasted light brown and you can smell that wonderful walnut smell, remove from heat. Toss the walnuts in 2-3 tablespoons of butter and add your cooked butternut squash to the pan to gently mix with the butter and walnuts. Add 1-2 teaspoons of vanilla, along with 2 tsp of grated ginger and ½ tsp of thyme for a completely magical combination. 

This is one of our favorite side dishes and the perfect complement to a Thanksgiving feast or cozy fall meal.

Looking for other ways to use butternut squash? We love to transform them into something completely unique and delicious in our butternut squash enchilada casserole or our butternut squash lasagna where they replace the need for tortillas and noodles respectively.

What are your favorite ways to eat butternut squash? Tell us below!

November 13, 2022 2 comments
0 FacebookTwitterPinterestEmail
easy gluten free apple bread recipe
DessertNourishing RecipesSides

The Best Gluten Free Apple Bread Without Dairy

by From Scratch Farmstead October 16, 2022

Gluten and grain free baking can be tricky! But when you find a recipe that nails the taste and texture, doesn’t have a million ingredients, and everyone loves it, you know you found something special. This gluten free apple bread recipe is one of those for our family. 

After much experimentation, this gluten free apple bread hits the nail on the head. It is one of those requested recipes that is my go-to any time we have company or need to bring a dish to a pot luck or gathering!

Jump To Recipe

The Art of Gluten and Grain Free Baking

While our family doesn’t exclusively eat gluten or grain free anymore, we have at various seasons in the past when trying to overcome some health challenges. We now enjoy the addition of some sourdough and einkorn flour recipes into our regular repertoire. But we still enjoy many of the gluten and grain free recipes that we came to know and love.

fresh sliced apple bread

Gluten and grain free baking really is an art to be mastered. There are several unique flour options with different properties. But none of them really behave like gluten containing wheat that gives most baked goods the texture that we have come to know and love. This means, in order to get the most optimal results, often multiple flours need to be use. But where do you even begin and in what ratios?

I am a big fan of simple when it comes to baking, cooking, and really most things in life. A recipe with tons of ingredients is an automatic turnoff. So, when I dove head first into the world of gluten and grain free baking, I needed a way to make it simplified. 

After lots of playing around with different flours and recipes, I settled on the combination of using tapioca starch (or arrowroot powder) and coconut flour leading to the best results in most recipes. Only two flours to keep on hand and the texture was usually better than anything else we tried. This is definitely true in this gluten free apple bread where a 1:1 ration of coconut flour and tapioca starch work perfectly.

Gluten Free Apple Bread – The Perfect Side for Company

Whenever we are going to a potluck or other gathering, I usually try to bring some sort of allergy friendly dish. These sorts of events can be so challenging for those with food restrictions to navigate. So even though we don’t have any restrictions at this time, I like to bring something that anyone, regardless of restrictions, will hopefully be able to enjoy. 

fresh baked homemade apple bread

This gluten free apple bread is probably the most common dish I bring to these events because both people with sensitivities and those without love this bread. People usually have no idea it’s even gluten free and it’s a highly requested recipe by others.

Bonus, this gluten free apple bread is so quick and easy to make, coming together in just a few minutes, and only requires simple ingredients that I almost always have on hand.

The Ingredients in Gluten Free Apple Bread:

Eggs

This is the one common allergen that this bread does contain and I’ve never tried making it with an egg substitute. But I love that there are 4 eggs in this gluten free apple bread to give it a boost of protein meaning it’s more satisfying and will keep you fuller longer than a lot of sweet, fruit breads will.

gluten free apple bread ingredients

Coconut Oil

I normally use melted coconut oil as the fat in this recipe but have substituted leaf lard or melted butter with great results if dairy is an option for you.

Maple Syrup or Honey

Maple syrup is my favorite sweetener to use in this recipe because it pairs perfectly with the apples, but honey is a great choice as well. In a pinch I have substituted brown sugar or even cane sugar and they worked ok too.

Apples

What would apple bread be without apples? You could shred the apples but I prefer to just dice them finely – why make more dishes? We always leave the peels on when working with apples because that is where the bulk of the nutrients are.

windfall apples for applesauce

Coconut flour

As I mentioned above, this recipe contains a 1:1 ratio of coconut flour and tapioca starch. Coconut flour is known for being incredibly absorbent, hence why there are 4 eggs needed for this recipe.

Tapioca Starch

Tapioca starch or arrowroot powder can be used interchangeably in most recipes. It is also very absorbent and is my go-to thickener for soups and sauces like our homemade enchilada sauce.

Baking Powder

Make sure to look for aluminum free baking powder for your cooking needs. We use Bob’s Red Mill Aluminum Free Baking Powder.

Cinnamon

You can feel free to go crazy here with fall spices like nutmeg, ginger, or cardamom. But we have found that a heaping teaspoon of cinnamon in this gluten free apple bread does the trick!

Equipment Needed for Gluten Free Apple Bread

This recipe is lovely because it’s a super simple, one mixing bowl sort of recipe. With just a loaf pan and a mixing bowl you can whip up this gluten free apple bread. If you did want to shred your apple instead of dice them, we highly recommend this shredder.

That’s all you need to make this gluten free apple bread that is sure to be a hit at your next party or gathering!

Gluten Free Apple Bread Recipe

Ingredients:

4 eggs
1/3 cup melted coconut oil (butter or leaf lard will work too)
1/3 cup maple syrup or honey
1 large or 2 small apples, finely diced
½ cup coconut flour
½ cup tapioca starch or arrowroot flour
1 tsp baking powder
1 tsp cinnamon, heaping
¼ tsp salt

Optional Topping
2 tbsp brown sugar
1 tsp cinnamon

Some of the above links are affiliate links. This means we earn a small commission on qualifying purchases at no cost to you. We are so appreciative of your support!

homemade grain free apple bread

Directions:

1. Mix wet ingredients, eggs, melted coconut oil, maple syrup, and apples together.

2. Add dry ingredients, coconut flour, tapioca starch, baking powder, cinnamon and salt.

3. Stir everything together until thoroughly mixed.

4. Pour into a greased loaf pan.

pre-baked gluten free apple bread in greased pan
pre-baked gluten free apple bread in greased pan with topping

5. Sprinkle cinnamon sugar topping over batter if desired.

6. Bake at 350 for 40-45 minutes until bread is completely cooked through.


For more of our other gluten free favorites, check out our Soaked Baked Oatmeal and Gluten Free Dutch Baby Pancake!

soaked baked oatmeal ready to serve with milk

The Best Soaked And Baked Oatmeal – Gluten Free

January 9, 2022

monster poof pancake

Gluten Free Dutch Baby Pancake

February 24, 2022

homemade grain free apple bread

The Best Gluten Free Apple Bread Without Dairy

Yield: 1 loaf
Prep Time: 10 minutes
Cook Time: 40 minutes
Total Time: 50 minutes

Gluten and grain free baking can be tricky! But when you find a recipe that nails the taste and texture, doesn’t have a million ingredients, and everyone loves it, you know you found something special. This gluten free apple bread recipe is one of those for our family.

After much experimentation, this gluten free apple bread hits the nail on the head. It is one of those requested recipes that is my go-to any time we have company or need to bring a dish to a pot luck or gathering!

Ingredients

  • 4 eggs

  • 1/3 cup melted coconut oil (butter or leaf lard will work too)
  • 
1/3 cup maple syrup or honey

  • 1 large or 2 small apples, finely diced
  • 
½ cup coconut flour
  • 
½ cup tapioca starch or arrowroot flour

  • 1 tsp baking powder
  • 
1 tsp cinnamon, heaping
  • 
¼ tsp salt
  • Optional Topping
  • 
2 tbsp brown sugar

  • 1 tsp cinnamon

Instructions

    1. Mix wet ingredients, eggs, melted coconut oil, maple syrup, and apples together.
    2. Add dry ingredients, coconut flour, tapioca starch, baking powder, cinnamon and salt.
    3. Stir everything together until thoroughly mixed.
    4. Pour into a greased loaf pan.
    5. Sprinkle cinnamon sugar topping over batter if desired.
    6. Bake at 350 for 40-45 minutes until bread is completely cooked through.
© From Scratch Farmstead
October 16, 2022 0 comment
0 FacebookTwitterPinterestEmail
baked blackberry crisp
DessertNourishing Recipes

The Best Gluten Free Blackberry Crisp

by From Scratch Farmstead July 21, 2022

In the summer when berries are bursting from branches, this gluten free blackberry crisp is a fan favorite and highly requested dessert in our house. 

It comes together in just a few minutes and contains a few basic ingredients that we always have stored away on pantry shelves. Bonus, it is filled with nutrient dense ingredients while being oh so yummy! If you are looking for a quick and easy dessert for your next potluck, picnic, or just simple night at home, give this gluten free blackberry crisp a try!

Jump To Recipe

Blackberries – A Nutritional Powerhouse

When selecting fruits and vegetables, we always prioritize darker varieties. The darker in color, the more robust nutrients that fruit or vegetable generally contains. This definitely holds true for the blackberry, touting nutritional benefits superior to other common summer berries like strawberries and red raspberries.

bowl of freshly picked blackberries

Nutritional Benefits of Blackberries include:

  • A great source of Vitamin C. One cup of blackberries contains roughly 50% of the recommended daily intake of vitamin C. Vitamin C is important for building a robust immune system, protecting cells from damage caused by free-radicals, and aiding the synthesis of collagen.
  • Tons of polyphenols. Blackberries are one of the most highly concentrated sources of polyphenols of any food. Polyphenols are known to have significant benefits for health.
  • Rich in manganese. Manganese is a critical mineral for many routine body functions and blackberries are a great source of this important mineral.
  • Great bang for your buck. Blackberries are rich in nutrients and fiber while being low in overall calories and carbohydrates. A handful of these berries will have tremendous benefits with no risk of causing damage to your waistline.

Foraging for Blackberries

Another perk of blackberries (also called black raspberries) is that they can be found wild throughout the world. That is definitely the case where we live here in the Midwest. Come late June/early July, blackberries are ripe and can be found in almost any forested or wooded area growing like gangbusters.

foraging for black raspberries

We are thankful to have them growing abundantly on our property. In those months when they are in season we stock up on as many as we can to freeze for the winter. However, prior to living here, we’d often bring our buckets and forage blackberries at local nature areas. Free berries plus family fun and outdoor time – wins all around.

Tips when foraging for blackberries:

  • Dress appropriately. Blackberry bushes are quite thorny and prickly so pants and a long sleeve shirt can help protect skin from inevitable scrapes and cuts.
  • Look low. To find the best berries you need to look all around. The best one’s often hide low to the ground or their shoots hide within other plants.
  • Be prepared for mosquitoes. Enough said!

Uses for Blackberries

In addition to this delicious gluten free blackberry crisp, there are several other ways to put those abundant blackberries to use. Besides eating them as-is of course, some of our favorites include using them to top salads, in soaked and baked oatmeal, as a topping for yogurt or vanilla ice cream, or in a simple sauce served with sourdough pancakes or a gluten free dutch baby.

fresh blackberry garden salad

Preserving Blackberries

The traditional method of storing blackberries would be to dry them out. You could do this in the sun, dehydrator, or oven set to a minimal temperature.

Blackberries can also be canned into jams or sauces.

Our favorite preservation method is freezing blackberries. Simply put the freshly harvested berries straight into a ziplock bag and store in the freezer. Blackberries are nice because of their texture, they do not all clump together when frozen so they are easy to break apart when ready to thaw and use.

Gluten Free Blackberry Crisp – Frequently Asked Questions

Do I have to sweeten the filling? 

This is totally up to you. We do add around ¼ cup of honey to our blackberry filling but if you are accustomed to food on the tarter side, you might prefer to omit the sweetener here all together. Honey can also be substituted with a sweetener of choice, but our preference is either honey or maple syrup for this.

blackberry crisp served with ice cream

Why arrowroot flour or tapioca starch? 

Arrowroot flour and tapioca starch are used as thickeners in this recipe and play an important role! If you leave this ingredient out you will be left with a much more soupy crisp. The thickener helps bind the liquids that are released as the berries cook and give it a nice thick, fruity texture. Either arrowroot flour or tapioca starch are our favorite gluten free thickeners but cornstarch can be substituted.

Where do you source your ingredients? 

We get most of the ingredients for this recipe at Costco. This includes the one degree sprouted gluten free rolled oats, almond flour, organic brown sugar, and coconut oil.

gluten free blackberry crisp ingredients

Can you use a different fruit? 

Absolutely! This is my go-to crisp topping for various fruits including mixed berries, apples, peaches, and we have even substituted ground cherries. The important thing to remember is that the filling needs fruit, a thickener, and a sweetener.

What substitutions can be made? 

While we have always made the recipe pretty much exactly as written, it is a somewhat flexible recipe. 

The filling for this gluten free blackberry crisp needs fruit, a thickener, and a sweetener.

For the topping, coconut sugar (or white in a pinch) could be substituted for brown sugar, butter for coconut oil, and extra butter or coconut oil instead of the yogurt if you don’t have it. I personally haven’t tried substituting for the almond flour but I’m sure it’s possible to play around there too!

Enough talking – on with the gluten free blackberry crisp recipe!

Gluten Free Blackberry Crisp

Serves 6

Ingredients:

Filling

4-5 cups fresh blackberries
¼ cup honey
2 Tbsp arrowroot flour or tapioca starch

Topping

1 cup gluten free oats
½ cup almond flour
1/3 cup brown sugar
¼ cup coconut oil or butter (melted or soft)
¼ cup plain yogurt
A pinch of salt

prebaked gf blackberry crisp
pre-baked blackberry crisp

Directions:

  • Preheat oven to 350 degrees.
  • Mix filling ingredients in an 8×8 inch pan or pie plate.
  • In a separate bowl mix oats, almond flour, brown sugar, and salt.
  • Add coconut oil or butter and yogurt to the oat mixture and stir until everything is incorporated.
  • Spoon dollops of topping onto your filling until filling is covered and all topping is used up.
  • Bake at 350 for 40-45 minutes until berries are bubbly and top is lightly browned.
  • Let rest for 10-15 minutes before serving.
blackberry crisp with vanilla ice cream

No gluten free blackberry crisp is complete without being served with some vanilla ice cream. If you’ve never tried making your own, we highly recommend giving it a try!

Some of the above links are affiliate links. This means we earn a small commission on qualifying purchases at no cost to you. We are so appreciative of your support!

vanilla raw milk ice cream

THE BEST VANILLA RAW MILK ICE CREAM

February 13, 2022

baked blackberry crisp

Gluten Free Blackberry Crisp

Yield: Serves 6
Prep Time: 10 minutes
Cook Time: 40 minutes
Total Time: 50 minutes

In the summer when berries are bursting from branches, this gluten free blackberry crisp is our go-to dessert.

It comes together in just a few minutes and contains a few basic ingredients that we always have stored away on pantry shelves. Bonus, it is filled with nutrient dense ingredients while being oh so yummy! If you are looking for a quick and easy dessert for your next potluck, picnic, or just simple night at home, give this gluten free blackberry crisp a try!

Ingredients

  • Filling
  • 4-5 cups fresh blackberries
  • 
¼ cup honey
  • 
2 Tbsp arrowroot flour or tapioca starch
  • Topping
  • 1 cup gluten free oats
  • 
½ cup almond flour
  • 
1/3 cup brown sugar

  • ¼ cup coconut oil or butter (melted or soft)
  • 
¼ cup plain yogurt

  • A pinch of salt

Instructions

    1. Preheat oven to 350 degrees.
    2. Mix filling ingredients in an 8x8 inch pan or pie plate.
    3. In a separate bowl mix oats, almond flour, brown sugar, and salt.
    4. Add coconut oil or butter and yogurt to the oat mixture and stir until everything is incorporated.
    5. Spoons dollops of topping onto your filling until filling is covered and all topping is used up.
    6. Bake at 350 for 40-45 minutes until berries are bubbly and top is lightly browned.
    7. Let rest for 10-15 minutes before serving.
© From Scratch Farmstead
July 21, 2022 0 comment
0 FacebookTwitterPinterestEmail
fresh mint brownies
DessertNourishing Recipes

Fresh Mint Brownies

by From Scratch Farmstead May 12, 2022

If you’ve grown mint before, you know that it grows like crazy. While there’s nothing better than the crisp flavor of fresh peppermint or spearmint from the garden, figuring out what to do with all that mint can be a challenge. We love to preserve as much of that mint as possible for use all year and these fresh mint brownies are some of our favorite ways to put them to use.

Jump To Recipe

Our Herbal Story

I’ve been on a mission to learn to identify and use as many of the plants growing on our property as possible. 

This process has looked like first identifying plants and then figuring out simple ways to incorporate them into our everyday cooking. This is a great opportunity to include your kids in both teaching them how to identify and harvest plants and then how to use them in the kitchen! I’ve found by slowing down and inviting them into this process, we’ve all learned so much more.

My two favorite resources to get started with simple plant identification and learning what they do and how to use them are:

1) The book Medicinal Herbs A Beginner’s Guide by Rosemary Gladstar

2) The app, Picture This. I use the free version. You can take picture of any plants and within seconds it will identify them for you and give you basic information.

medicinal herbs a beginners guide

How to Grow Mint

Mint grows robustly in most zones from 4-9 as a perennial, meaning that it will return year after year. The problem most gardeners have with mint is not growing it but containing it as it tends to spread and can easily take over your garden area. Because of this, many people prefer to grow mint in a pot or container to keep it contained to one area. Mint grows well in well drained soils from full sun to partial shade. However, don’t be surprised if your mint thrives even in not ideal conditions as mint tends to be a force not to be reckoned with and can seem to survive in almost any conditions.

Peppermint vs Spearmint

While there are actually over 15 different types of mint plants, peppermint and spearmint are the most popular. Peppermint is actually a hybrid mint variety of spearmint and water mint and tends to grow well near bodies of water. Spearmint is more common as a garden mint but can also grow wildly as a weed. One of the key distinguishing features in their appearance is that peppermint has more purple hues on their stems and leaves while spearmint tends to have more green tones.

spearmint growing at a farm

spearmint

One of the main differences between the two comes in their taste. Peppermint has a much more intense minty taste while spearmint is much milder. This is from their levels of methanol, which gives the plants their characteristic minty taste. Peppermint has a methanol concentration of up to 40% while spearmint is much lower, only around 0.5%. This can make spearmint a more preferred option especially when introducing this plant to children.

Another taste difference is that spearmint contains a compound called carvone that gives it a sweeter taste while peppermint has a more pungent, peppery flavor.

Because of these differences in their properties, you will want to note the variety you are using. The stronger flavor of peppermint will mean needing less of it than the milder spearmint in culinary applications.

Medicinal Benefits of Mint

The properties in mint, specifically methanol, make it well known for its ability to help digestion. It is a go-to choice for nausea and upset tummy’s. It is antispasmodic, meaning that it helps muscles relax and can reduce stomach cramping. Mint has also been found to be helpful in reducing the pain associated with headaches, tooth aches, burns, bug bites, and bee stings. The familiar taste and popular flavor of mint leave you feeling refreshed and clean.

fresh mint picked from the garden

How to Dehydrate Mint for Long Term Storage

While the taste and flavor of mint will be stronger when their fresh leaves are used, in order to preserve them for use all year round, our favorite method is to dehydrate them for long term storage. 

To do this, simply pick several handfuls of leaves, we love using these mesh produce bags for this purpose. Then lay the mint out on cookie sheets in a single layer to dry. You can either let these dry naturally in the sun for several days or you can place them in your oven at the lowest temperature to speed the process up considerably. Alternatively, you can dehydrate them on racks in your dehydrator. 

dried mint leaves in a jar

After the leaves are dried out, we store them in a dark place in mason jars for use all year. Although their flavor will be muted some, the characteristic minty flavor definitely still comes through.

Mint Extract

Another way to preserve mint is to turn it into a mint extract. To do this submerge a cup of mint leaves into a cup and a half of vodka in a jar and let sit in a dark place for 6-8 weeks. Once your desired minty flavor is reached, strain off the mint leaves and you can use the extract to flavor your favorite mint dishes and desserts.

Ways to Use Mint

In my mind, chocolate and mint pair perfectly together, which is what inspired us to create these delicious fresh mint brownies. However, there are many other ways you can use the preserved mint leaves or mint extract. Some of our favorite ways include ice cream and other minty desserts, refreshing cold salads, and spicing up a cocktail or mocktail.

dried mint used for brownies

Fresh Mint Brownies

Ingredients:

½ cup Coconut Oil or Butter
1 cup Chocolate Chips
½ cup Brown sugar (coconut sugar or granulated white sugar would work as well)
3 eggs
¼ cup cacao powder (or cocoa powder)
2 heaping tbsp of fresh or dried mint leaves
Salt to taste

fresh mint brownies ingredients

Directions:

  • Place butter or coconut oil in a small saucepan with chocolate chips and mint leaves.
  • Heat over low/medium heat, stirring continuously until everything is melted.
  • Remove from heat and pour melted mixture into a high-powered blender or food processor.

fresh mint brownie batter in pan

  • Add the rest of the ingredients (sugar, eggs, cacao powder, and a dash of salt) to the blender or food processor.
  • Blend everything until smooth. The mixture will be quite thick.
  • Pour into a greased 8×8 baking dish and bake at 350 degree for 25 minutes.

mint brownies on plate

Nothing beats these fresh mint brownies with a scoop of vanilla ice cream. We highly recommend making your own homemade ice cream to take this dessert to the next level!

Some of the above links are affiliate links. This means we earn a small commission on qualifying purchases at no cost to you. We are so appreciative of your support!

Feb
13

The Best Vanilla Raw Milk Ice Cream

Made with super nourishing ingredients and oh so delicious, if you have a family milk cow or access to raw dairy near you, this raw milk ice cream is a…

fresh mint brownies

Fresh Mint Brownies

Yield: 12 servings
Prep Time: 10 minutes
Cook Time: 25 minutes
Total Time: 35 minutes

If you’ve grown mint before, you know that it grows like crazy. While there’s nothing better than the crisp flavor of fresh peppermint or spearmint from the garden, figuring out what to do with all that mint can be a challenge. We love to preserve as much of that mint as possible for use all year and these fresh mint brownies are some of our favorite ways to put them to use.

Ingredients

  • ½ cup Coconut Oil or Butter

  • 1 cup Chocolate Chips
  • 
½ cup Brown sugar (coconut sugar or granulated white sugar would work as well)

  • 3 eggs
  • 
¼ cup cacao powder (or cocoa powder)

  • 2 heaping tbsp of fresh or dried mint leaves
  • 
Salt to taste

Instructions

    1. Place butter or coconut oil in a small saucepan with chocolate chips and mint leaves.
    2. Heat over low/medium heat, stirring continuously until everything is melted.
    3. Remove from heat and pour melted mixture into a high-powered blender or food processor.
    4. Add the rest of the ingredients (sugar, eggs, cacao powder, and a dash of salt) to the blender or food processor.
    5. Blend everything until smooth. The mixture will be quite thick.
    6. Pour into a greased 8x8 baking dish and bake at 350 degree for 25 minutes.
© From Scratch Farmstead

May 12, 2022 0 comment
0 FacebookTwitterPinterestEmail
Newer Posts
Older Posts

About Us

About Us

So Glad You're Here!

Hi! We are Jim and Joelle. We love sharing homestead how-to’s, from scratch recipes, and natural do-it-yourself projects to help you nourish your family. To learn about our story, click the image above!

Stay Up-To-Date

Popular Posts

  • How Many Cows Per Acre On A Small Farm

    May 26, 2022
  • Chicken Tractor Plans for 25 Chickens

    May 1, 2022
  • Easy Farmhouse Cheddar Hard Cheese Recipe

    July 17, 2022
  • Predator Proof Chicken Coop Essentials You Need To Know

    February 11, 2023
  • How To Make Quick and Natural Mozzarella Cheese with Vinegar

    August 7, 2022

Follow Along!

  • Email
  • Facebook
  • Instagram
  • YouTube

Instagram

  • Facebook
  • Instagram
  • Youtube
  • Email
  • About
  • Privacy Policy

© 2021-2023 From Scratch Farmstead | As an Amazon Associate we earn from qualifying purchases.


Back To Top
From Scratch Farmstead
  • About
  • Homestead How-to’s
    • Family Milk Cow
    • Gardening
    • Chickens
    • Small Scale Farming
    • Buying A Homestead
    • Homestead Living
  • Nourishing Recipes
    • Home Dairy
    • Food Preservation
    • Breakfast
    • Main Course
    • Sides
    • Dessert
    • Sauces & Condiments
  • Natural Living
    • Skin Care
    • Home Essentials
    • Living On A Budget
    • Our Healing Journey
    • Homestead Skills
    • DIY
    • AGA Stove