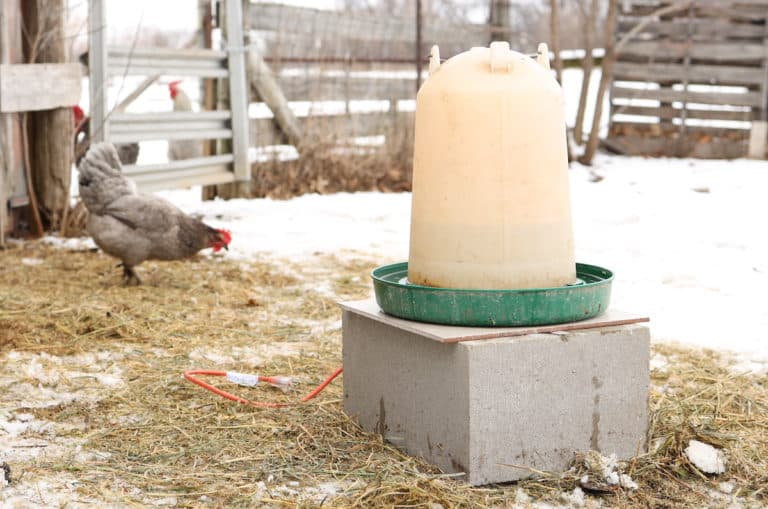
If you’re looking for a reliable, worry-free water source for your flock this winter, this easy do-it-yourself heated chicken waterer is it. Make it in just 10-15 minutes. Use your existing waterer. It’s simple and it works. Your chickens will love it and you will love not having to worry about frozen water in the dead of winter.
We live in northern Illinois and can have some pretty extreme winters. I knew I was going to need something reliable and I wanted to be ready for our first winter having chickens on our new farm. So, I originally went out to my local Farm n Fleet and picked up a heated chicken waterer base that cost $40. The box told me they wouldn’t guarantee it to work unless you bought their double-walled metal waterer with it. All in, the total was over $100 with tax.
Yikes!
I knew I could do better. So, I returned both items, got my money back, did a little research, and came up with a fool-proof heated chicken waterer design that is super simple.
Why I don’t recommend a heated waterer with a lightbulb.
In the past I’ve built a different style of heated chicken waterer that you commonly see out there. It’s a large cookie tin with a lightbulb socket and incandescent bulb as the heat source inside the tin.
I built one a few years back for our backyard coop while living in the suburbs. There were a lot of pros; everyone has an old cookie tin lying around the house and its pretty simple and cheap to rig up a bulb socket inside of one.
However, what it didn’t account for is moisture. Water spills. Rain and snow. General moisture from chicken doo-doo. Moisture creeps into your cookie tin over time and incandescent bulbs just don’t hold up to moisture. I found myself replacing bulbs monthly, if not weekly.
Climbing into a tight coop in 0-degree weather trying to pop open a frozen cookie tin is not fun! We have a larger coop now and I needed something our 20+ birds can rely on.
What makes this the best heated chicken waterer design?
First off, it’s easy. If projects aren’t your thing, you CAN build this! The steps are simple, it doesn’t require a lot of tools, and it will only take about 10-15 minutes to build.
I also believe in replaceable parts. If a product or brand doesn’t have replaceable parts for what they sell I generally won’t support it. That’s a big reason why I returned the waterer from the store. When the heating element goes bad, which it will, I don’t like the idea of tossing the entire thing and starting over when only one part went bad.
This heated chicken waterer base will cost less than $35 and I use very basic, readily available materials that can all be swapped out quickly and easily.
What I used
12’ Electric Heat Cable (~$28) – These flexible heat elements can be found in the plumbing department of your local hardware store and are relatively affordable, or buy it here. This one came with a built-in thermostat. The thermostat turns on the heating element automatically when there is a risk of water freezing. This is a fantastic feature so you don’t need to worry about wasting energy or turning your waterer on and off constantly. A 12’ cable has worked fine inside our coop here in northern Illinois, but if you need more heat, simply get a longer heat cable for only a few dollars more.
Note: This installation does go against the manufacturers recommended installation guidelines to not have the heat cable coiled or touching itself. I have not had issues with the cable overheating but you should read the instructions yourself. This alternative heat cable assures it will not short or burnout when overlapped, but it does not have a built in thermostat.
Concrete Block (~$2) – I used a 12” x 16” concrete block (or CMU) that is 8” high. You want a sturdy base under your waterer and something heavy enough that your chickens won’t knock over. Concrete is also a great insulator, so it traps a lot of heat within the hollow chambers of the block. I did purchase this one but I am also a big fan of reusing, and concrete blocks are something you can almost always find for free on Craigslist or Marketplace.
Tile (~$1) – I used one, 13-1/2” x 13-1/2” flooring tile. Your tile needs to accomplish two things: 1) Be large enough to fully cover the chambers of the concrete block to trap heat, and 2) Be thin enough to effectively transfer heat. They sell thin concrete blocks that would have fit nicely and certainly been more robust, but they are over an inch thick and I wasn’t sure heat would transfer well through them. Go with the tile. Mine has held up well and always stays plenty warm.
Electrical Tape – You probably already have some one hand, but if not pick up a role of electrical tape. Cheaper tape may not stick well to the block, so I’ll save you the hassle upfront and recommend you spend a few dollars more for the name brand tape.
Thermostat Alternative – Some heat tapes don’t come with a built-in thermostat. In this case, you can buy a super handy plug called a Thermo-Cube which has the same affect. In fact, going this route would probably have been my preference if my local hardware store carried just a basic heat cable. It’s cheaper to buy one with out a thermostat and generally it’s the electric heat element that goes bad and not the thermostat.
Tools List:
- Angle Grinder w/ Masonry Grinding Blade (or a hammer and chisel)
- Safety Glasses
- Sharp knife to cut electrical tape
- pencil
Step-by-step Guide to Building your Heated Waterer Base
Step One: Mark out where you want your heat cable to enter the block. With an angle grinder and masonry grinding blade (wear safety glasses while using), grind a notch at your make large enough for the heat tape to sit in so the tile can lay flush on top of the block. Next, make two similar notches on the top of the center divider between the two chambers. These notches allow your heat cable to transfer from one chamber to the other and also help hold the heat tape in place.
Note – If you don’t have an angle grinder, now worries! Grab a hammer and a chisel and you can chisel out your own notches. It might take a little extra time and not be as precise, but your chickens will never know the difference!
Step Two: Run your heat cable through the entry notch and tape it in place. Make sure the thermostat hangs outside the block about 6-8” so that it can get accurate readings. Coil up about half the tape in the first chamber, tape the coil so it holds together, then tape it to the block so it stays near the top. Bring your heat cable to the other chamber through one of your center notches, coil up and tape the rest. I left a tail at the end of the second coil to bring through my second center notch. Apply as much tape as needed at the end to hold it all in place.
Step Three: Place the block in your chicken coop where you want it and make sure it is level.
Step Four: Plug in the tape, put your tile on top making sure the chambers of the block are fully covered, and place your chicken waterer on top.
That’s it!
We couldn’t be happier with the results. We’ve had multiple nights in the negatives and woken up each morning to fresh, unfrozen water for our ladies to drink from. Give this one a try and you’ll have a long-lasting, worry-free water supply for your own flock!
We’re excited to hear what you think in the comments below and let us know if you have questions.
Some of the above links are affiliate links. This means we earn a small commission on qualifying purchases at no cost to you.