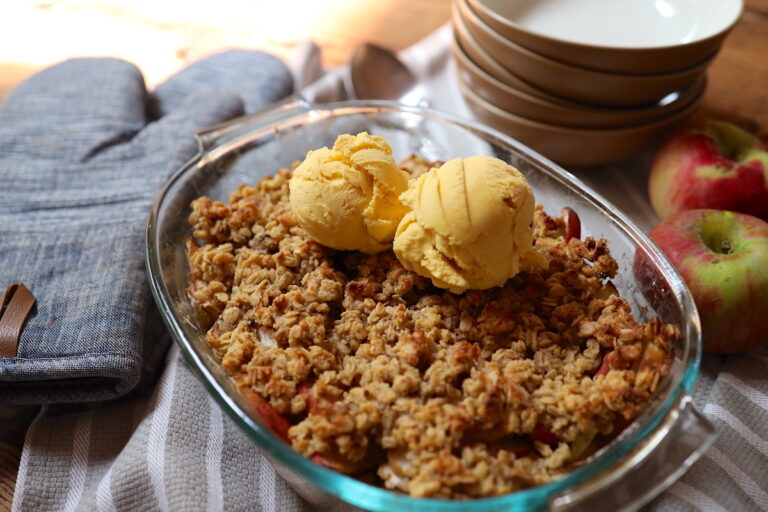
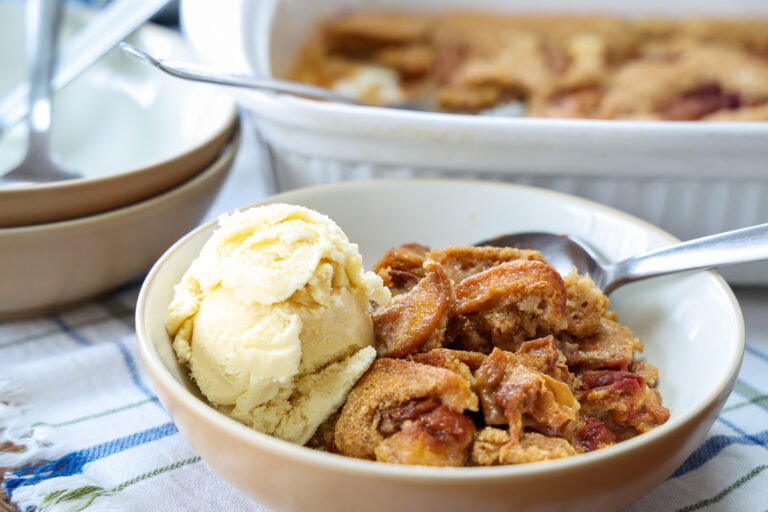
From Scratch Farmstead
  • About
  • Homestead How-to’s
    • Family Milk Cow
    • Gardening
    • Chickens
    • Small Scale Farming
    • Buying A Homestead
    • Homestead Living
  • Nourishing Recipes
    • Breakfast
    • Main Course
    • Sides
    • Dessert
    • Sauces & Condiments
    • Home Dairy
  • Natural Living
Tag:

dessert

baked blackberry crisp
DessertNourishing Recipes

The Best Gluten Free Blackberry Crisp

by From Scratch Farmstead July 21, 2022

In the summer when berries are bursting from branches, this gluten free blackberry crisp is a fan favorite and highly requested dessert in our house. 

It comes together in just a few minutes and contains a few basic ingredients that we always have stored away on pantry shelves. Bonus, it is filled with nutrient dense ingredients while being oh so yummy! If you are looking for a quick and easy dessert for your next potluck, picnic, or just simple night at home, give this gluten free blackberry crisp a try!

Jump To Recipe

Blackberries – A Nutritional Powerhouse

When selecting fruits and vegetables, we always prioritize darker varieties. The darker in color, the more robust nutrients that fruit or vegetable generally contains. This definitely holds true for the blackberry, touting nutritional benefits superior to other common summer berries like strawberries and red raspberries.

bowl of freshly picked blackberries

Nutritional Benefits of Blackberries include:

  • A great source of Vitamin C. One cup of blackberries contains roughly 50% of the recommended daily intake of vitamin C. Vitamin C is important for building a robust immune system, protecting cells from damage caused by free-radicals, and aiding the synthesis of collagen.
  • Tons of polyphenols. Blackberries are one of the most highly concentrated sources of polyphenols of any food. Polyphenols are known to have significant benefits for health.
  • Rich in manganese. Manganese is a critical mineral for many routine body functions and blackberries are a great source of this important mineral.
  • Great bang for your buck. Blackberries are rich in nutrients and fiber while being low in overall calories and carbohydrates. A handful of these berries will have tremendous benefits with no risk of causing damage to your waistline.

Foraging for Blackberries

Another perk of blackberries (also called black raspberries) is that they can be found wild throughout the world. That is definitely the case where we live here in the Midwest. Come late June/early July, blackberries are ripe and can be found in almost any forested or wooded area growing like gangbusters.

foraging for black raspberries

We are thankful to have them growing abundantly on our property. In those months when they are in season we stock up on as many as we can to freeze for the winter. However, prior to living here, we’d often bring our buckets and forage blackberries at local nature areas. Free berries plus family fun and outdoor time – wins all around.

Tips when foraging for blackberries:

  • Dress appropriately. Blackberry bushes are quite thorny and prickly so pants and a long sleeve shirt can help protect skin from inevitable scrapes and cuts.
  • Look low. To find the best berries you need to look all around. The best one’s often hide low to the ground or their shoots hide within other plants.
  • Be prepared for mosquitoes. Enough said!

Uses for Blackberries

In addition to this delicious gluten free blackberry crisp, there are several other ways to put those abundant blackberries to use. Besides eating them as-is of course, some of our favorites include using them to top salads, in soaked and baked oatmeal, as a topping for yogurt or vanilla ice cream, or in a simple sauce served with sourdough pancakes or a gluten free dutch baby.

fresh blackberry garden salad

Preserving Blackberries

The traditional method of storing blackberries would be to dry them out. You could do this in the sun, dehydrator, or oven set to a minimal temperature.

Blackberries can also be canned into jams or sauces.

Our favorite preservation method is freezing blackberries. Simply put the freshly harvested berries straight into a ziplock bag and store in the freezer. Blackberries are nice because of their texture, they do not all clump together when frozen so they are easy to break apart when ready to thaw and use.

Gluten Free Blackberry Crisp – Frequently Asked Questions

Do I have to sweeten the filling? 

This is totally up to you. We do add around ¼ cup of honey to our blackberry filling but if you are accustomed to food on the tarter side, you might prefer to omit the sweetener here all together. Honey can also be substituted with a sweetener of choice, but our preference is either honey or maple syrup for this.

blackberry crisp served with ice cream

Why arrowroot flour or tapioca starch? 

Arrowroot flour and tapioca starch are used as thickeners in this recipe and play an important role! If you leave this ingredient out you will be left with a much more soupy crisp. The thickener helps bind the liquids that are released as the berries cook and give it a nice thick, fruity texture. Either arrowroot flour or tapioca starch are our favorite gluten free thickeners but cornstarch can be substituted.

Where do you source your ingredients? 

We get most of the ingredients for this recipe at Costco. This includes the one degree sprouted gluten free rolled oats, almond flour, organic brown sugar, and coconut oil.

gluten free blackberry crisp ingredients

Can you use a different fruit? 

Absolutely! This is my go-to crisp topping for various fruits including mixed berries, apples, peaches, and we have even substituted ground cherries. The important thing to remember is that the filling needs fruit, a thickener, and a sweetener.

What substitutions can be made? 

While we have always made the recipe pretty much exactly as written, it is a somewhat flexible recipe. 

The filling for this gluten free blackberry crisp needs fruit, a thickener, and a sweetener.

For the topping, coconut sugar (or white in a pinch) could be substituted for brown sugar, butter for coconut oil, and extra butter or coconut oil instead of the yogurt if you don’t have it. I personally haven’t tried substituting for the almond flour but I’m sure it’s possible to play around there too!

Enough talking – on with the gluten free blackberry crisp recipe!

Gluten Free Blackberry Crisp

Serves 6

Ingredients:

Filling

4-5 cups fresh blackberries
¼ cup honey
2 Tbsp arrowroot flour or tapioca starch

Topping

1 cup gluten free oats
½ cup almond flour
1/3 cup brown sugar
¼ cup coconut oil or butter (melted or soft)
¼ cup plain yogurt
A pinch of salt

prebaked gf blackberry crisp
pre-baked blackberry crisp

Directions:

  • Preheat oven to 350 degrees.
  • Mix filling ingredients in an 8×8 inch pan or pie plate.
  • In a separate bowl mix oats, almond flour, brown sugar, and salt.
  • Add coconut oil or butter and yogurt to the oat mixture and stir until everything is incorporated.
  • Spoon dollops of topping onto your filling until filling is covered and all topping is used up.
  • Bake at 350 for 40-45 minutes until berries are bubbly and top is lightly browned.
  • Let rest for 10-15 minutes before serving.
blackberry crisp with vanilla ice cream

No gluten free blackberry crisp is complete without being served with some vanilla ice cream. If you’ve never tried making your own, we highly recommend giving it a try!

Some of the above links are affiliate links. This means we earn a small commission on qualifying purchases at no cost to you. We are so appreciative of your support!

vanilla raw milk ice cream

THE BEST VANILLA RAW MILK ICE CREAM

February 13, 2022

baked blackberry crisp

Gluten Free Blackberry Crisp

Yield: Serves 6
Prep Time: 10 minutes
Cook Time: 40 minutes
Total Time: 50 minutes

In the summer when berries are bursting from branches, this gluten free blackberry crisp is our go-to dessert.

It comes together in just a few minutes and contains a few basic ingredients that we always have stored away on pantry shelves. Bonus, it is filled with nutrient dense ingredients while being oh so yummy! If you are looking for a quick and easy dessert for your next potluck, picnic, or just simple night at home, give this gluten free blackberry crisp a try!

Ingredients

  • Filling
  • 4-5 cups fresh blackberries
  • 
¼ cup honey
  • 
2 Tbsp arrowroot flour or tapioca starch
  • Topping
  • 1 cup gluten free oats
  • 
½ cup almond flour
  • 
1/3 cup brown sugar

  • ¼ cup coconut oil or butter (melted or soft)
  • 
¼ cup plain yogurt

  • A pinch of salt

Instructions

    1. Preheat oven to 350 degrees.
    2. Mix filling ingredients in an 8x8 inch pan or pie plate.
    3. In a separate bowl mix oats, almond flour, brown sugar, and salt.
    4. Add coconut oil or butter and yogurt to the oat mixture and stir until everything is incorporated.
    5. Spoons dollops of topping onto your filling until filling is covered and all topping is used up.
    6. Bake at 350 for 40-45 minutes until berries are bubbly and top is lightly browned.
    7. Let rest for 10-15 minutes before serving.
© From Scratch Farmstead
July 21, 2022 0 comment
0 FacebookTwitterPinterestEmail
ice cream made with dandelions
DessertNourishing Recipes

Simple Homemade Dandelion Ice Cream

by From Scratch Farmstead May 31, 2022

When life gives you dandelions, make dandelion ice cream! If you are looking for the perfect spring recipe to wow your friends and family, this simple, homemade dandelion ice cream recipe is just the thing!

Jump To Recipe

When life gives you dandelions…

Last spring, when the dandelions began blooming in full force, one of our kids’ favorite activities was to pick bouquets full of these yellow flowers and then present them to me proudly. That sparked an idea. Why not turn those yellow flowers into something delicious? I knew that dandelion flowers were naturally sweet and almost honey like in taste. So I thought, why not add them into our homemade ice cream?

pulling apart dandelion flowers for baking

This dandelion ice cream experiment quickly became a family favorite. Not only did it taste great, it was a fun activity that everyone could be a part of. I simply tweaked our well-loved vanilla ice cream and turned it into this arguably superior creamy, yellow treat.

How to Make Ice Cream

Growing up, I had a daily ritual of eating a bowl of ice cream every night before bed. The idea that you could actually make homemade ice cream never crossed my mind. My love for ice cream continues and was well known by my family and friends. When Jim and I got married, one of my good friends gifted us our very own ice cream maker. 

My curiosity was piqued and our adventure into the world of homemade ice cream making began.

Making ice cream from scratch is actually very easy and only requires a few basic ingredients. Namely cream/milk, a sweetener, egg yolks, salt, and any flavoring. You will find that everyone has their own unique twists to make the perfect ice cream. But simply by blending these basic ingredients up and pouring them into the frozen bowl of an ice cream maker will result in creamy, delicious ice cream.

Do You Need to Temper the Egg Yolks?

One common step in most homemade ice cream recipes is to temper the egg yolks. This is a process of cooking egg yolks in heated up milk or cream so they are cooked yet remain creamy and don’t turn into an unpleasant scrambled egg mess. No one wants that in their ice cream. 

Personally, I skip this step when we make ice cream and prefer to just mix in the egg yolks raw. Because we raise our own chickens, I feel very comfortable with the source of our eggs and trust them to be healthy. Plus, there are additional benefits that you get in raw yolks that are lost in the cooking process. 

However, if you feel more comfortable tempering your egg yolks, just add this step in and chill your tempered mixture before blending it with the rest of your ingredients and pouring into the ice cream maker.

How to Harvest and Prepare Dandelions

Our preferred method for doing this is to grab a bucket and fill it with the plucked off flowers from the dandelion stems. After you have filled your bucket to your liking, you have to pull off the bottom green casing from the flower. This green part will be quite bitter and not something you want in your ice cream. You may notice some white milky or fuzz like part of the flower. If that gets mixed in with the flowers, that’s totally fine.

pulling dandelion petals off of flowers

This process does take some time so it is a great one to invite your kids or a friend into, turn on the music, and have a dandelion flower separating party.

The Best Sweetener for Dandelion Ice Cream

You have options here. My preference and what I have included in the recipe is to sweeten the ice cream with honey. Dandelion flowers have a natural honey like taste and honey compliments them perfectly. Alternatively, you could use maple syrup or a combination of maple syrup and honey. Or plain old white granulated sugar works fine too.

Cream vs Half and Half vs Milk

My favorite proportion is to use 2 cups of cream with 1 cup of whole milk. However, there is room for some flexibility here. Mainly, you want to make sure you have enough cream to give your ice cream its signature creamy texture. If you want it even creamier you could use all cream or a mixture of half and half and cream.

dandelion flower ice cream

Can Dandelion Ice Cream Be Made Dairy Free?

While I haven’t personally tried making this specific ice cream dairy free, I have had great success making my vanilla ice cream dairy free by substituting the milk and cream for one can of full fat coconut milk.

Do I need to Have an Ice Cream Maker?

While I have heard of alternative options for making ice cream that may work very well, I only have experience making it with this ice cream maker. In our opinion, a basic ice cream maker is worth the cost and makes the process extremely easy. But, if you have had success using another method, I’d love to hear about it!

fresh picked dandelions

Keep Everything Cold

Before adding your ingredients to your ice cream maker, you want to make sure they are fully chilled. Especially if you choose to heat your cream/milk and temper the egg yolks, you want to cool everything thoroughly before using it. Adding cold ingredients verses warm or even room temperature will produce a better end result.

Dandelion Ice Cream Recipe

simple dandelion isce cream recipe

Ingredients

2 cups cream
1 cup whole milk
4 egg yolks
1 cup dandelion flowers (just the yellow part! The green is quite bitter)
1/2 cup honey
1/2 tsp salt
1 tbsp vanilla
1 tbsp arrowroot powder or tapioca starch (optional but I think it helps with the texture)

Directions

1. Add all ingredients to the container of a blender.
2. Blend until well mixed.
3. Pour into the frozen container of an ice cream maker.
4. Let churn in ice cream maker for 25-30 minutes until creamy ice cream is formed.
5. Store in freezer for a couple of hours before serving.

Looking for other ways to use those dandelion flowers? Try serving this dandelion ice cream alongside our dandelion cake – another family favorite!

Some of the above links are affiliate links. This means we earn a small commission on qualifying purchases at no cost to you. We are so appreciative of your support!

gluten free dandelion cake

Gluten Free Dandelion Cake

May 15, 2022

simple dandelion isce cream recipe

Simple Homemade Dandelion Ice Cream

Yield: 8 servings
Prep Time: 20 minutes
Maker Time: 40 minutes
Total Time: 1 hour

When life gives you dandelions, make dandelion ice cream! If you are looking for the perfect spring recipe to wow your friends and family, this simple, homemade dandelion ice cream recipe is just the thing!

Ingredients

  • 2 cups cream

  • 1 cup whole milk

  • 4 egg yolks
  • 
1 cup dandelion flowers (just the yellow part! The green is quite bitter)

  • 1/2 cup honey

  • 1/2 tsp salt
1 tbsp vanilla

  • 1 tbsp arrowroot powder or tapioca starch (optional but I think it helps with the texture)

Instructions

    1. Add all ingredients to the container of a blender.

    2. Blend until well mixed.

    3. Pour into the frozen container of an ice cream maker.

    4. Let churn in ice cream maker for 25-30 minutes until creamy ice cream is formed.

    5. Store in freezer for a couple of hours before serving.
© From Scratch Farmstead
May 31, 2022 0 comment
0 FacebookTwitterPinterestEmail
dulce de leech without sweetened condensed milk
DessertHome DairyNourishing Recipes

Homemade Dulce De Leche without Sweetened Condensed Milk

by From Scratch Farmstead February 13, 2022

This dulce de leche without sweetened condensed milk is our favorite way to use up extra milk you may happen to have on hand.

Jump To Recipe

All you need is milk, sugar, baking soda and salt, to make the most delicious sauce for all of your apple dipping and ice cream topping needs.

stirring pot of milk making dulce de leche

When you have a milk cow, milk can pile up quickly! In a desperate moment of needing to figure out a way to put to use all of the milk we had, I discovered the beauty of cooking it down to make this delectable dulce de leche. Win, win. Typically, recipes for dulce de leche use canned sweetened condensed milk. But I much prefer to have control over the milk and sugar that is going into our bodies and opt for our fresh milk with organic cane sugar vs the conventional varieties in a can.

Dulce De Leche without Sweetened Condensed Milk Basics

The ingredients in this recipe are super basic items that we always have on hand. However, it is a good weekend project as it does require a few hours of time. Thankfully, most of this is completely hands off time. Just waiting, with some occasional stirring because it will take a couple of hours for the milk to cook down enough to give your dulce de leche without sweetened condensed milk the perfect texture. 

The trickiest thing about this recipe is determining exactly when your dulce de leche is finished. If it’s not cooked enough, you will have a super liquidy sauce that will disappear when spooned onto some ice cream or drizzled over a cheesecake. Cook it for too long and the end result will be too thick, more like a caramel candy, which while delicious can be too firm for all intended purposes. 

It may take some trial and error to determine exactly the time and temperature needed for your stove. But I promise, this experimentation is worth it. Even if it doesn’t turn out perfect the first time, this dulce de leche without sweetened condensed milk is delicious no matter what!

What exactly is Dulce de Leche?

Literally meaning sweet milk, that’s exactly what dulce de leche is. It is more popular in South America and commonly used in Spanish desserts. When milk and sugar are mixed together and then heated, it causes the milk to be cooked down and the sugar to brown giving you dulce de leche.

mason jar of dulce de leche

Are Dulce de Leche and Caramel the same thing?

Technically, no. While they are very similar and often used interchangeably the main differences are in how they are made and their consistency. Caramel translates to “burnt sugar” and is made by heating sugar until it is browned. Cream or butter are often added in to create more of a sauce. Dulce de Leche tends to be thicker in consistency than caramel and is made by cooking down milk with sugar.

The Perfect Gift

We always make a few batches of this dulce de leche without sweetened condensed milk around Christmas time. It is perfect for pouring into 4 or 8 oz mason jars, tying a decorative ribbon around, and giving as gifts to friends and neighbors.

Homemade Dulce de Leche Frequently Asked Questions

What’s the deal with adding baking soda? Baking soda is totally not critical to this recipe and can easily be omitted. The purpose of adding it is to help prevent the dulce de leche from forming clumps and to give it a smoother consistency. It can also aid in giving it a nice golden-brown color. Additionally, it should be noted that adding baking soda will cause your milk to foam up quite a bit. Therefore, it’s important that you are using a big enough pot to allow for this expansion and not have a huge mess on your hands.

milk frothing up after adding baking soda

milk frothing up after adding baking soda

Can I use non-dairy milks for this? I have heard of people having success making a similar version with goat milk and coconut milk but I haven’t tried it myself.

It’s taking forever and doesn’t seem to be getting there? I’ve totally done this before, turn up the heat a bit and the process should go more quickly.

Does the texture change after it’s refrigerated? Yes! I do find that dulce de leche becomes significantly thicker after it is cooled and refrigerated.

How will I know when it’s finished? As you are approaching the end product, now is the time to plant yourself in front of your stove with your wooden spoon. Watch your pot stirring regularly until it gets to a thick enough consistency to coat the back of the spoon. Remember that it will continue to thicken once cooled. So I find that I need to remove from heat a little before it’s at the final consistency that I want. This takes observation and experimentation. I am definitely still not perfect at getting it exactly the right texture every time.

How long does the process take? That will depend on how hot you have your stove. The warmer it is, the quicker it will go. I like to set it at a medium heat and start-to-finish it will generally take around 2 hours.

Enough talk, let’s get cooking!

Dulce de Leche Step by Step

Ingredients:

½ gallon of whole milk
2 cups organic cane sugar
½ tsp baking soda (mixed in a few teaspoons of water) *
½ tsp salt

*The baking soda is optional but the purpose is to keep the caramel from clumping together. It can also help give the caramel a lovely caramel brown color.

Directions:

  1. Pour milk, organic cane sugar, and salt into a stock pot. Make sure that the stock pot is large enough to handle the milk bubbling up after the baking soda is added.
  2. Stir and begin heating on med-high heat until mixture begins to boil.
  3. Once boiled, remove from heat and stir in baking soda/water mixture.
  4. Place back on heat and bring to a steady simmer. I prefer a medium heat for this. If it’s too low, it will take forever to cook down.
  5. Let it cook down and do it’s thing. I like to check in every 10-15 minutes to give it a quick stir.
  6. After an hour or so, begin checking and stirring your dulce de leche more regularly, every 5-10 min.
  7. When the color is looking golden and it’s beginning to coat a wooden spoon, keep a careful eye on your dulce de leche and stir regularly.
  8. When it has reached desired consistency, coats the back of a wooden spoon and is nice and golden, remove from heat, pour into mason jars and once cooled, store in the fridge.

Serve alongside your favorite treat, and enjoy!

For more of our favorite desserts from our home dairy check out our raw milk ice cream and chocolate pudding without cornstarch!

Feb
13

The Best Vanilla Raw Milk Ice Cream

Made with super nourishing ingredients and oh so delicious, if you have a family milk cow or access to raw dairy near you, this raw milk ice cream is a…

Dec
22

Simple Chocolate Pudding without Cornstarch

This chocolate pudding without cornstarch is so simple, requiring only five ingredients and can be whipped up in less than 10 minutes. By swapping out sugar, cornstarch, and cocoa powder…

dulce de leech without sweetened condensed milk

Homemade Dulce De Leche without Sweetened Condensed Milk

Yield: 3 cups
Prep Time: 5 minutes
Cook Time: 2 hours
Total Time: 2 hours 5 minutes

This dulce de leche without sweetened condensed milk is our favorite way to use up extra milk you may happen to have on hand. All you need is milk, sugar, baking soda and salt, to make the most delicious sauce for all of your apple dipping and ice cream topping needs.

Ingredients

  • ½ gallon of whole milk
  • 
2 cups organic cane sugar
  • 
½ tsp baking soda (mixed in a few teaspoons of water)*
  • 
½ tsp salt
  • *The baking soda is optional but the purpose is to keep the caramel from clumping together. It can also help give the caramel a lovely caramel brown color.

Instructions

    1. Pour milk, organic cane sugar, and salt into a stock pot. Make sure that the stock pot is large enough to handle the milk bubbling up after the baking soda is added.
    2. Stir and begin heating on med-high heat until mixture begins to boil.
    3. Once boiled, remove from heat and stir in baking soda/water mixture.
    4. Place back on heat and bring to a steady simmer. I prefer a medium heat for this. If it’s too low, it will take forever to cook down.
    5. Let it cook down and do it’s thing. I like to check in every 10-15 minutes to give it a quick stir.
    6. After an hour or so, begin checking and stirring your dulce de leche more regularly, every 5-10 min.
    7. When the color is looking golden and it’s beginning to coat a wooden spoon, keep a careful eye on your dulce de leche and stir regularly.
    8. When it has reached desired consistency, coats the back of a wooden spoon and is nice and golden, remove from heat, pour into mason jars and once cooled, store in the fridge.
© From Scratch Farmstead


February 13, 2022 0 comment
0 FacebookTwitterPinterestEmail
homemade paleo chocolate pudding
DessertHome DairyNourishing Recipes

Simple Chocolate Pudding without Cornstarch

by From Scratch Farmstead December 22, 2021

This chocolate pudding without cornstarch is so simple, requiring only five ingredients and can be whipped up in less than 10 minutes. By swapping out sugar, cornstarch, and cocoa powder for more nutrient rich alternatives, this pudding is nourishing while still being delicious.

Jump To Recipe

chocolate pudding with whipped cream

Growing up, the only chocolate pudding we ever ate came out of the box. I remember emptying the contents from those little boxes and shaking them with milk, letting them set in the fridge and eagerly awaiting our chocolate pudding treat.

Thankfully, from scratch chocolate pudding without cornstarch hardly requires any extra effort and is free of the artificial flavors, colors, chemical thickeners, and genetically modified cornstarch that these boxed mixes contain.

When you have a milk cow, you are always thinking of recipes that use the abundance of on-hand dairy. Hence the creation of this simple chocolate pudding without cornstarch, and when topped with homemade whipped cream, it’s a perfect homestead dessert.

How to serve chocolate pudding:

Our favorite way to serve this simple chocolate pudding is “as is” in small 4–6-ounce servings and topped with strawberry sauce and whipped cream. In individual containers it makes a fancy dessert with little effort. However, it would also be perfect in pudding pies, trifles, or poured over poke cakes.

adding whipped cream on top of chocolate pudding

Mmm… whipped cream on top is our favorite!

Cacao Powder versus Cocoa Powder

Cacao and Cocoa powder can be used interchangeably in this recipe; however, there is a notable difference between the two.

Cacao is the raw and unprocessed form of chocolate. It contains abundant antioxidants and is a rich source of magnesium. It is the traditional form that has been used across cultures for years and is specifically noted for its health purposes. Cacao powder has more nutrients in tact from the whole cacao bean.

Cocoa powder is the heated form of cacao that is much more standard on grocery store shelves. While cocoa powder is inferior in nutrients to cacao powder, it still retains antioxidants despite its heating. When buying cocoa powder, be sure to look for a product with cocoa powder being the only ingredient as mixes often contain added sugar. Dutch-processed cocoa powder is a cocoa powder that has been treated with an alkalized solution making it less acidic and richer in taste than regular cocoa powder.

adding cacao powder to saucepan

Adding cacao powder to saucepan.

The components:

Coconut Sugar – Coconut sugar is a sweetener that is made from coconut palm sap. The sap, or nectar, is collected, boiled, and then dehydrated. This causes the water to evaporate and the small, brown granules of the sugar remain. It is a good substitute for brown sugar as it has a similar taste. While it is still sugar and should not be eaten in large quantities, it does contain more trace vitamins and minerals than conventional cane sugar.

Cacao Powder (or cocoa powder) – We discussed the differences between cacao and cocoa powder above but both can be used in this recipe. We prefer cacao powder if possible as it is the raw form with added nutritional benefits, but buying a high-quality cacao or cocoa powder will give this chocolate pudding it’s rich chocolatey taste.

Arrowroot Powder – Arrowroot powder comes from the extraction of starch from the arrowroot plant. The arrowroot plant is a tropical tuber and when it’s extracted it becomes a white powder that is both flavorless and odorless. Arrowroot is a wonderful thickening agent and has two times the thickening power of wheat flour. We often use it to thicken soups, jams, fillings, and sauces. It works perfectly in this pudding and is a great substitute for the more commonly used corn starch which is generally made with genetically modified corn.

Milk – We prefer to use whole milk. This provides a richer taste and extra creaminess as well as health benefits from the fat-soluble vitamins in whole milk. However, any sort of milk will work for this recipe.

Salt – A small amount of salt is so helpful to enhance the flavor of this chocolate pudding. We prefer a high-quality sea salt.

Simple Chocolate Pudding without Cornstarch

Ingredients:

½ cup coconut sugar (or brown sugar)
¼ cup cacao powder (or cocoa powder)
3 Tbsp arrowroot powder
¼ tsp salt
2 ¾ cup milk

How to make:

In a saucepan, mix together the sugar, cacao (or cocoa) powder, arrowroot, and salt. Place the pan on the stove at a medium heat and stir in milk. Bring the mixture to a gentle boil, stirring continuously. Once the mixture reaches a boil, it will begin to thicken. Once it thickens enough to coat the back of a metal spoon, remove from heat. Stir pudding and pour into desired containers and let cool in the refrigerator for at least two hours before serving. Feel free to doctor up your pudding with any or all of the following add in’s.

Optional additions:

Egg – For extra creaminess and nutrients, you can add a tempered egg to your pudding mixture. Beat an egg thoroughly and after you have a thickened, warm pudding mixture, quickly pour it into your beaten egg. Stir the hot pudding mixture into the egg.

Melted Chocolate – For an extra sweet, cocoa flavor, you can add an extra ¼ cup of chocolate chips to your mixture. After you’ve heated your pudding, remove from heat and stir in chocolate chips. Stir until chips are melted and everything is fully incorporated.

Butter – To pack in those quality fats and add to the flavor and creaminess of the pudding, we love to add a tablespoon or two of butter. After the pudding is thickened and removed from heat, mix in your butter and stir until incorporated.

Vanilla – I find that one teaspoon of vanilla can really add to the flavor of your pudding. Stir in one teaspoon after your pudding mixture is removed from heat.

While the simple chocolate pudding without cornstarch is delicious as is, we’ve enjoyed playing with adding some or all of these additional items to customize your pudding and take it to the next level.

chocolate pudding with spoons

How to store your pudding:

This chocolate pudding without cornstarch will store, covered in the refrigerator for up to three days. If you wish to eliminate the skin layer that can form on the top of the pudding, place a layer of wax paper on top of the pudding before placing in the refrigerator.

chocolate pudding with whipped cream chocolate crumbles

Simple Chocolate Pudding without Cornstarch

Yield: 4 - 6 servings
Prep Time: 5 minutes
Cook Time: 5 minutes
Total Time: 10 minutes

This chocolate pudding is so simple, requiring only five ingredients and can be whipped up in less than 10 minutes. By swapping out sugar, cornstarch, and cocoa powder for more nutrient rich alternatives, this pudding is nourishing while still being delicious.

Ingredients

  • ½ cup coconut sugar (or brown sugar)
  • ¼ cup cacao powder (or cocoa powder)
  • 3 Tbsp arrowroot powder
  • ¼ tsp salt
  • 2 ¾ cup milk

Instructions

    1. In a saucepan, mix together the sugar, cacao (or cocoa) powder, arrowroot, and salt.
    2. Place the pan on the stove at a medium heat and stir in milk. Bring the mixture to a gentle boil, stirring continuously. Once the mixture reaches a boil, it will begin to thicken. Once it thickens enough to coat the back of a metal spoon, remove from heat.
    3. Stir pudding and pour into desired containers and let cool in the refrigerator for at least two hours before serving.

Notes

See post for optional add-ins including egg, melted chocolate, butter, and vanilla.

© From Scratch Farmstead
Category: Nourishing Recipes


December 22, 2021 0 comment
1 FacebookTwitterPinterestEmail

About Us

About Us

So Glad You're Here!

Hi! We are Jim and Joelle. We love sharing homestead how-to’s, from scratch recipes, and natural do-it-yourself projects to help you nourish your family. To learn about our story, click the image above!

Stay Up-To-Date

Popular Posts

  • Chicken Tractor Plans for 25 Chickens

    May 1, 2022
  • How Eating Liver Changed My Life

    March 31, 2022
  • Why a 5 Acre Homestead is the Perfect Size for a Beginner

    March 20, 2022
  • Cornish Cross vs. Freedom Ranger Chickens

    February 27, 2022
  • Deep Dish Sourdough Cast Iron Pizza

    April 21, 2022

Follow Along!

  • Email
  • Facebook
  • Instagram
  • YouTube

Instagram

  • Facebook
  • Instagram
  • Youtube
  • Email

As an Amazon Associate we earn from qualifying purchases.


Back To Top
From Scratch Farmstead
  • About
  • Homestead How-to’s
    • Family Milk Cow
    • Gardening
    • Chickens
    • Small Scale Farming
    • Buying A Homestead
    • Homestead Living
  • Nourishing Recipes
    • Breakfast
    • Main Course
    • Sides
    • Dessert
    • Sauces & Condiments
    • Home Dairy
  • Natural Living