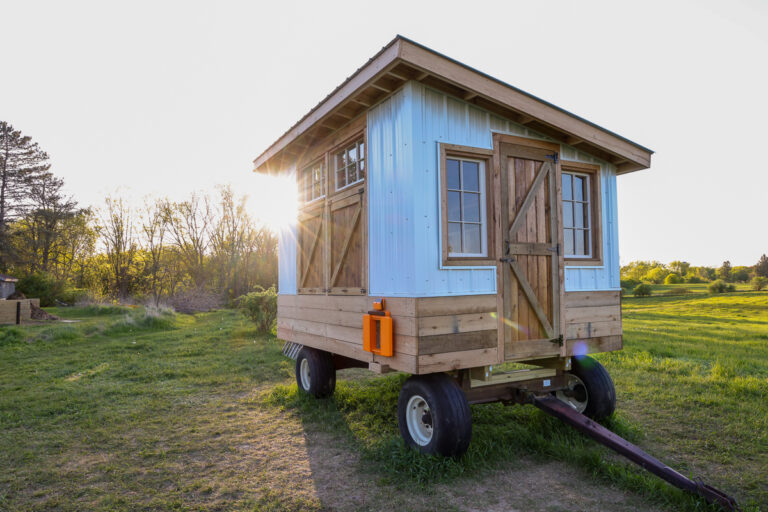
From Scratch Farmstead
  • About
  • Homestead How-to’s
    • Family Milk Cow
    • Gardening
    • Chickens
    • Small Scale Farming
    • Buying A Homestead
    • Homestead Living
  • Nourishing Recipes
    • Home Dairy
    • Food Preservation
    • Breakfast
    • Main Course
    • Sides
    • Dessert
    • Sauces & Condiments
  • Natural Living
    • Skin Care
    • Home Essentials
    • Living On A Budget
    • Our Healing Journey
    • Homestead Skills
    • DIY
    • AGA Stove
Tag:

diy

rolling library ladder hardware from diyhd
DIYNatural Living

How To Install DIY Library Ladder Hardware

by From Scratch Farmstead February 1, 2023

A rolling library ladder adds fun and function to any space! After installing ours, we’ll share which library ladder hardware set we chose, how we installed it, and what you should consider when installing your own DIY library ladder.

As a sneak peak:

1. It was LOW COST.
2. Installation was EASY.
3. We LOVE the results!

Our Rolling Library Ladder Dream

When working in the construction/maintenance department of a college a few years back I stumbled upon something. 

Tucked in one of the basement storage rooms of a building we were remodeling was a whole slew of rolling library ladders. Their timeless charm drew me in. I wanted one!

While I never managed to get my hands on one of those vintage library ladders the college had retired long ago, it became a personal dream to someday install a rolling library ladder in our home.

living room book and toy storage with library ladder

Fast forward to now, and our bookshelf/toy storage project in our living room was just begging for a ladder to accompany it!

So, we checked out the options.

DIY Library Ladder Hardware Options

Library ladders are making a comeback. As a result, a variety of library ladder hardware options are now on the market.

This wasn’t the case when we originally researched the project over a year ago. Few options existed and even fewer fit our budget.

The high end library ladder hardware sets were nearing the $1,000 mark, or higher. I understand that if you have a high-end bookshelf or space you want hardware that matches the craftsmanship. But our custom bookshelf/toy storage made of construction grade 2×12’s was full of character but didn’t exactly scream “high end.”

The most affordable option was made by Rockler, a trusted and quality brand in woodworking. But, it was still over $400 and only supplied hooks instead of rollers that the ladder slid across the track on.

So, I researched how to make your own library ladder hardware out of materials commonly found at hardware stores. This DIY library ladder video had a really clever and affordable option that seemed doable.

top rollers on diyhd rolling library ladder

But, when I checked on the options again more recently, I was surprised and excited to find there were now a TON of affordable library ladder hardware options available!

After researching them, we went with hardware from DIYHD.

DIYHD Rolling Library Ladder Hardware Review

We chose the 4’ track option in the Rustic Black color to go on our 5’ wide shelf. The cost was around $100 – super affordable! In all honesty, I didn’t have high expectations for the product exceeding my expectations of quality at that sort of price point. But, I was pleasantly surprised with what I found in the box.

Here’s our review on what the kit includes:

Finish/Color

The Rustic Black finish has a crisp, matte look to it with a durable feel. I didn’t find any finish flaws and the color was consistent between the hardware pieces and included fasteners. They also offer a gold/brass and silver color option that also look beautiful.

diyhd library ladder hardware in rustic black

Top Track

The steel top track the ladder hangs from is heavy duty and solid. The brackets feel very secure when mounted and give you confidence the track can support a lot of weight without flexing. DIYHD offers many track lengths. Or you can purchase individual track lengths with connectors to custom fit any project.

Rollers

The rollers atop the ladder are great. Other library ladder hardware kits come with only one wheel or simply a hook that slides on the track. The double rollers from DIYHD are a major upgrade. They lock the ladder in place on the track to avoid accidents and ball bearings in the wheels assure a smooth and quiet roll when repositioning the ladder.

diyhd top rollers for library ladder

Wheels

At the bottom, the wheels mount securely to your ladder and also provide a smooth roll with the help of ball bearings. The clear rollerblade-like wheels roll quietly and won’t mark up your floors. And the ability to lock the wheels is a very nice safety feature—especially if you have little ones, or a very tall ladder/shelf.

diyhd bottom wheels for library ladder

Stops

There’s nothing special about the provided stops. But they mount securely to the track bar and do their job stopping the ladder at your desired position. The rubber ring helps soften the impact when stopping the ladder.

Fasteners, Gaskets, Etc.

There are 3 sizes of screws included, with enough quantity of each to mix and match with some leftover. Wall anchors were also provided if needed. I worry about cheap fasteners stripping out when torquing them tight, but none of them did. There are also gaskets included to go behind each mounting bracket for the top track along with the necessary allen wrenches for the project. A nice touch.

Cons?

We are still just breaking in our new library ladder, but so far there are no complaints or cons to speak of with the hardware we received. We’ll update this post over time if anything comes up. But overall, the library ladder hardware kit from DIYHD looks and feels like a quality product at a great value.

And if it can fit on our antique, rickety wooden extension ladder we picked up on FB Marketplace, it should be versatile enough for any ladder!

how to install a library ladder yourself

How To Install Your Own Library Ladder

The box for your DIYHD library ladder hardware comes with a set of instructions, which I recommend you default to. They also have their own installation video, which I found helpful.

But here are the steps I used to install our ladder with some tips and things I learned along the way.

Step 1 – Install the top track

The mounting brackets for our 4’ track where 2’ apart. First, mark the centerline of the shelf you are mounting your track to. Then, measure 1’ to the left and right of your centerline and mark those positions.

Hold your track up on your marks. Place a level flat on the bar and level out your track. Mark the hole locations for each bracket with a pencil.

installing top track of library ladder
drilling holes for library ladder top track

Take the bar down and drill pilot holes at each hole that you marked. Place the rubber gaskets behind the mounting brackets and screw in the track with provided fasteners. I used the longest screws here.

Step 2 – Install top rollers

Slide the rollers onto the track. Hold your ladder in place at your desired position and angle. Mark where the screw holes fall on each side of the ladder.

Take the ladder and rollers down. Drill pilot holes at the marks you made. Place roller back on the ladder and screw it in with provided fasteners.

marking holes for top rollers
screwing in top rollers on library ladder

One thing to note is that we installed our rollers on the inside of the rails while the instructions call for them to be installed on the outside. This is because we left the vintage rung locks on the ladder that prevented us from installing them on the outside. This did not seem to impact the performance.

Step 3 – Install bottom wheels

Slide your ladder with installed rollers back onto the track. Hold the ladder at the desired angle. I used blocks of wood to keep the ladder in the same location while positioning the wheels.

Hold wheel in place in desired location on each rail and mark the top hole location. Also trace a line along the side of the wheel bracket since the bottom hole location is not yet accessible. Note, wheels should be perpendicular to the ground.

marking bottom wheel position on library ladder

Next, unscrew and remove the wheel from the bracket with provided allen wrench. Now place the wheel bracket back on the ladder rail in the marked position and mark the bottom screw hole position.

Drill pilot holes and secure the wheel brackets with provided screws.

Replace the wheels in the wheel brackets. Make sure you replace the washers between the wheel and the bracket. This task might require some patience!

removing wheel to install wheel bracket
replacing wheel after mounting bracket

Step 4 – Install stops

Slide your ladder back on the track and make sure it rolls as desired.

Then, fit your stops on the top track and secure at the desired location in the vertical position.

And voila! You have yourself a schnazzy new rolling library ladder!

DIY Library Ladder Considerations

Which ladder should I use?

There are prefabricated ladders available that are specifically designed to be library ladders, like this DIYHD library ladder. This will be your easiest route to go. But it might not be the most cost effective or provide the most character for your space.

We wanted something antique and weathered to fit our farmhouse look. If you search for “wooden ladder” on FB Marketplace or Craigslist you’ll find plenty of options. Just wait for the right size, look, and price to pop up. We found ours nearby for $30.

antique extension ladder for rolling library ladder

When looking at antique wooden ladders, I came to the conclusion that wooden extension ladders with round rungs were the best fit. Because the rungs are round, they’re flexible to work with any angle your ladder is installed at. They also generally come in long lengths and can be cut to size. A-frame ladders with flat rungs might not be set at the right angle, since library ladders are typically installed at a steeper angle than a typical ladder setup.

Shelf Design

To accommodate the top track, your shelf will need to meet one of two criteria: 1) The vertical supports of the bookshelf need to fall at 2’ apart to fasten the track brackets to, or 2) you need at least a 4” dimensional front face on your shelf to mount the track to.

library ladder end bumpers on top track

I designed our shelves with this in mind. The rest of the shelves were trimmed with 1×2’s. But the top shelf that I attached the track to is finished with a 1×4 trim piece to accommodate the track. I also fastened another 1x trim piece behind the 1×4 to fit the longest screws provided.

Track Length

Your top track doesn’t need to span the full width of your shelf. Our shelf was 5’ wide and the 4’ track option fit it perfectly. One, you can always reach beyond where the ladder stops. And two, the bottom wheels stick out a few inches from the ladder. You can adjust the stops wherever needed, but it’s worth mentioning that undersizing the track length a bit will work out just fine.

Make Sure it’s Secure!

Wherever you’re installing your library ladder in—bookshelf, pantry, workshop—make sure your shelving is secured tightly to the wall. I used 3” screws with a finish washer and sunk them into studs just above the shelf that the track was installed on. Use screws versus nails wherever possible to make sure that shelf is solid. This is an area I’d rather over-engineer than skimp on.

bookshelf securely screwed to wall with finish washers

How did you build your 2×12 bookshelf?

In case you’re wanting to build something similar for your home, I’ll give a brief overview of what we used to build our shelf and how we built it.

Dimensions

Our shelf was built out of 2×12’s with a 1×2 front face trim. Therefore the single shelves are around 12″ deep and the bottom shelves are around 24″ deep. Using 2×10’s would also work but we like having a little extra space. The bottom shelves are 16″ high to fit our baskets and the top shelves are around 10-1/2″ to 12″ high.

Lumber

The 2×12’s were construction grade lumber. I had to do quite a bit of digging at Menards to find the straightest ones in good shape. This made for a heavy duty and affordable shelf. I ran all the boards through a table saw first to remove the rounded edge. For the 24″ bottom portion I glued up two boards side-by-side with dowels. since I don’t have a planer, they took a significant amount of time with a belt sander to get them relatively smooth.

The trim was mostly 1×2 trim with the exception of using 1×4 on the shelf where the ladder track mounts to and the base. I did use mid-grade Select lumber so the front face had a nicer finished look.

installing dowels in 2x12 shelves
gluing up shelves for 2x12 bookshelf

Backing Board

I try to only use natural building materials, but my one exception on this project was the ready-to-paint 4’x8′ beadboard backing panels I purchased at Menards. I needed something thin and they painted up nice.

Finish

My go-to wood finish option is Tung Oil from Real Milk Paint Co. We have used tung oil for so many projects around the house: butcher block countertops, trim, cutting boards. Specifically I used their Dark Half tung oil which has 50/50 mixture of Dark tung oil and and Citrus Solvent. It looks beautiful and is completely natural!

And if you use the promo code – FROMSCRATCH – you can get an additional 10% off your order!

bookshelf finished with tung oil and milk paint

Paint

We had already painted many accents in our home with Milk Paint from General Finishes. So we continued that trend with the backing board on the bookshelf. The color is Basil. We love milk paint! It applies so nicely, gives no fumes or VOCs, touches up extremely well, and is completely safe for your family.

Baskets

And our final finishing touch was buying these rope baskets for toy storage on the bottom. We love them! They’re firm enough to stand straight, yet soft and flexible. And they can hold a lot! Overall we’re very happy with the quality for a really affordable price.

large rope baskets for toy storage

A Fun and Practical Project!

Any time you can incorporate design elements that are both practical and offer a fun and unique aesthetic, I say go for it!

That’s exactly what this DIY rolling library ladder project offers. 

Any book is now within reach for all of us on our floor to ceiling shelving. Especially for our kiddos without needing to ask for help! And it allows us to store books we care about a bit higher up so our really little ones don’t constantly destroy them.

easy diy library ladder bookshelf project

This is a beginner friendly project that you can retrofit onto your existing shelving setup, find new shelves that can easily accommodate it, or design your own custom shelving setup with a library ladder in mind… like we did!

If you decide to go for it too, we hope you love it! And drop us a line with your experience or any questions you have.

Some of the above links are affiliate links. This means we earn a small commission on qualifying purchases at no cost to you. We are so appreciative of your support!

February 1, 2023 2 comments
0 FacebookTwitterPinterestEmail
homemade tallow balm for dry skin
Natural LivingSkin Care

Tallow Balm – The Best Remedy For Dry Skin And How to Make It Yourself

by From Scratch Farmstead January 8, 2023

It’s no secret that we are big fans of tallow around here. Whether using for cooking or skincare products, tallow is a staple for our family. After trying everything under the sun to help my skin—prone to dryness—tallow balm has been far and away my favorite.

Jump To Recipe

When our infant son began to experience dry skin and eczema patches as well, tallow balm has taken permanent residence in our medicine cabinet. Thankfully, with only two ingredients, making it yourself at home is super easy. We’ll walk you through exactly how you can make your own tallow balm and why you might want to!

Our Story – Why We Use Tallow

Ever since I was a young child, I remember being prone to skin issues. From cracked skin after spending time in the swimming pool to lathering Aquaphor on my face in the dry winter months. Dry skin has always plagued me. 

Thankfully, after changing our diet to primarily real, whole foods and incorporating nutrient dense foods like liver, most of the skin issues that I’ve always had have been completely resolved. However, occasionally in the winter months when the air is dry, I can still get a bit of dry skin. These rare occurrences are what first introduced me to tallow balm.

smiling homestead family in overalls

I wanted to have something on hand, other than petroleum based Aquaphor, to help when dry skin patches appeared. That’s when I first learned of tallow for skin care. Soon after, I whipped up my first batch of tallow balm and was hooked. Now, almost all of our skin care products are tallow based like our tallow deodorant, magnesium lotion, and sunscreen.

What is Tallow Balm?

Tallow balm is a nourishing and natural skin moisturizer with the main ingredient being tallow or beef fat. Because tallow is a solid at room temperature, another liquid oil (we prefer olive oil) is added to the tallow to give tallow balm a texture better suited for easy application on skin. While it may sound funny to promote the wonders of applying beef fat to skin, tallow for skincare has actually been used throughout history.

easy homemade tallow balm recipe

Dating back to medieval times, the Romans and ancient Egyptians have used tallow as a miraculous agent of healing for skin. Whether used as a soap, balm, or lotion, tallow has long been touted for its ability to moisturize along with the potential for helping to heal other skin ailments like burns and scrapes. 

Why Use Tallow Balm for Skin?

There are so many benefits to using tallow on the skin. After first trying it, we were so pleased with how it felt and what it did for our skin that we haven’t looked back. 

Tallow has been used both internally and externally for hundreds of years and with good reason – its benefits are hard to beat! 

  • High in vitamins A, D, E, K, and B12
  • Rich in minerals
  • Contains conjugated linoleic acid (CLA) with natural anti-inflammatory properties
  • Palmitoleic acid is a powerful antimicrobial agent that is also a basic building block of our skin
  • Palmitic acid helps to improve the function of the skin’s protective barrier
  • Stearic acid helps to repair damaged skin and improves the skins flexibility and suppleness

This list just begins to scratch the surface of the nourishing benefits that tallow balm offers for the skin. But, making it yourself can be intimidating, so let’s dive in!

How to Source Tallow?

The first question we get when we start talking about making tallow-based skin care products is how do you find tallow? 

Our preference is always to work directly with a local farmer. Whether you are using the tallow in your cooking or skincare, quality makes a difference! Most of the toxins in an animal are stored in fat tissue. So, finding a clean, high-quality source of beef tallow is important!

Our preference is to always look for grass-fed cows on farms that follow regenerative practices. This helps to ensure that the tallow you are getting is not only going to be the best for you and your family but this is also best for the health of the animal and the planet as well. 

pasture raised cows from terra vitae farms

Thankfully, more farms with regenerative practices are being established. So hopefully you know of one in your local area. If not, websites like localharvest.org provide a directory of farmers to help you get connected with someone in your area.

If a local farm isn’t an option, you should also be able to find tallow at a local butcher.

In our experience, because tallow is something that doesn’t typically fly off the shelves, it’s easy to source and at very reasonable prices.

How to Render Tallow to Make Tallow Balm

Once you pick up your tallow, the first step is rendering it down into a usable fat. Tallow normally comes as large chunks that you must melt down into a usable form. There are two methods for doing this: the dry and wet methods.

The dry method for rendering tallow is great and very straightforward. You can learn exactly how to render tallow this way in our post, Cooking with Lard and How to Render It Yourself, because the process of rendering lard and tallow is exactly the same. This method is great for rendering tallow to use in cooking but can still leave the tallow with a slightly beefy scent.

cutting pork fat to render lard at home
Rendering lard – the same method used to render tallow at home.

Because of this, when we are rendering tallow for use in skin care, we prefer the wet method. The wet method of rendering tallow is slightly more involved but it leaves you with a beautiful, odorless tallow. I’ve always followed this video to render tallow for making tallow balm.

How to Make Tallow Balm

After you’ve rendered your tallow down, the hard part is done. From there transforming your tallow into tallow balm is very easy. All you need is a small sauce pan, heat safe container, and a little bit of olive oil.

There are two different ways to make tallow balm: solid or whipped. 

Solid Tallow Balm

Solid tallow balm is simply made by mixing melted tallow and olive oil. After they are mixed together, pour into an appropriately sized mason jar to store. In its solid form, tallow balm will store well for several months at room temperature. The final product is smooth and easy to apply with a fingertip. Because of the simplicity and longer storage of the solid version, that’s the method that we prefer.

2 ingredient tallow balm recipe

Whipped Tallow Balm

To make the whipped version, you do exactly the same thing as you would in the solid version. However, after your tallow and olive oil are mixed, instead of pouring them into a jar to store, let them solidify in a mixing bowl. Once they have solidified, mix with an immersion blender to create a texture akin to whipped cream. The downside to whipped tallow balm is that it doesn’t store as well due to the infusion of air. But it does create a more luxurious texture that is very easy to apply.

Can You Make Scented Tallow Balm?

Yes! If you prefer to add essential oils, you can definitely do this. After you mix your melted tallow and olive oil together, add your essential oils. For adults a 1% dilution is recommended and if applying on babies, a .25% dilution is safer.

How do I Use Tallow Balm?

The beauty of tallow balm is that it is the perfect all-purpose moisturizer. It’s excellent for dry and cracked skin and can be applied to any part of the body including faces. Tallow balm is also my go-to for babies and diaper rash.

Tallow Balm Recipe

Ingredients:

½ cup rendered tallow

2 tbsp olive oil

tallow balm ingredients

Directions:

1. Measure ½ cup of tallow and put in the heat safe jar or glass measuring cup.

2. Fill a small saucepan partially with water and over low to medium heat, bring to heat with the container of tallow in the water.

3. Heat until the tallow is completely melted.

melted tallow balm that needs to solidify
Melted tallow balm that needs to solidify.

4. Remove from heat and stir in olive oil. Add essential oils if desired.

5. If making solid tallow balm, pour into a jar for storage. For whipped tallow balm, pour into a mixing bowl and let solidify. Once solid, mix with an immersion blender until a whipped cream consistency is achieved.


For more of our favorite tallow-based recipes, check out our:

Simple Tallow Deodorant Recipe That Actually Works
DIY Tallow Magnesium Lotion
Simple Homemade Sunscreen With Tallow

DIY solid or whipped tallow balm

Tallow Balm - The Best Remedy For Dry Skin And How to Make It Yourself

Yield: ~1 4 oz. jar
Prep Time: 15 minutes
Total Time: 15 minutes

It’s no secret that we are big fans of tallow around here. Whether using for cooking or skincare products, tallow is a staple for our family. After trying everything under the sun to help my skin—prone to dryness—tallow balm has been far and away my favorite.

Ingredients

  • ½ cup rendered tallow
  • 2 tbsp olive oil

Instructions

    1. Measure ½ cup of tallow and put in the heat safe jar or glass measuring cup.
    2. Fill a small saucepan partially with water and over low to medium heat, bring to heat with the container of tallow in the water.
    3. Heat until the tallow is completely melted.
    4. Remove from heat and stir in olive oil. Add essential oils if desired.
    5. If making solid tallow balm, pour into a jar for storage. For whipped tallow balm, pour into a mixing bowl and let solidify. Once solid, mix with an immersion blender until a whipped cream consistency is achieved.
© From Scratch Farmstead
January 8, 2023 2 comments
0 FacebookTwitterPinterestEmail
tung oil for butcher block turorial
DIYHome EssentialsNatural Living

We Chose Tung Oil For Butcher Block And Love It!

by From Scratch Farmstead December 15, 2022

Kitchen countertops take a beating! When it comes to sealing your butcher block countertops you don’t want to settle for any run-of-the-mill sealer. Trust us – we’ve tried! When it comes to sealing, Tung Oil for butcher block is your best bet! 

After two years of heavy use, our countertops finished with 100% Pure Tung Oil from Real Milk Paint Co. still look AMAZING! Here’s what you need to know.

Use Promo Code FROMSCRATCH for 10% off your Real Milk Paint Co. purchase.

A case for butcher block countertops

Somehow in our decade plus of marriage we’ve owned 4 different homes and done 3 pretty involved kitchen remodels.

Plus, all of them were done on a very tight budget. You can read more about our cost saving tips in our post – How to Create Your Dream Kitchen Remodel on a Budget | 5 DIY Ideas to Save Thousands.

If there’s one thing we’re sold for life on, it’s butcher block countertops. Here’s just a few reasons why:

They’re inexpensive. You can buy standard lengths of raw butcher block from most major hardware stores at very affordable costs as compared to even the most entry level countertops, like laminate.

They’re DIY friendly. You don’t need to be a pro to install them. With just a circular saw and some other basic tools you can easily install your own butcher block countertops.

butcher block countertops finished in dark tung oil

They’re forgiving. Yes, butcher block is not impenetrable like other countertop options. But with just a light sanding and reapplying your finish they can always look brand new!

They’re natural. When it comes to food prep you want a toxic-free surface. Many countertops are industrially produced from plastic that continually give off toxic fumes. Even stone options often require a toxic sealer or conditioner be applied regularly to the surface. What’s more natural than wood?

They’re beautiful! Butcher block countertops provide a warm and friendly feel in any space. They can be modern, quaint, or rustic. And they just stand out! They’ve been the perfect compliment to our farmhouse kitchen.

But we’ve definitely learned a thing or two about how to finish them.

How NOT to seal your butcher block countertops

After excitedly installing butcher block countertops in our first kitchen remodel we soon realized we overlooked one important detail; how to seal them?

So we hopped over to our local hardware store and checked out the options. We found a bottle of butcher block sealer made with a blend of beeswax and mineral oil. It sounded natural enough so we went with it!

farmhouse kitchen with painted used cabinets

It was easy to apply – looked great – even smelled great. But after a couple months of routine kitchen use we were feeling uneasy about what we got ourselves into.

What, another ring from leaving a water glass out on the counter overnight?

We learned quickly that leaving a drying towel down for any amount of time when doing dishes was just a bad idea.

And I’ll never forget the day I came home after a mishap with some beets and a blender and realized I’d be staring at those purple spots for along time.

The kitchen is not the place to be on pins and needles about making a mess. We sold that house but resolved that should we ever have butcher block countertops again we would do a bit more research.

What is the Best Tung Oil? – Why we chose Real Milk Paint Co.

A year or so later I decided to make Joelle a cutting board out of one of the cutoff butcher block pieces we still had from that kitchen remodel.

And that cutting board would get some daily use and abuse! Time to research a more impenetrable finish option.

Polyurethane? Nope. Yes, it would make them waterproof. But coating natural wood in plastic just didn’t seem right. And refinishing them would be a nightmare. Why even have butcher block then?

There were plenty of oil options out there for a sealer. Each with their own set of pros and cons. But one repeatedly stood out: Tung Oil.

butcher block cutting board finished with tung oil
This butcher block cutting board finished with Tung Oil looks great after 4 years of HEAVY use!

We had previously been introduced to Real Milk Paint Co. through their milk paints. We loved the transparency and commitment to quality, natural products this small business offered. And their 100% Pure Tung Oil finish for butcher block really caught our attention.

So, I ordered up a bottle, sealed the cutting board, and loved the end result. Four years later that same cutting board is still looking beautiful and holding up incredibly well!

Lo and behold, a little over two years ago we bought our foreclosed, 5-acre homestead property that once again needed a complete kitchen overhaul. Did we go with butcher block countertops? You bet!

And this time, sealing them with Tung Oil from Real Milk Paint Co. was a no-brainer!

What is Tung Oil and how is it used?

Tung oil (or Chinawood Oil) is 100% natural and made by crushing the seeds from the nuts of tung trees. It has been used for centuries, often nautically as a dependable waterproofer for boats and ships. More recently the uses of tung oil have expanded to the home. Particularly on surfaces that come in contact with food because of its non-toxic nature. 

real milk paint co tung oil for butcher block review

Tung Oil is thick and needs to be thinned for deep penetration. To thin, it’s commonly paired with a Citrus Solvent. Citrus Solvent is also a natural, food-safe product derived from orange peels. Plus, you can’t beat the aroma it leaves! Mineral spirits is another option to thin Tung Oil with, but is less natural being derived from petroleum. 

Mixing Tung Oil and Citrus Solvent at a 1:1 ratio allows for a deep and penetrating finish on your wood. Real Milk Paint Co. sells a pre-mixed blend called Half & Half, which is a 50/50 blend of Tung Oil and Citrus Solvent. 

The seal Tung Oil provides is hard and waterproof, yet flexible and easily allows for refinishing. Tung oil gives a clear, matte finish to wood that does not yellow wood to the extreme of other oil finishes like linseed oil. 

Real Milk Paint Co. also offers a Dark Tung Oil that provides a beautiful and rich dark wood color. Many stains contain toxic ingredients, but the natural resin used to stain wood in Dark Tung Oil holds true to the companies commitment of a truly natural product. You can also purchase Dark Half, which is the dark version of their 50/50 Half & Half blend. This is what we used for our countertops!

Benefits of 100% Pure Tung Oil for butcher block

Food Safe

Real Milk Paint Co. guarantees their Tung Oil to be 100% pure. No additives, preservatives, or petroleum derived ingredients. There are only two things; oil from the tung tree and citrus solvent from orange peels. It doesn’t get more simple than that! And this matters when it comes to the surfaces your food will come in contact with. 

cutting butternut squash into cubes for roasting

Waterproof

There are few, if any marks on our countertops from liquids after a couple years of heavy use. Water literally pools on top like it would on granite. We do try to be conscious and wipe up wet spots when we see them. But we don’t have to live in constant fear that one slip up or forgotten water glass will produce an everlasting ring. And we even have our butcher block around our sink!

Easy To Apply

Seriously, you don’t have to be any sort of woodworker pro to produce a stunning end result! The application process is as simple and forgiving as it comes. You can really WOW your guests when you let them know you finished your own countertops!

Non-toxic

Tung Oil has zero VOC’s (volatile organic compounds) and is safe to contact skin during and after application. Just like in the food industry, you have to do your homework and read labels these days as to what’s inside building materials and products. As a former construction manager, one of my main reasons for leaving the industry was how cheap and toxic many standard materials have become. Stains and sealers are often atop of that list.

open farmhouse kitchen remodel

Gorgeous

Tung Oil does an amazing job at preserving the natural beauty within wood. Many oil sealers continue to darken or yellow wood over time. Tung Oil only provides a slight coloration that holds true over time. And the Dark Tung Oil applies evenly and leaves deep, stunning wood tones.

Disadvantages of Tung Oil for butcher block

Every oil will have its disadvantages. Our experience with Tung Oil has been so positive though that it seems like a bit of stretch to come up with any cons. However, here’s a couple things to consider.

Curing Time

Tung Oil can take up to 30 days to fully cure. This can easily be remedied with setting up temporary kitchen prep surfaces for a time while curing. Honestly though, we started using our countertops pretty quickly after we first finished them and they still help up shockingly well. The curing time is a minor disadvantage but it’s worth mentioning so you can plan for lighter use during that period.

Maintenance

When going with butcher block, regardless of sealer selection, maintenance comes with the territory. Tung Oil is no different. The “set it and forget it” option doesn’t exist. All butcher block sealers need to be reapplied occasionally. The good news is that reapplying Tung Oil to keep them looking new is really simple, which we’ll talk more about.

How to finish butcher block countertops and cutting boards with Tung Oil

I will always recommend you check out the manufactures recommendations when it comes to application. Real Milk Paint Co. has a helpful butcher block tutorial post.

But here are the simple steps we followed when applying Tung Oil to our butcher block countertops:

Step 1: Prep Surfaces

Assuming you are starting with raw butcher block, provide a light sanding first to remove any bumps or imperfections. Start with a 80-100 grit sandpaper for larger flaws, then finish with 120-150 grit sandpaper. It’s important to not finish finer than 150 grit as the oils will not be able to penetrate as deeply. Wiping the surface with a moist rag will raise the grain allowing for a smoother finish when sanding. Wipe away any dust or debris when satisfied with the surface.

Butcher block countertops for farmhouse kitchen

Step 2: Mix

Unless you’ve bought the half Tung Oil, half Citrus Solvent mixture you’ll want to mix them to a 1:1 ratio. We typically just used something that can be disposed of after like an old yogurt or ice cream container. And if using Dark Tung Oil or Dark Half, don’t forget to thoroughly stir the oil before pouring so the pigment applies consistently.

Step 3: Apply

You’ll want your first coat of Tung Oil to be heavy. Raw wood soaks up oils rapidly. Pour the oil directly onto surface and work it into the wood grains with a rag, sponge, or brush. We usually used an old t-shirt or sock. Continue to apply coats allowing at least 30 minutes for absorptions between each coat. Be sure to apply coats of Tung Oil around the edges of the countertop along with at least 2 thick coats on the bottom side for an even finish and protection. Once wood appears fully saturated and to no longer be absorbing oil, move on to the next step.

butcher block countertops finished with dark tung oil

Step 4: Wipe Away

Let the final layer of Tung Oil sit for at least 30 minutes, then wipe any excess away with a fresh, clean rag. Wipe smoothly with the grain to leave a uniform finish.

Step 5: Cure

Tung Oil will take 15-30 days to fully cure. Use your countertop surfaces minimally during this period. Especially for the first 10 days following application. Some residual oil may continue to rise to the surface and can be wiped away. I’ll be honest that we didn’t follow the curing procedure to a T, but still have been very happy with the look and longevity of our countertops!

Refinishing butcher block countertops with Tung Oil

The beauty of butcher block is that they can always be new again! A quick refinish (and sanding if necessary) and any flaws can instantly vanish.

But when do you refinish them? That’s really up to you and how much wear and tear you’re ok with. You might have something more catastrophic happen – a gouge or gash, spill or stain. Or you might just have minor scuffs and marks that add up over time.

We didn’t refinish ours until after two years of heavy use. Really they still looked great, but we were happy to lightly sand out any minor imperfections, reapply some fresh Tung Oil, and be setup again for at least a couple more years.

butcher block countertops after 2 years of use
kitchen island butcher block countertops needing to be refinished
Our countertops prior to refinishing after 2 years of use.

So you’ll need to decide when is the right time to refinish your countertops. It might be every 6 months. It might be every 6 years! But whatever you decide, the steps are simple and vey similar to the original finish process.

Step 1

First I went through and gave a light sanding with 100-150 grit sandpaper to any spots, ridges, scratches, or other flaws I found. Then wipe the surfaces clean with a moist rag.

Step 2

This time, mix at a 2:1 ratio of Citrus Solvent to Tung Oil then apply the same as above. This thinner ratio of Tung Oil allows for deeper penetration. I found another 2 or 3 coats did the trick.

real milk paint co dark tung oil for butcher block
applying dark tung oil on butcher block countertops

Step 3

Wipe away any excess and allow some time for curing before use.

What other uses does Tung Oil have?

Beyond countertops and cutting boards, we’ve found Tung Oil to be an incredibly helpful product to keep extra of around the house.

We used the same Dark Half from our butcher blocks to finish the trim we installed throughout our home.

wood pine trim finished with dark tung oil

I’ve even used it reseal wood handled garden tools like hoes and rakes.

And while we didn’t use it for this, a common application is to use Tung Oil for wood floors. Non-toxic finish options for flooring are difficult to come by. We researched the gamete when checking out options for our white oak floors we installed. We ended up choosing to soap finish them, but Tung Oil was a close second, and still may be the finish we switch to in the future.

Indoor to outdoors use. Furniture making to spoon carving. Cutting boards to trim. Even concrete countertops! Tung Oil truly has a broad range of applications.

Where to buy Tung Oil?

We’ve had a really positive experience ordering directly through the Real Milk Paint Co. website.

And if you use the promo code – FROMSCRATCH – you can get an additional 10% off your order!

Other brands of Tung Oil exist, but Real Milk Paint Co. is the only brand we trust for 100% Pure Tung Oil without any added junk. We have promoted products from them for years and are happy to do so now as an affiliate earning a small commission from sales at no extra cost to you.

It’s worth also checking the Store Locator on the Real Milk Paint Co. website for retail locations! We were pleased to find that a local woodworking store in our area carries their products.

tung oil for butcher block review

December 15, 2022 6 comments
1 FacebookTwitterPinterestEmail
diy black drawing salve
Natural LivingSkin Care

DIY Drawing Salve

by From Scratch Farmstead May 5, 2022

When it comes to building a natural first aid kit – this DIY drawing salve is a must! It is the perfect remedy for drawing out bites, stings, and even deep splinters.

What’s a Drawing Salve?

A drawing salve is named for its ability to draw things out of the skin. When toxins get stuck in the skin the combination of ingredients in the drawing salve work to effectively draw those things out. It has been used as a traditional remedy for hundreds of years. The drawing salve works by pulling foreign substances, toxins, and unwanted particles that make their way deep into the skin to the skin’s surface so that they can be eliminated.

Our Experience Using Drawing Salve

Last year was our first year making this salve which I wanted to have on hand just in case. Unfortunately, “just in case” turned into being used many times by almost every member of our family. The first application was for ticks. Last year was a terrible season for ticks and every time we found one on any of us, besides saving the tick and putting it in a plastic bag in the freezer, we’d apply a thick layer of drawing salve on the spot where the tick was, cover it with a bandage and let it sit overnight.

homemade drawing salve recipe

After tick season wound down, then came the bees. After not having been stung by a bee since childhood, last year was the year of the bee sting in our house. There were several stings that happened and each time, we immediately applied this drawing salve to the sting and it made for extremely quick healing and very minimal reactions. 

I was so glad we had our “just in case” drawing salve on hand for the many occasions that required it.

Case Study – Bee Stings

Five years ago, was our first jump into the world of backyard beekeeping. And, my husband’s first bee sting since childhood. He strolled into the house, one early summer day and casually mentioned that he got a couple of bee stings on his hand. Tough guy that he is, he just went about his normal day without doing anything to said bee stings. While within a couple of hours his hand was hugely swollen and the stings were extremely irritating. At this point we quickly realized our mistake and grabbed at anything we could to rub on for some relief.

backyard beehive frame

Fast forward, last year, he managed to get close to a dozen bee stings by the year’s end. Every time he got stung, he immediately went in and applied this DIY drawing salve to the sting and there was no residual swelling, minimal pain and itching, and instantaneous relief. That being said, we are true believers in the power of this drawing salve!

Active Ingredients in DIY Drawing Salve

Activated Charcoal: Basic charcoal is made from wood, coconut shell, peat, coal, or petroleum but the difference in “activated” charcoal is a form of charcoal that has been processed to contain pores that can trap chemicals and prevent them from being absorbed by the body. 

Activated charcoal is a common remedy to remove poisons from the body. It has also had applications for the treatment of digestive issues. Activated charcoal is black and super messy but it’s a very helpful thing to have on hand.

ingredients for diy drawing salve

Bentonite Clay: Bentonite clay comes from ash taken from volcanoes. It is dried out and filtered before being sold. The benefits of bentonite clay include: 

  • Healing skin conditions
  • Aiding in detoxification
  • Protective against bacterial infections
  • Supporting digestion and respiration

The main mechanism by which bentonite clay works is by binding to toxins in the body, almost magnet like, and removing them from the body.

Plantain: This is optional but we love to make a plantain infused olive oil to add to this salve. Next to dandelion, plantain is one of the most abundant weeds with so many beneficial medicinal uses. Plantain is also known to draw toxicity from the body. It has a long history being used to stimulate the liver, and is highly effective against bites, stings, and other irritations of the skin.

How to Apply:

DIY drawing salve is extremely effective against combating the negative effects of stings and bites, as well as painful splinters that may have wedged their way deep into the skin, helping to protect against infection. Simply rub a thick layer of the drawing salve over the wounded area and cover with a band aid. It can be quite messy, so you will definitely want to cover up the area where the salve has been applied. Keep the area covered overnight and, in the morning, you can uncover and clean off the drawing salve.

diy drawing salve in containers

How to store:

I like to store our drawing salve in these 2 oz containers. These little containers can make a great gift item or are small enough to have on hand in your purse or diaper bag. Alternatively, you can keep them in any glass storage jar with lid. I like to store in a cool dark place.

Ingredients:

1/3 cup olive oil infused with plantain* (the plantain is optional)
2 tsp beeswax
1 tbsp activated charcoal
1 tbsp bentonite clay
Essential oils (optional)

DIY Drawing Salve being poured into containers

Directions:

1. Put olive oil and 2 tsp beeswax in a heat safe glass container (I use a 1 cup pyrex measuring cup).
2. Place the glass container in a pot with about 1-2” of water.
3. Heat the pot and water until the beeswax is fully melted.
4. Once melted, remove from heat.
5. Stir in the charcoal and clay and add essential oils if adding.
6. Pour salve into containers.

*There are 2 methods to infuse the plantain in olive oil. You can either place plantain leaves covered in oil and let it sit for a week or two and then use. Or you can heat the oil lightly on the stove with the plantain leaves and then strain the leaves out and use right away.

Another of the most frequently used items in our natural skincare regimen is our DIY magnesium tallow balm. This one is a must to promote restful and deep sleep.

Some of the above links are affiliate links. This means we earn a small commission on qualifying purchases at no cost to you. We are so appreciative of your support!

Apr
07

DIY Tallow Magnesium Lotion

Magnesium is a critical mineral for health, yet many people are deficient. This DIY tallow magnesium lotion is a great option for boosting magnesium levels. This post was updated on…

diy black drawing salve

DIY Drawing Salve

When it comes to building a natural first aid kit – this DIY drawing salve is a must! It is the perfect remedy for drawing out bites, stings, and even deep splinters.

Ingredients

  • 1/3 cup olive oil infused with plantain* (the plantain is optional)

  • 2 tsp beeswax

  • 1 tbsp activated charcoal

  • 1 tbsp bentonite clay

  • Essential oils (optional)

Instructions

    1. Put olive oil and 2 tsp beeswax in a heat safe glass container (I use a 1 cup pyrex measuring cup).

    2. Place the glass container in a pot with about 1-2” of water.

    3. Heat the pot and water until the beeswax is fully melted.

    4. Once melted, remove from heat.

    5. Stir in the charcoal and clay and add essential oils if adding.

    6. Pour salve into containers.
© From Scratch Farmstead


May 5, 2022 0 comment
0 FacebookTwitterPinterestEmail
simple diy tallow magnesium lotion recipe
Natural LivingSkin Care

DIY Tallow Magnesium Lotion

by From Scratch Farmstead April 7, 2022

Magnesium is a critical mineral for health, yet many people are deficient. This DIY tallow magnesium lotion is a great option for boosting magnesium levels.

This post was updated on 3/12/2023 from its original recipe.

Why is Magnesium Important?

Magnesium is involved in over 500 processes in the body! To name a few, the body needs sufficient levels of magnesium for cell metabolism, producing energy, and regulating insulin. Furthermore, magnesium is the first mineral to be depleted when the body is under stress. I think we can all agree that we have stress in some way, shape, or form. So, some extra magnesium would likely be beneficial! 

homemade magnesium lotion for kids or adults

Other indications that your magnesium could be low are:

  • Anxiety/Depression
  • Sleep Issues
  • Migraines/headaches
  • Fatigue
  • Infertility
  • PMS
  • High or Low Cholesterol
  • Arrhythmia/heart palpitations
  • Numbness/Tingling
  • Nausea

Our Story Around Magnesium Lotion

We’ve been on a significant health journey for many years. This was actually the instigator for us in beginning our homesteading journey. However, even after making a lot of changes, there were still a few things that I was trying to figure out, especially around hormonal imbalances. 

I began to do a deep dive into understanding how minerals work in the body and how important they are for health. The hormone healing rd is a great resource for this. In my exploration, I realized I had several symptoms of possible magnesium deficiency and wanted to begin adding it in to our family’s routine.

applying magnesium tallow lotion

How Do You Know If You Need More Magnesium?

The way to find out your magnesium status is by a magnesium RBC blood test or a Hair Mineral Analysis. Talk to your practitioner if you want to get more testing done to find out exactly what your levels are.

Ways to Get more Magnesium

The foods with the most robust amounts of magnesium present are cooked leafy greens, bone broth, grass fed dairy, or cacao. In fact, if you often crave chocolate, this could definitely be an indication that your body is actually depleted in magnesium.

As you can see, this is a pretty short list. It is difficult to get in sufficient amounts of magnesium solely through food. Especially if you are under stress and are burning through magnesium rapidly.

do it yourself tallow magnesium lotion

Enter in, adding magnesium topically! There are three options of getting magnesium in through the skin.

  • Magnesium oil
  • Magnesium lotion
  • Epsom Salt Baths or Soaks

My preferred method is lotion. I’ve tried simply rubbing magnesium oil on my skin, which is the first step in making the lotion. However, the magnesium oil was irritating on my skin and dried it out. I really like the idea of Epsom salt baths or foot soaks, but with three young children and a homestead, my time for baths is limited. Magnesium lotion is quick and easy to apply and leaves my skin feeling soft and moisturized.

What Is Tallow?

Tallow is rendered suet or beef fat. Don’t worry, if rendered in a specific way the tallow is completely odorless. This video shows exactly how to render tallow to make it odorless and ready to use for all of your skincare needs.

cows on pasture with sunrise

Why Tallow?

There are so many benefits to using tallow on the skin. In fact, after we started incorporating it, it’s all we use for our complete skin care regimen – shampoo bars, soap, lotion, moisturizer, and deodorant. Tallow has been used both internally and externally for hundreds of years and with good reason – its benefits are hard to beat! 

  • High in vitamins A, D, E, K, and B12
  • Rich in minerals
  • Contains conjugated linoleic acid (CLA) with natural anti-inflammatory properties
  • Palmitoleic acid is a powerful antimicrobial agent that is also a basic building block of our skin
  • Palmitic acid helps to improve the function of the skin’s protective barrier
  • Stearic acid helps to repair damaged skin and improves the skins flexibility and suppleness

FAQ About Tallow Magnesium Lotion

Who is this lotion good for? Is it safe for Kids?

If you are unsure about adding a topical magnesium to your routine, you should always consult your medical provider before implementing anything. That being said, the amount of magnesium you would get from the lotion is not a high dose. Our whole family uses it including babies and kids. It is my opinion that almost everyone could benefit from adding a bit of magnesium, especially if you are under stress or experiencing any of the above symptoms associated with magnesium deficiency.

Where do you buy tallow?

In order to get the maximum nutrients and health benefits in tallow for your skin, you will want to find tallow from grass fed and finished cows. Contact your local farmer or if you are unaware of a regenerative farm in your area, you can check out localharvest.org for some options in your area.

ingredients for diy tallow magnesium lotion

What type of magnesium?

My favorite magnesium for this is the magnesium flakes from Ancient Minerals. As far as I am aware, this is the most reputable product for high quality magnesium available.

Can you Substitute Beeswax for the Candelilla Wax?

I used to use beeswax instead of candelilla wax in this recipe but found that overtime, the emulsion separated and the magnesium water would separate from the oils. Although beeswax can often act as an emulsifier in skin care products, it isn’t a true emulsifier when emulsifying water in oils. While we still used this lotion, the consistency significantly improved when we made the switch from beeswax to candelilla wax. 

thick creamy homemade magnesium lotion

How frequently and where do you apply it?

Our routine is to apply it to our kids and ourselves as part of our bedtime routines. You will want to avoid applying it to any areas with a cut or open wound as it may burn. Besides that, we just lather it on. I like to put it on areas under clothing like feet or belly that won’t get the sheets potentially stained from the oils in the lotion. If I remember, I try to use it in the morning as well.

Tallow Magnesium Lotion

Yield: 1.5 Cups

Ingredients:

½ cup water
½ cup magnesium flakes
3 tbsp olive oil (or avocado oil)
1/2 cup tallow
2 tbsp cocoa butter (or shea butter)
2 tbsp candelilla wax
10 or more drops of essential oils (optional)

Directions:

1. Heat ½ cup of water to just before boiling.
2. Stir ½ cup of magnesium flakes into the hot water until the magnesium flakes are completely dissolved.
3. Add tallow, oil, cocoa butter, and candelilla wax to a heat safe glass container
4. Add water to a pot and heat on stove. Place a rag or towel at the bottom of the pot and add your container of tallow and other ingredients on top of the rag.
5. Heat up the water on medium heat on stove to heat up tallow mixture until everything is completely melted.
6. Once melted, remove from heat.
7. Using an immersion blender*, blend the tallow mixture while slowly pouring the magnesium water into the tallow mixture.
8. Blend until the magnesium solution is completely blended in, a lotion is formed, and desired consistency is reached.
9. Pour into jars.

*A blender on a low speed or food processor will work if you don’t have an immersion blender.

Have you tried adding magnesium topically? We’d love to hear your experiences in the comments below!

Some of the above links are affiliate links. This means we earn a small commission on qualifying purchases at no cost to you. We are so appreciative of your support!

simple diy tallow magnesium lotion recipe

DIY Tallow Magnesium Lotion

Yield: 1.5 cups

Magnesium is a critical mineral for health, yet many people are deficient. This simple DIY tallow magnesium lotion is a great option for boosting magnesium levels.

Ingredients

  • ½ cup water
  • ½ cup magnesium flakes
  • 3 tbsp olive oil (or avocado oil)
  • 1/2 cup tallow
  • 2 tbsp cocoa butter (or shea butter)
  • 2 tbsp candelilla wax
  • 10 or more drops of essential oils (optional)

Instructions

    1. Heat ½ cup of water to just before boiling.

    2. Stir ½ cup of magnesium flakes into the hot water until the magnesium flakes are completely dissolved.

    3. Add tallow, oil, cocoa butter, and beeswax to a heat safe glass container

    4. Add water to a pot and heat on stove. Place a rag or towel at the bottom of the pot and add your container of tallow and other ingredients on top of the rag.
    5. Heat up the water on medium heat on stove to heat up tallow mixture until everything is completely melted.

    6. Once melted, remove from heat.
    7. Using an immersion blender*, blend the tallow mixture while slowly pouring the magnesium water into the tallow mixture.
    8. Blend until the magnesium solution is completely blended in, a lotion is formed, and desired consistency is reached.
9. Pour into jars.

    *A blender on a low speed or food processor will work if you don’t have an immersion blender.

© From Scratch Farmstead

April 7, 2022 16 comments
2 FacebookTwitterPinterestEmail

About Us

About Us

So Glad You're Here!

Hi! We are Jim and Joelle. We love sharing homestead how-to’s, from scratch recipes, and natural do-it-yourself projects to help you nourish your family. To learn about our story, click the image above!

Stay Up-To-Date

Popular Posts

  • How Many Cows Per Acre On A Small Farm

    May 26, 2022
  • Chicken Tractor Plans for 25 Chickens

    May 1, 2022
  • Easy Farmhouse Cheddar Hard Cheese Recipe

    July 17, 2022
  • Predator Proof Chicken Coop Essentials You Need To Know

    February 11, 2023
  • How To Make Quick and Natural Mozzarella Cheese with Vinegar

    August 7, 2022

Follow Along!

  • Email
  • Facebook
  • Instagram
  • YouTube

Instagram

  • Facebook
  • Instagram
  • Youtube
  • Email
  • About
  • Privacy Policy

© 2021-2023 From Scratch Farmstead | As an Amazon Associate we earn from qualifying purchases.


Back To Top
From Scratch Farmstead
  • About
  • Homestead How-to’s
    • Family Milk Cow
    • Gardening
    • Chickens
    • Small Scale Farming
    • Buying A Homestead
    • Homestead Living
  • Nourishing Recipes
    • Home Dairy
    • Food Preservation
    • Breakfast
    • Main Course
    • Sides
    • Dessert
    • Sauces & Condiments
  • Natural Living
    • Skin Care
    • Home Essentials
    • Living On A Budget
    • Our Healing Journey
    • Homestead Skills
    • DIY
    • AGA Stove