How To Install DIY Library Ladder Hardware
A rolling library ladder adds fun and function to any space! After installing ours, we’ll share which library ladder hardware set we chose, how we installed it, and what you should consider when installing your own DIY library ladder.
As a sneak peak:
1. It was LOW COST.
2. Installation was EASY.
3. We LOVE the results!
Our Rolling Library Ladder Dream
When working in the construction/maintenance department of a college a few years back I stumbled upon something.
Tucked in one of the basement storage rooms of a building we were remodeling was a whole slew of rolling library ladders. Their timeless charm drew me in. I wanted one!
While I never managed to get my hands on one of those vintage library ladders the college had retired long ago, it became a personal dream to someday install a rolling library ladder in our home.
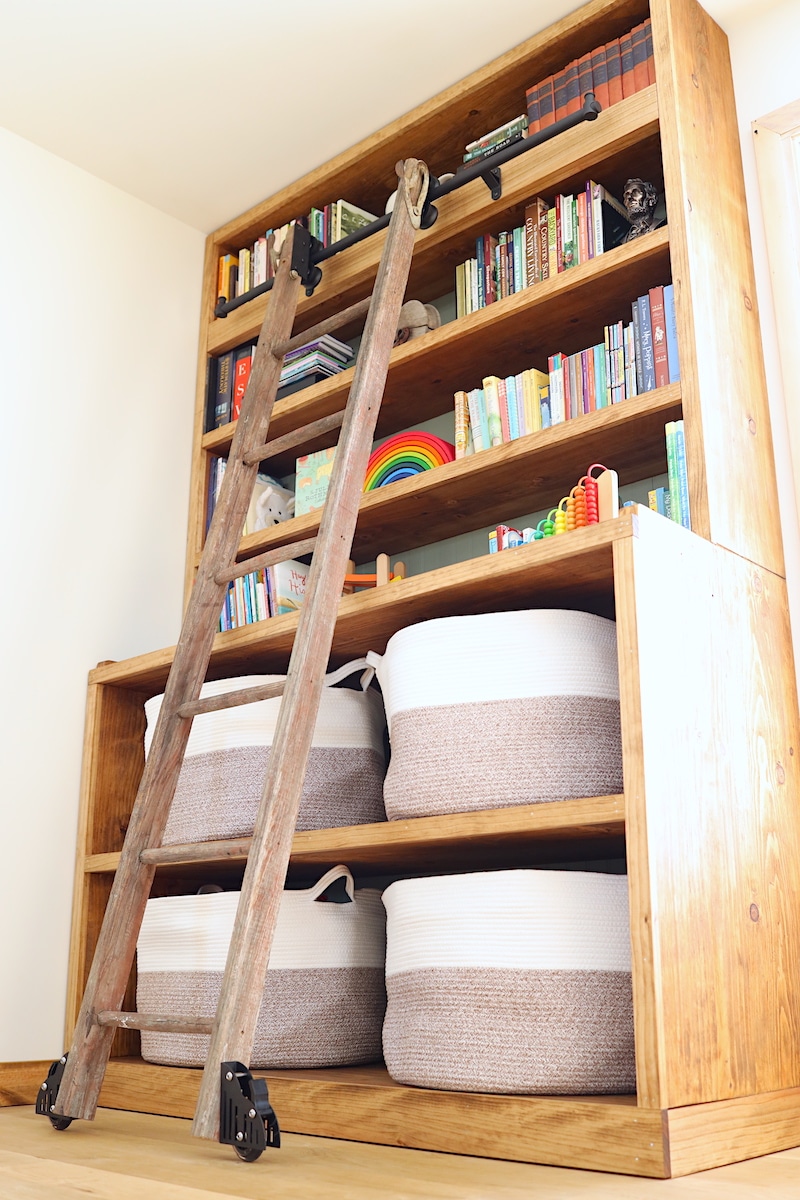
Fast forward to now, and our bookshelf/toy storage project in our living room was just begging for a ladder to accompany it!
So, we checked out the options.
DIY Library Ladder Hardware Options
Library ladders are making a comeback. As a result, a variety of library ladder hardware options are now on the market.
This wasn’t the case when we originally researched the project over a year ago. Few options existed and even fewer fit our budget.
The high end library ladder hardware sets were nearing the $1,000 mark, or higher. I understand that if you have a high-end bookshelf or space you want hardware that matches the craftsmanship. But our custom bookshelf/toy storage made of construction grade 2×12’s was full of character but didn’t exactly scream “high end.”
The most affordable option was made by Rockler, a trusted and quality brand in woodworking. But, it was still over $400 and only supplied hooks instead of rollers that the ladder slid across the track on.
So, I researched how to make your own library ladder hardware out of materials commonly found at hardware stores. This DIY library ladder video had a really clever and affordable option that seemed doable.
But, when I checked on the options again more recently, I was surprised and excited to find there were now a TON of affordable library ladder hardware options available!
After researching them, we went with hardware from DIYHD.
DIYHD Rolling Library Ladder Hardware Review
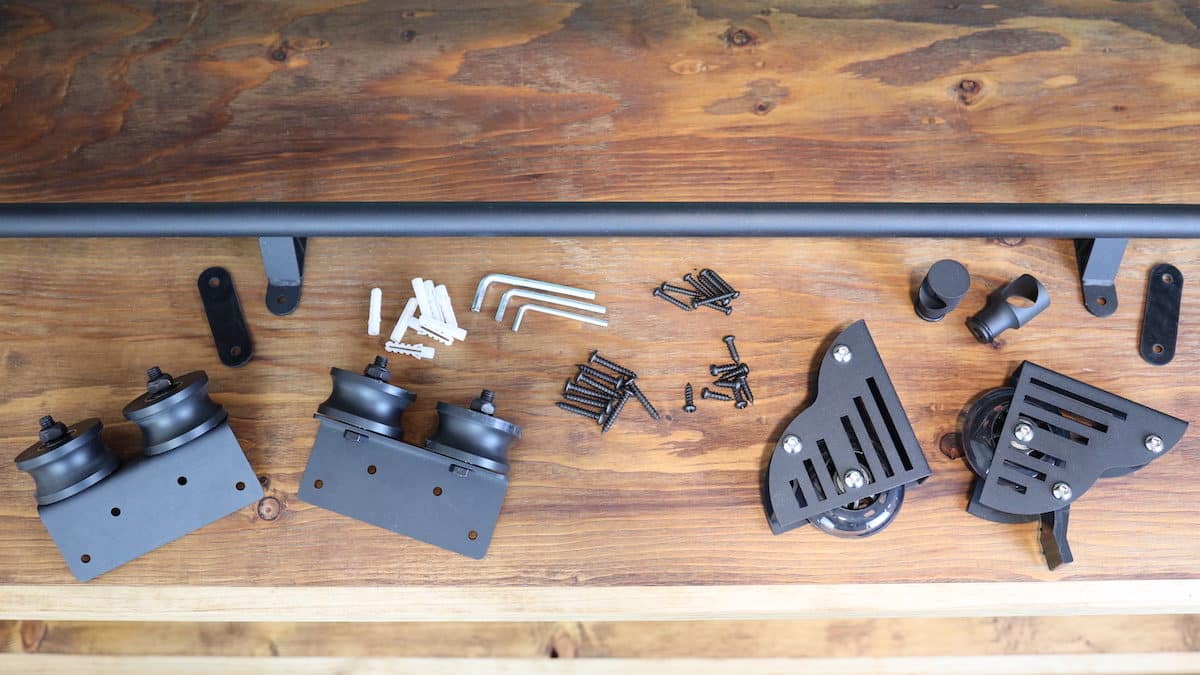
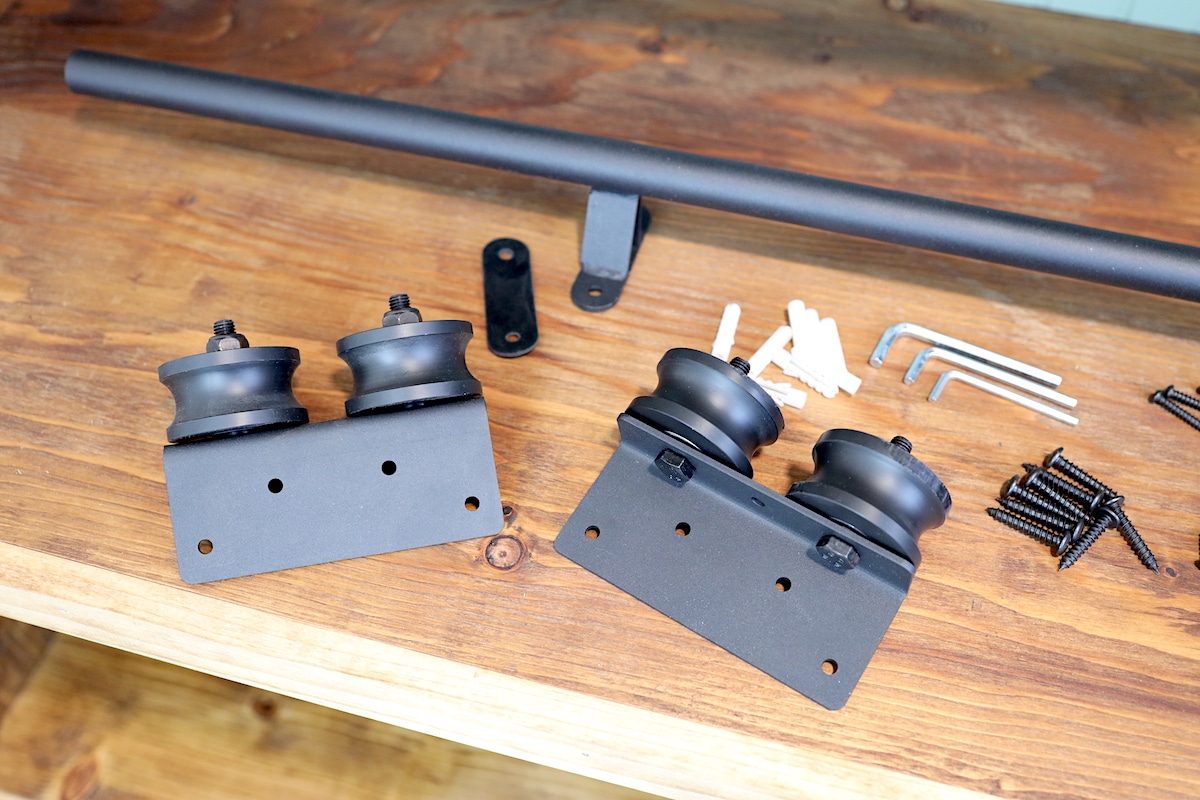
We chose the 4’ track option in the Rustic Black color to go on our 5’ wide shelf. The cost was around $100 – super affordable! In all honesty, I didn’t have high expectations for the product exceeding my expectations of quality at that sort of price point. But, I was pleasantly surprised with what I found in the box.
Here’s our review on what the kit includes:
Finish/Color
The Rustic Black finish has a crisp, matte look to it with a durable feel. I didn’t find any finish flaws and the color was consistent between the hardware pieces and included fasteners. They also offer a gold/brass and silver color option that also look beautiful.
Top Track
The steel top track the ladder hangs from is heavy duty and solid. The brackets feel very secure when mounted and give you confidence the track can support a lot of weight without flexing. DIYHD offers many track lengths. Or you can purchase individual track lengths with connectors to custom fit any project.
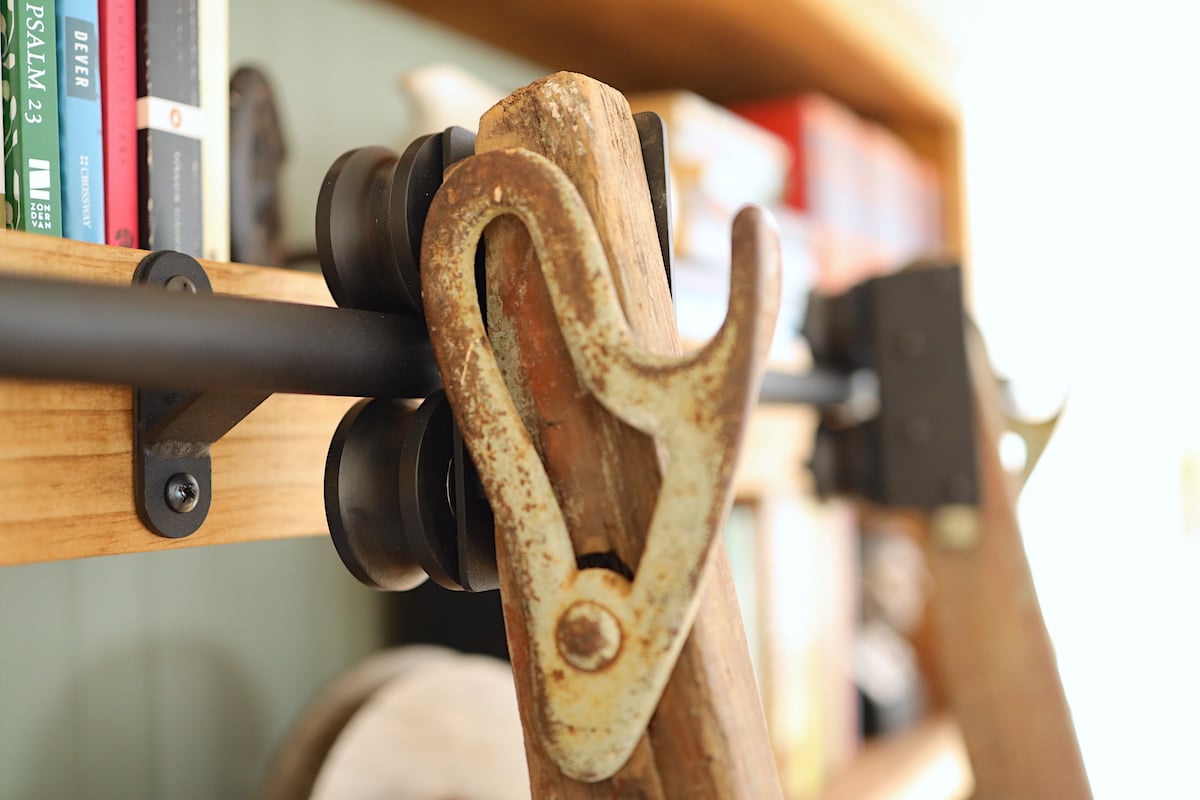
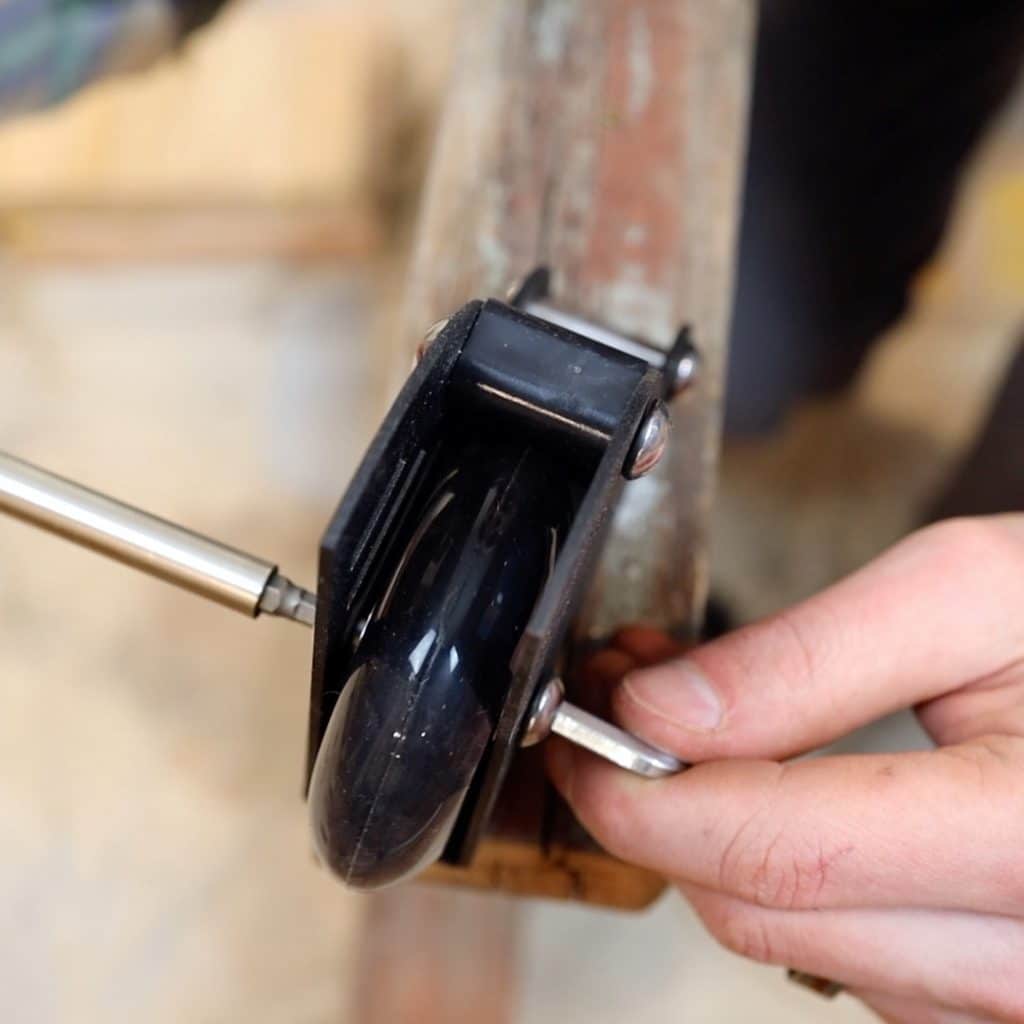
Rollers
The rollers atop the ladder are great. Other library ladder hardware kits come with only one wheel or simply a hook that slides on the track. The double rollers from DIYHD are a major upgrade. They lock the ladder in place on the track to avoid accidents and ball bearings in the wheels assure a smooth and quiet roll when repositioning the ladder.
Wheels
At the bottom, the wheels mount securely to your ladder and also provide a smooth roll with the help of ball bearings. The clear rollerblade-like wheels roll quietly and won’t mark up your floors. And the ability to lock the wheels is a very nice safety feature—especially if you have little ones, or a very tall ladder/shelf.

Stops
There’s nothing special about the provided stops. But they mount securely to the track bar and do their job stopping the ladder at your desired position. The rubber ring helps soften the impact when stopping the ladder.
Fasteners, Gaskets, Etc.
There are 3 sizes of screws included, with enough quantity of each to mix and match with some leftover. Wall anchors were also provided if needed. I worry about cheap fasteners stripping out when torquing them tight, but none of them did. There are also gaskets included to go behind each mounting bracket for the top track along with the necessary allen wrenches for the project. A nice touch.
Cons?
We are still just breaking in our new library ladder, but so far there are no complaints or cons to speak of with the hardware we received. We’ll update this post over time if anything comes up. But overall, the library ladder hardware kit from DIYHD looks and feels like a quality product at a great value.
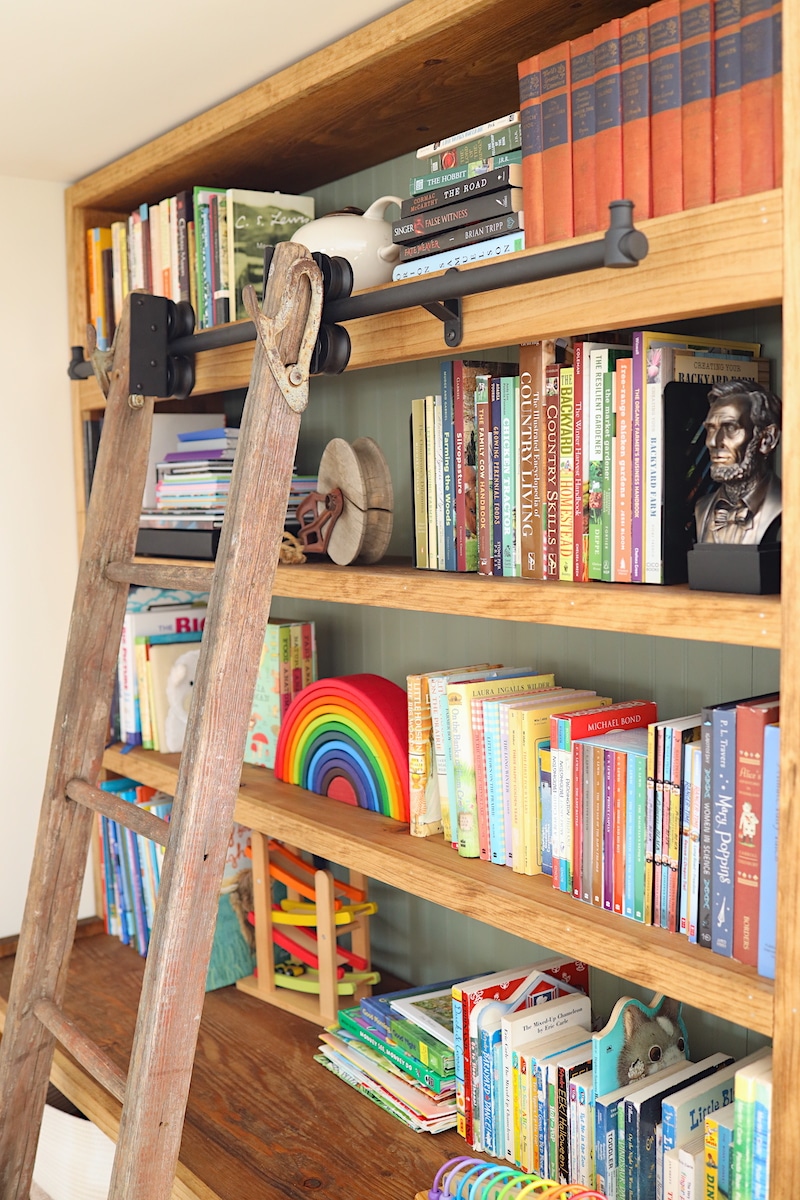
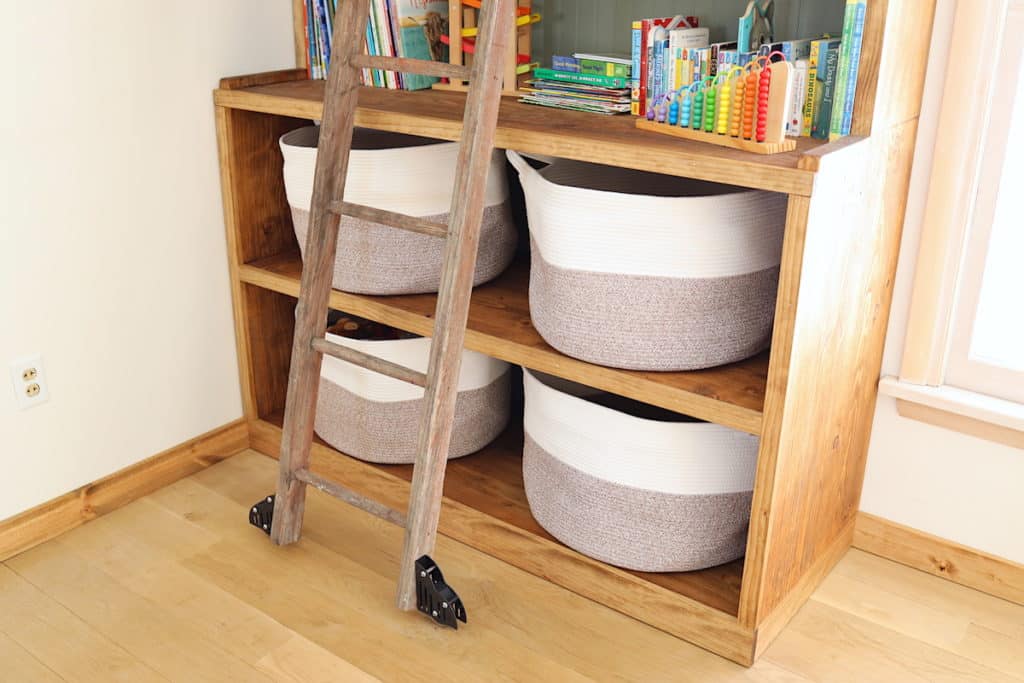
And if it can fit on our antique, rickety wooden extension ladder we picked up on FB Marketplace, it should be versatile enough for any ladder!
How To Install Your Own Library Ladder
The box for your DIYHD library ladder hardware comes with a set of instructions, which I recommend you default to. They also have their own installation video, which I found helpful.
But here are the steps I used to install our ladder with some tips and things I learned along the way.
Step 1 – Install the top track
The mounting brackets for our 4’ track where 2’ apart. First, mark the centerline of the shelf you are mounting your track to. Then, measure 1’ to the left and right of your centerline and mark those positions.
Hold your track up on your marks. Place a level flat on the bar and level out your track. Mark the hole locations for each bracket with a pencil.
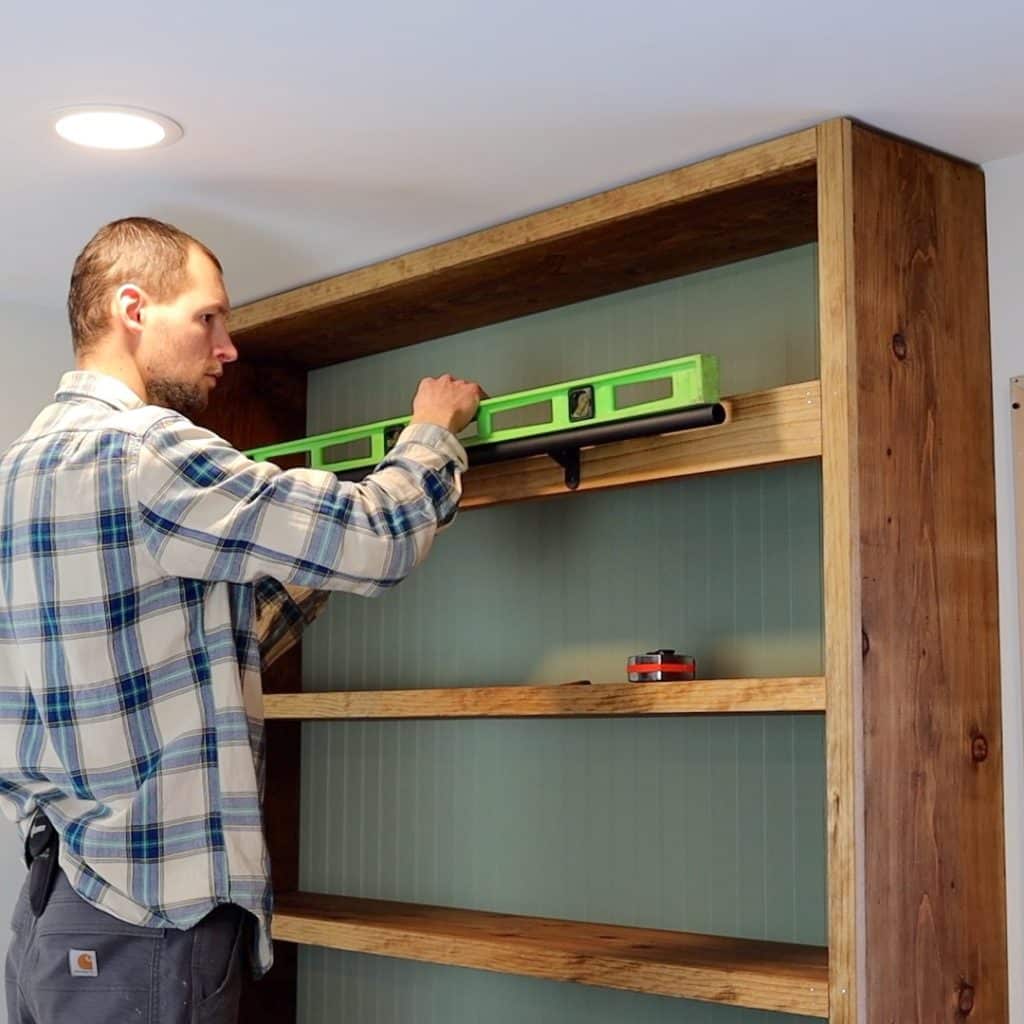
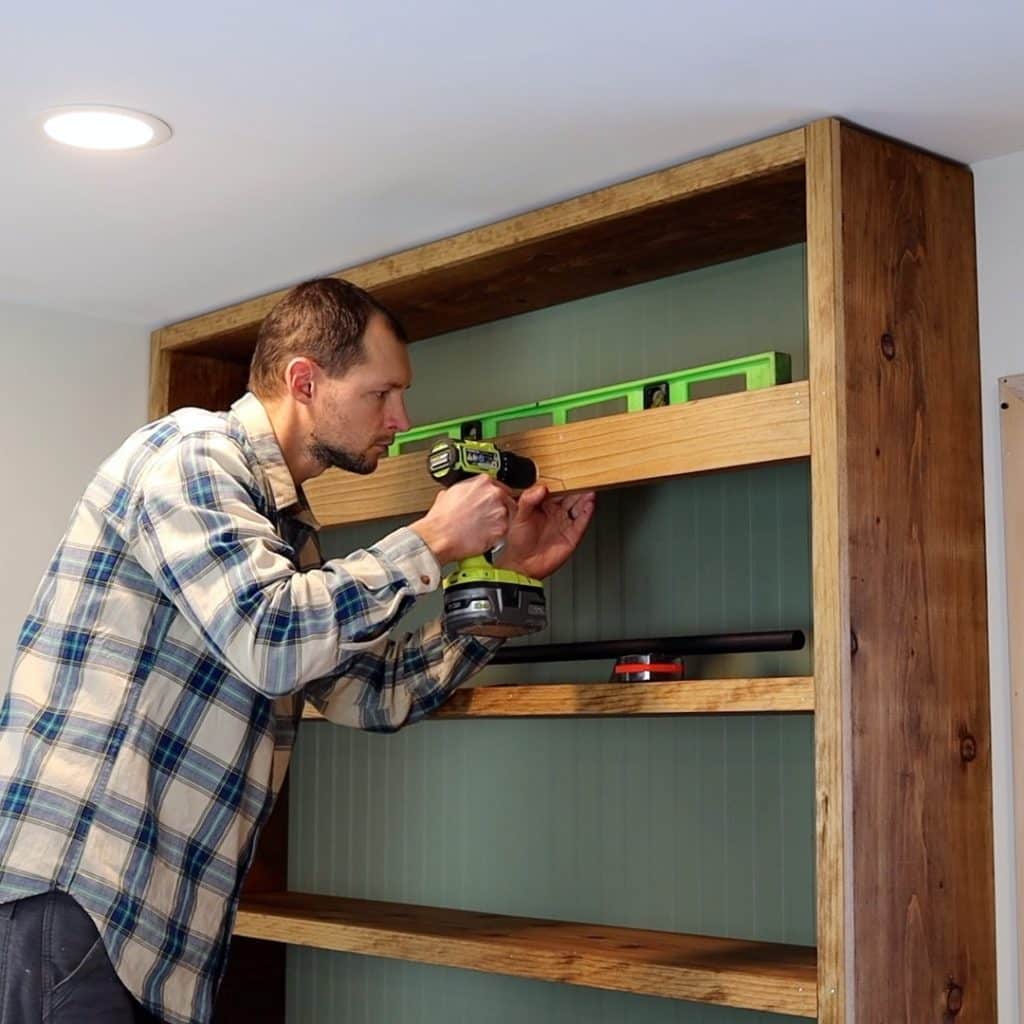
Take the bar down and drill pilot holes at each hole that you marked. Place the rubber gaskets behind the mounting brackets and screw in the track with provided fasteners. I used the longest screws here.
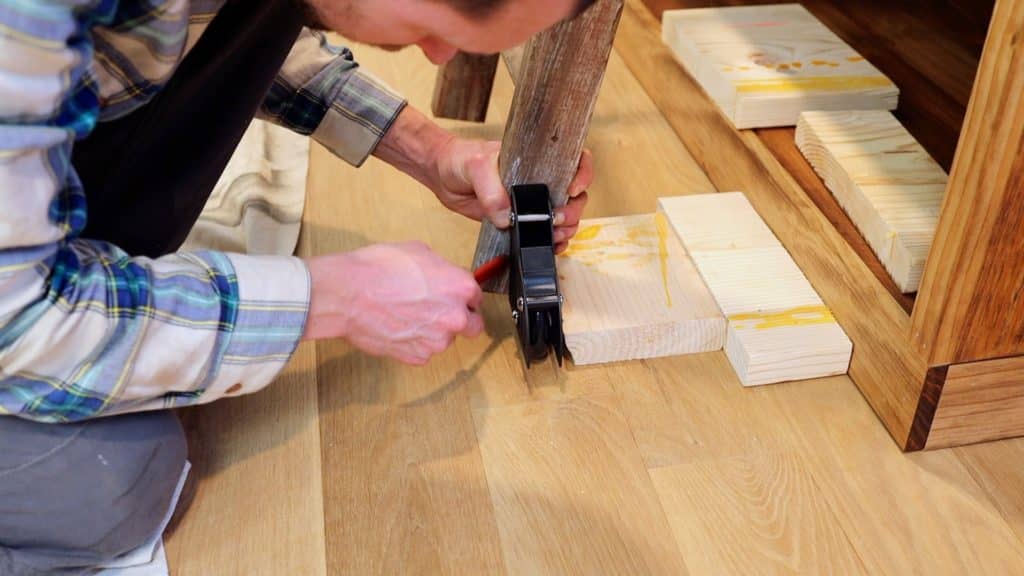
Step 2 – Install top rollers
Slide the rollers onto the track. Hold your ladder in place at your desired position and angle. Mark where the screw holes fall on each side of the ladder.
Take the ladder and rollers down. Drill pilot holes at the marks you made. Place roller back on the ladder and screw it in with provided fasteners.
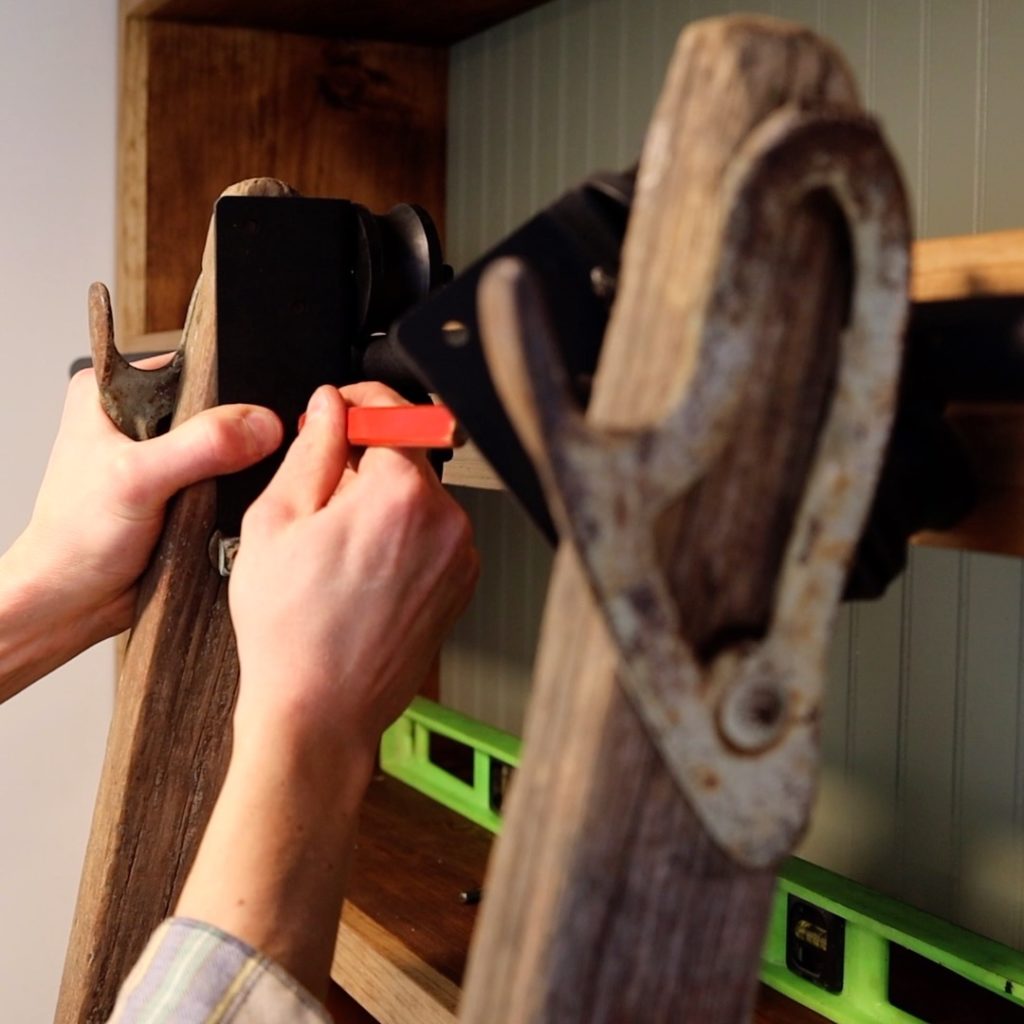
One thing to note is that we installed our rollers on the inside of the rails while the instructions call for them to be installed on the outside. This is because we left the vintage rung locks on the ladder that prevented us from installing them on the outside. This did not seem to impact the performance.
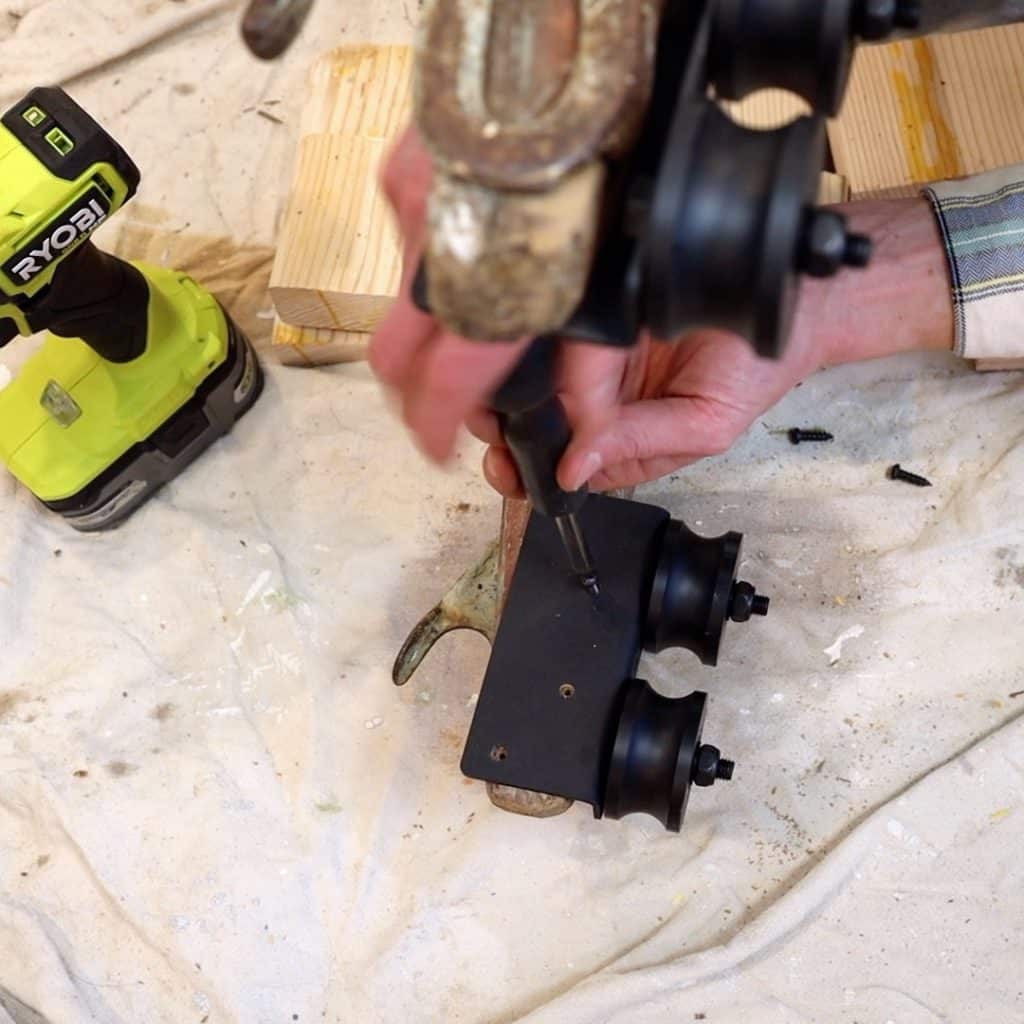
Step 3 – Install bottom wheels
Slide your ladder with installed rollers back onto the track. Hold the ladder at the desired angle. I used blocks of wood to keep the ladder in the same location while positioning the wheels.
Hold wheel in place in desired location on each rail and mark the top hole location. Also trace a line along the side of the wheel bracket since the bottom hole location is not yet accessible. Note, wheels should be perpendicular to the ground.
Next, unscrew and remove the wheel from the bracket with provided allen wrench. Now place the wheel bracket back on the ladder rail in the marked position and mark the bottom screw hole position.
Drill pilot holes and secure the wheel brackets with provided screws.
Replace the wheels in the wheel brackets. Make sure you replace the washers between the wheel and the bracket. This task might require some patience!

Step 4 – Install stops
Slide your ladder back on the track and make sure it rolls as desired.
Then, fit your stops on the top track and secure at the desired location in the vertical position.
And voila! You have yourself a schnazzy new rolling library ladder!
DIY Library Ladder Considerations
Which ladder should I use?
There are prefabricated ladders available that are specifically designed to be library ladders, like this DIYHD library ladder. This will be your easiest route to go. But it might not be the most cost effective or provide the most character for your space.
We wanted something antique and weathered to fit our farmhouse look. If you search for “wooden ladder” on FB Marketplace or Craigslist you’ll find plenty of options. Just wait for the right size, look, and price to pop up. We found ours nearby for $30.

When looking at antique wooden ladders, I came to the conclusion that wooden extension ladders with round rungs were the best fit. Because the rungs are round, they’re flexible to work with any angle your ladder is installed at. They also generally come in long lengths and can be cut to size. A-frame ladders with flat rungs might not be set at the right angle, since library ladders are typically installed at a steeper angle than a typical ladder setup.
Shelf Design
To accommodate the top track, your shelf will need to meet one of two criteria: 1) The vertical supports of the bookshelf need to fall at 2’ apart to fasten the track brackets to, or 2) you need at least a 4” dimensional front face on your shelf to mount the track to.

I designed our shelves with this in mind. The rest of the shelves were trimmed with 1×2’s. But the top shelf that I attached the track to is finished with a 1×4 trim piece to accommodate the track. I also fastened another 1x trim piece behind the 1×4 to fit the longest screws provided.
Track Length
Your top track doesn’t need to span the full width of your shelf. Our shelf was 5’ wide and the 4’ track option fit it perfectly. One, you can always reach beyond where the ladder stops. And two, the bottom wheels stick out a few inches from the ladder. You can adjust the stops wherever needed, but it’s worth mentioning that undersizing the track length a bit will work out just fine.
Make Sure it’s Secure!
Wherever you’re installing your library ladder in—bookshelf, pantry, workshop—make sure your shelving is secured tightly to the wall. I used 3” screws with a finish washer and sunk them into studs just above the shelf that the track was installed on. Use screws versus nails wherever possible to make sure that shelf is solid. This is an area I’d rather over-engineer than skimp on.

How did you build your 2×12 bookshelf?
In case you’re wanting to build something similar for your home, I’ll give a brief overview of what we used to build our shelf and how we built it.
Dimensions
Our shelf was built out of 2×12’s with a 1×2 front face trim. Therefore the single shelves are around 12″ deep and the bottom shelves are around 24″ deep. Using 2×10’s would also work but we like having a little extra space. The bottom shelves are 16″ high to fit our baskets and the top shelves are around 10-1/2″ to 12″ high.
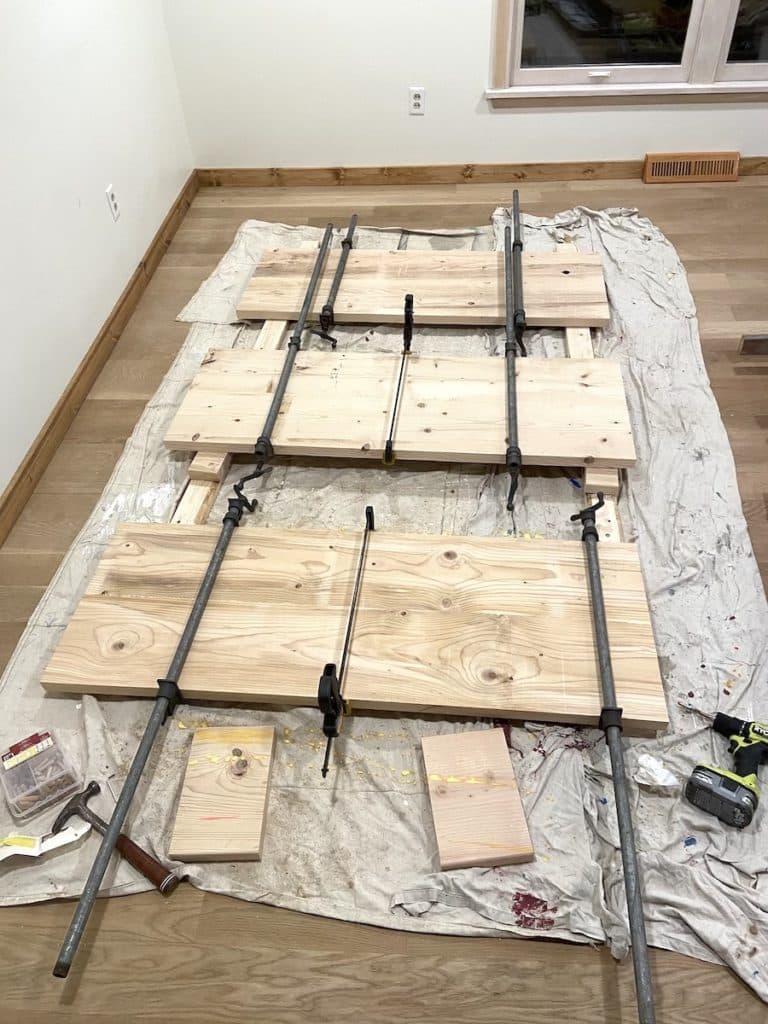
Lumber
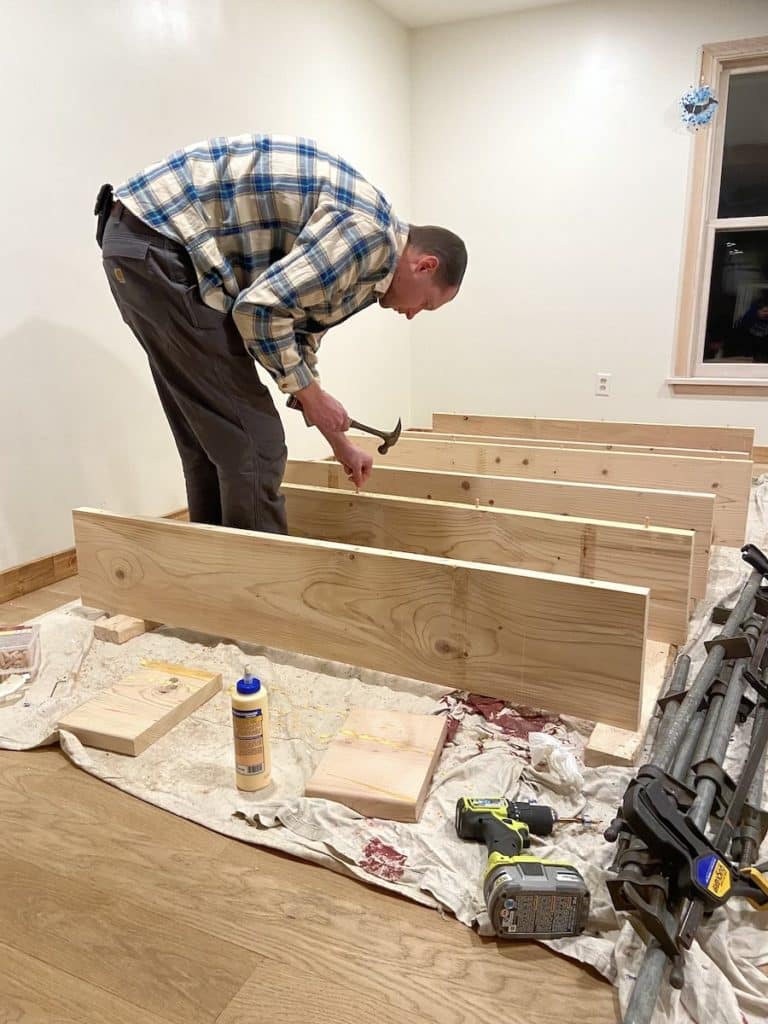
The 2×12’s were construction grade lumber. I had to do quite a bit of digging at Menards to find the straightest ones in good shape. This made for a heavy duty and affordable shelf. I ran all the boards through a table saw first to remove the rounded edge. For the 24″ bottom portion I glued up two boards side-by-side with dowels. since I don’t have a planer, they took a significant amount of time with a belt sander to get them relatively smooth.
The trim was mostly 1×2 trim with the exception of using 1×4 on the shelf where the ladder track mounts to and the base. I did use mid-grade Select lumber so the front face had a nicer finished look.
Backing Board
I try to only use natural building materials, but my one exception on this project was the ready-to-paint 4’x8′ beadboard backing panels I purchased at Menards. I needed something thin and they painted up nice.
Finish
My go-to wood finish option is Tung Oil from RMP Finishes. We have used Tung Oil for so many projects around the house: butcher block countertops, trim, cutting boards. Specifically, I used their Dark Half Tung Oil which has 50/50 mixture of Dark Tung Oil and and Citrus or Pine Solvent. It looks beautiful and is completely natural!
And if you use the promo code – FROMSCRATCH – you can get an additional 10% off your RMP Finishes order!
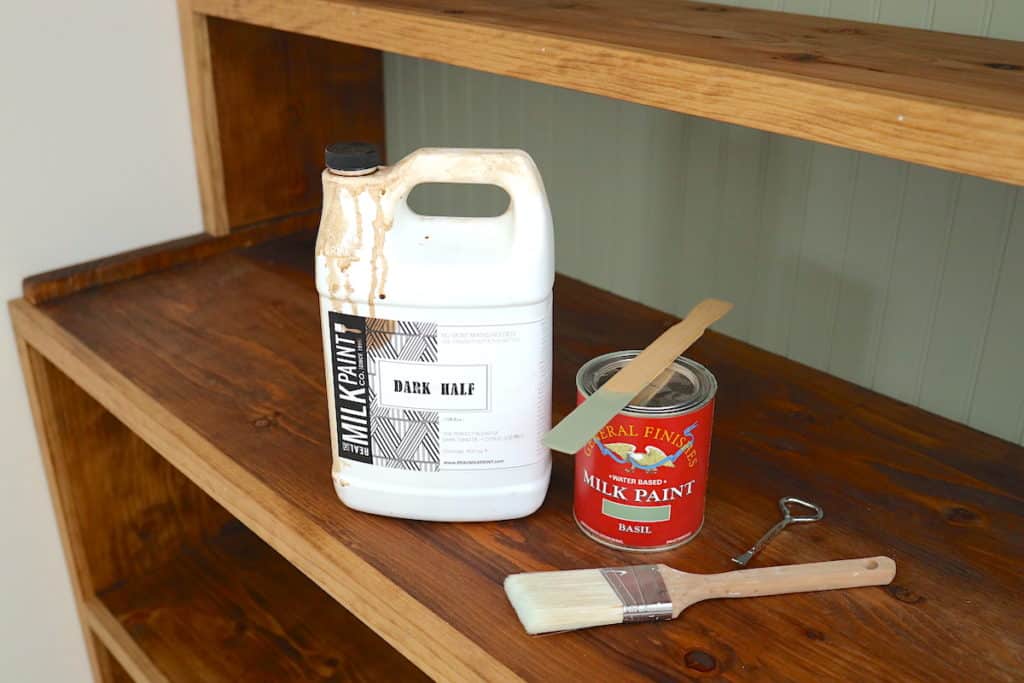
Paint
We had already painted many accents in our home with Milk Paint from General Finishes. So we continued that trend with the backing board on the bookshelf. The color is Basil. We love milk paint! It applies so nicely, gives no fumes or VOCs, touches up extremely well, and is completely safe for your family.
Baskets
And our final finishing touch was buying these rope baskets for toy storage on the bottom. We love them! They’re firm enough to stand straight, yet soft and flexible. And they can hold a lot! Overall we’re very happy with the quality for a really affordable price.
A Fun and Practical Project!
Any time you can incorporate design elements that are both practical and offer a fun and unique aesthetic, I say go for it!
That’s exactly what this DIY rolling library ladder project offers.
Any book is now within reach for all of us on our floor to ceiling shelving. Especially for our kiddos without needing to ask for help! And it allows us to store books we care about a bit higher up so our really little ones don’t constantly destroy them.
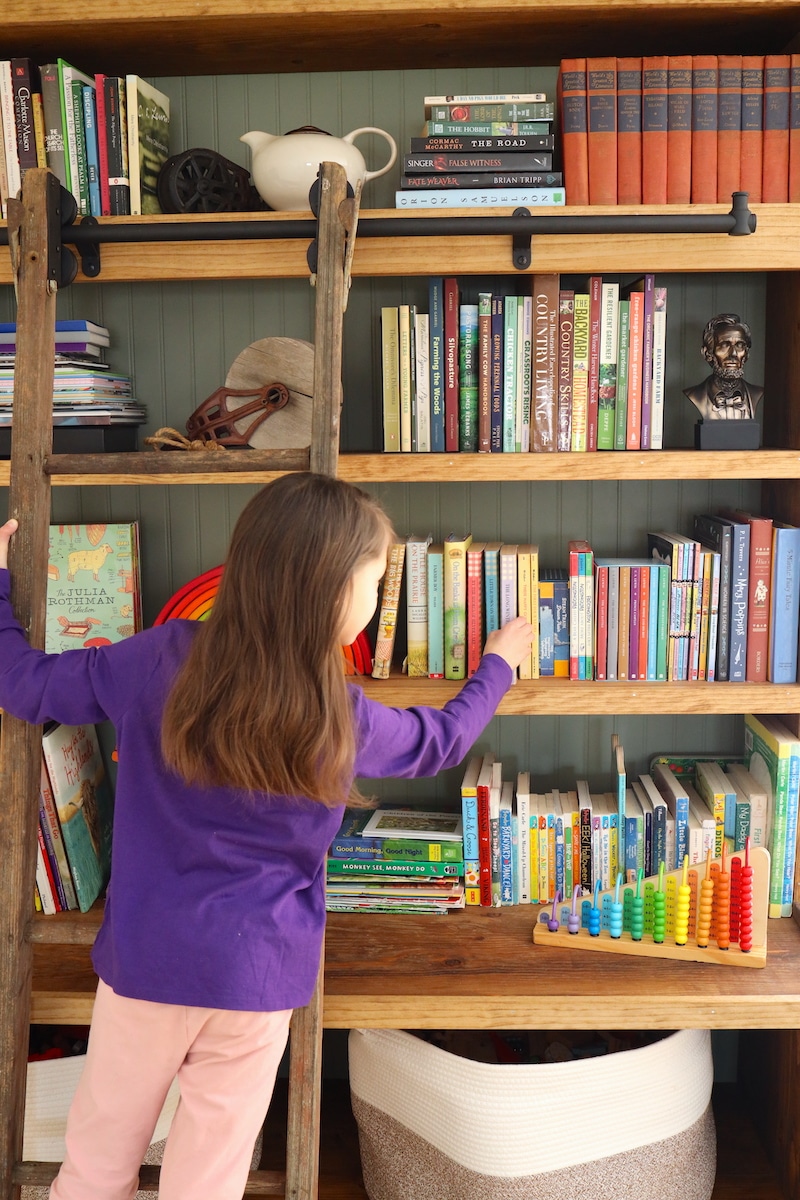
This is a beginner friendly project that you can retrofit onto your existing shelving setup, find new shelves that can easily accommodate it, or design your own custom shelving setup with a library ladder in mind… like we did!
If you decide to go for it too, we hope you love it! And drop us a line with your experience or any questions you have.
Some of the above links are affiliate links. This means we earn a small commission on qualifying purchases at no cost to you. We are so appreciative of your support!
Check out more of our favorite home DIY projects:
- Simple Farmhouse Shelf for Cast Iron Storage
- Wood Soap Finish Floors (Authentic Danish Soap Finish)
- Homemade Dish Soap Bar Recipe – Zero Waste & Works!
Pin it for later!


It turned out so good Joelle!
Thank you!! We are so pleased with it!!