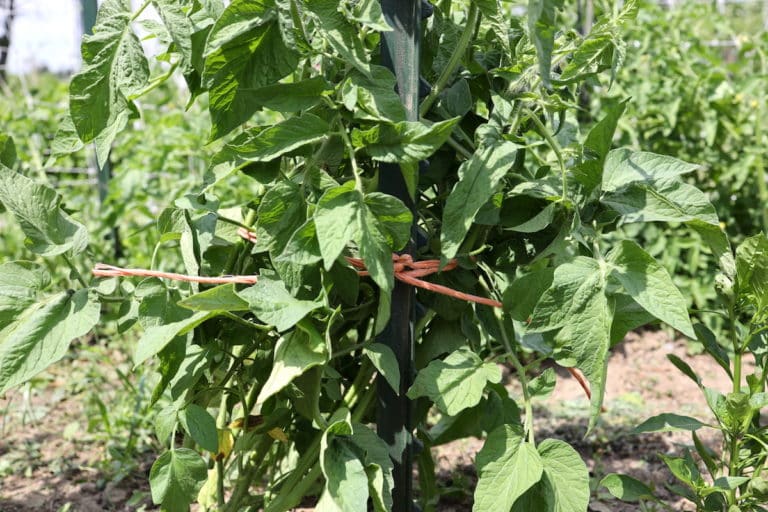
From Scratch Farmstead
  • About
  • Homestead How-to’s
    • Family Milk Cow
    • Gardening
    • Chickens
    • Small Scale Farming
    • Buying A Homestead
    • Homestead Living
  • Nourishing Recipes
    • Home Dairy
    • Food Preservation
    • Breakfast
    • Main Course
    • Sides
    • Dessert
    • Sauces & Condiments
  • Natural Living
    • Skin Care
    • Home Essentials
    • Living On A Budget
    • Our Healing Journey
    • Homestead Skills
    • DIY
    • AGA Stove
Tag:

garden

garden row with drip irrigation installed
GardeningHomestead How-to'sSmall Scale Farming

Drip Depot Review | Best Drip Irrigation Supplies

by From Scratch Farmstead May 27, 2023

We purchased our first drip irrigation system from Drip Depot in 2021 and haven’t looked back! This post covers our full drip depot review along with all the basics of piecing together your own DIY drip irrigation kit for a garden of any scale.

If you’re under the impression that drip irrigation is only for farmers and professionals, then think again!

Yes, it was a bit intimidating at first. But these foolproof irrigation systems are for ANYONE! And any application. 

Drip irrigation is easy, affordable, and the most reliable and efficient watering solution out there.

Let’s dig in!

Our Watering Woes

There’s a section of our barn that closely resembles a sprinkler graveyard. 

Maybe it’s us, but any mechanical sprinkler option we’ve tried just doesn’t last. The ratcheting types. The oscillating type. Overhead ones that mount on t-posts.

Sure they’ll work fine when new and just out of the packaging. But after a month or two of heavy use in the garden they get less and less reliable.

Oh, looks like the sprinkler jammed up again. One half of the garden is soaked while the other is bone dry. 

No problem. Remove the sprinkler, clean it a bit, set it back up. Two days later—jammed again! And the problem persists and gets worse and worse. Sprinklers that rely on mechanical motions—especially if your are on well water—just don’t hold up over time.

homestead vegetable garden

Eventually we just give up and go back to watering by hand. Not a good use of our time.

The year we moved onto our 5 acre homestead something else happened—drought set in.

We just couldn’t keep up with the hand watering anymore; especially after planting long rows of crops in our 1/4 acre self sufficient homestead garden.

We needed a solution fast. That’s when drip irrigation came to mind.

Drip Depot Review – Pros & Cons

That summer I happened to be working for our local farmers market in town. I knew nothing about drip irrigation. But I figured farmers would!

I asked one farmer where they get their drip irrigation supplies—Drip Depot.

Asked another—Drip Depot.

There seems to be a common thread here. So I went to the Drip Depot website.

They call themselves the “DIY Irrigation Superstore.” And that’s exactly what I found. A no-frills site with great prices, everything you need, helpful information, and fantastic customer service.

Drip Depot Review – PROS

Great Prices

The first thing I did after finding Drip Depot was price compare. They’re right on par or even more affordable than any other leading drip irrigation supplier out there. 

Huge Selection

They have everything! Every irrigation application you can imagine, most any brand of irrigation supplies out there—Drip Depot has you covered.

Helpful Information

Their website is a one stop shop for videos, tutorials, calculators, and other tips to make your DIY drip irrigation system a success. 

run of drip tape for irrigation

Fantastic Customer Service

From personal experience and from reading other customer testimonials, the customer support Drip Depot provides is top notch. You don’t need to be a drip irrigation expert. But they are and you’ll receive prompt and helpful support.

Free Shipping

Drip Depot offers free shipping on orders over $49. That can equate to huge savings. And while a basic drip irrigation system isn’t going to break the bank, most orders will have no problem meeting that minimum threshold. 

Drip Depot Review – CONS

No Phone Support Option

Maybe I’m old school, but my preference is still to talk to someone by phone. Drip Depot relies on an email messaging system for their customer support. You’ll get the answers you’re looking for in written form and not over the phone. Honestly, sometimes this can be more helpful since you have something to reference back to with easy links available to find what you’re after.

Website Learning Curve

I find the Drip Depot website a bit cumbersome. It’s all there. You can find whatever information or parts you need. There’s just a lot of it. And sometimes you have to dig through multiple links or pages to find what you’re after. But don’t get overwhelmed or discouraged. Use the search tool, watch some of their videos, reach out to customer support, and you’ll be just fine 🙂

drip tape irrigation system in homestead garden

No One-Stop-Shop Guide

Maybe it exists on the Drip Depot website, but I couldn’t find one singular guide that told me all the drip irrigation parts needed for a basic garden setup. What I did was reference their drip irrigation kits. While no kit exactly matched my needs, it allowed me to use the kit system as a template to know what parts I needed when building my own system. 

That is also a big part of why I’m creating this post—to create that one-stop-shop guide for a basic drip irrigation system.

Why We Love Drip Irrigation on our Small Scale Homestead

Truth be told, gardening is not our forte. But we’re committed to setting up our gardens year-after-year and growing as much food as we can to feed our family.

We previously assumed that drip tape was reserved for the elite. Farmers, market gardeners, greenhouse growers, and the like.

Surely, a drip irrigation system would be overkill for us ragtag, small-scale homestead gardeners? We were wrong!

Drip irrigation offers SO many benefits and you can create a system that meets your needs for ANY size.

Let’s look at some of those benefits.

Benefits of Drip Irrigation

Less Evaporation

When sunlight mixes with tiny droplets of water flying through the air, evaporation happens. Any overhead watering system is just not that efficient. Drip irrigation minimizes evaporation as water is applied directly at soil level where your plants are located.

Less Waste

Most sprinklers cover… well, everything. Weeds, walking paths between garden rows, the side of your garden shed. Drip irrigation is direct watering resulting in very little waste. Water what needs watering and don’t water what doesn’t. 

three sisters garden with irrigation

Less Relocation

Any mechanical sprinkler we’ve used needs to be relocated multiple times each watering session to hit the whole garden. A drip tape system can easily reach every row and area of your garden and it only requires a one-time setup. No moving required!

More Peace of Mind

After your sprinklers start failing, you become constantly paranoid that they’ll jam up again and flood an area of your garden. With drip tape, very little can go wrong. In our 3 years of use. It has run flawlessly without any time spent worrying or troubleshooting.

More Time Back

A hands-off drip irrigation system means you get time back in your world to focus on more important things. With a young family, running a business, and plenty of other things to tend to around our homestead, this set-it-and-forget-it setup has become invaluable to us!

Basic Drip Irrigation Parts for a Home Garden

Drip irrigation systems are not overly complex. But there are a fair amount of parts and fitting needed to make up a complete system.

The following is an overview of those parts and how to choose the right ones for you.

Don’t get overwhelmed. Take it one part at a time. Get some basic measurements of your garden area and you can put together your own kit in no-time!

basic drip irrigation parts for garden
A couple quick notes before we begin:

– All parts I’ve linked to are designed to work with a standard sized garden hose with 3/4” fittings. There are larger and smaller setups available. But for our purposes we’re going to stick with what’s most common for home use.

– These parts are designed to be hand tightened only without the need for thread seal tape. Don’t use tools to tighten. Just snug everything up with your hands and you are good to go.

– Keep in mind the parts we linked to are the ones we chose for our system. There are other options on the website for you to consider. Our criteria is typically to select what’s economical yet still meets minimum standards of quality and performance.

Parts at Your Water Supply

The following parts are needed at your water supply. We have a hydrant in our barn that supplies our drip irrigation system with water. A simple hose bib or spigot also works.

drip irrigation parts at water source
drip irrigation system connected at hydrant

Hose Manifold (optional)

To free up connections for additional hoses at your water supply a Hose Manifold can be used. We typically use all 4 connections on the 4-way manifold pictured. A manifold is optional, but gives you way more flexibility throughout the season.

4 way hose manifold

Automatic Water Timer (optional)

You can certainly use a simple shut off valve to turn your drip tape system on and off manually by hand. But in our experience, an Automatic Water Timer is worth the investment. Basic timers can also be found at most home improvement stores. They allow you to fully customize when, how often, and how long your drip tape runs for. If it rains, skip a day of watering with the push of a button! And you can program it to run during the early morning hours before the sun rises the it’s most efficient. 

automatic water timer for drip irrigation

Regardless, you will need some sort of shut off valve first in your system since most of the following components are not designed to operate under constant pressure.

Backflow Preventer

The Backflow Preventer is the first component after your timer or shutoff valve. It allows water to only flow one way and not feed back into your system. If your backflow prevent appears to leak, don’t worry, this is normal. It will drain out excess pressure and water from the system once the valve closes and water pressure is turned off.

backflow valve for drip irrigation

Filter

Next, a Filter utilizes a mesh screen to remove any particulate or debris from the water that could clog up the emitters in the drip tape. A removable cap on the filter canister allows for easy flushing to clear out the filter without dissembling the setup.

filter from drip depot for drip irrigation system

Pressure Regulator

The last part needed at your water supply is the Pressure Regulator. This creates even pressure and flow rates within your system. Most drip tapes are designed to run at 10 PSI. But you may need to adjust your pressure regulator based on the drip tape you choose. Keep in mind the basic pressure regulator I have linked is designed to work under an average flow rate of water in GPM (gallons per minute). If you have a larger well or water supply, you may need to upgrade your pressure regulator. There is a flow rate calculator on the Drip Depot site that gives you a GPM estimate by timing how long it takes to fill a 5 gallon bucket with water.

pressure regulator for drip irrigation
drip irrigation pressure regulator

Parts at Your Garden

After you hand tighten all the parts at your water supply, simply connect a garden hose up to it and run the hose out to your garden area. In your garden, you’ll need a run of main line tubing running the width of your garden, a run of drip tape at each garden row, and a smattering of fittings to connect everything together.

Tubing

Your garden hose will connect into a mainline tubing that runs perpendicular to your garden rows. We ordered a 100’ roll of 1/2” Polyethylene Tubing. You can measure out the width of your garden and determine the length you need. Tubing can be cut to length with a standard utility knife or scissors.

drip irrigation tubing and fittings from drip depot

Tubing Fittings

A Female Hose Thread Adaptor is needed at the front end of your tubing to allow your harden hose to connect into the tubing. At the end of your tubing, a Tubing End Cap is required. Both are installed by sliding the tubing onto the fitting, and then tightening the fitting clasp over the tubing.

Tubing Punch

We’ll get into drip tape next, but at each run or leg of drip tape, you’ll need to punch a hole in the tubing that your drip tape connects into. This Tubing Punch is needed for that. There are a few different punch sizes depending on your flow rates and needs. But the punch linked is the size for the parts referenced in this post.

Tubing Plugs

Don’t forget to pick up a package of Goof Plugs! These plug up the holes in your tubing in the event you ever need to relocate a run of drip tape.

Drip Tape

Drip Tape is plastic tubing with emitters. The emitters are where water drips out of at a constant, slow trickle when the system is on. Drip tape is most commonly installed along the soil surface, but some have specially designed emitters that allow the drip tape be buried just below the surface. This can actually extend the life of the drip tape since sun exposure is what most rapidly deteriorates the tape material.

drip irrigation roll with 8" emitters from drip depot

If there’s one part of the drip irrigation process that can send your head spinning, selecting your drip tape is it. Not only are there different brands available, but each offer different emitter spacing, emitter flow rates, and tape thicknesses. Drip Depot has produced this drip tape buying guide to help you select the proper drip tape for your application. 

If you’re not sure and just looking for an all around good fit for a variety of things, I selected this Drip Tape. It has 8” emitter spacing, an average emitter flow rate, and a thicker wall so your tape will last as long as possible.

To determine the length of drip tape you need, simply measure the length of your garden rows and multiply that length by the quantity of rows. For instance, if you have 10 rows that are 10’ in length, then a 100’ roll of drip tape is perfect. Even though the rolls come in sizes of 100’, 1,000’, or 10,000’, consider getting a bit more tape than what is immediately needed. Drip tape does not last forever and you may expand your gardening over time, so having some extra on hand can be a good thing.

drip tape takeoff fitting connected to tubing

Drip tape is installed with the emitters facing up and can be cut to length with standard household scissors or a knife. Note that depending on the width of your garden rows and what you have planted, you might also consider running two or more runs of drip tape per row. But for most applications, one line of drip tape per row is sufficient.

Drip Tape Fittings

Just like your tubing, your drip tape runs will have a fitting at each end. At the front end, a Takeoff Fitting connects your drip tape into your tubing. It simply plugs into the hole you’ve punched in your tubing at each garden row. These takeoff fitting come either with or without a shut off valve. If you can afford the extra cost, I recommend the ones with the shutoff valve. This gives you extra control to water or not water certain rows of your garden, which could be helpful throughout the season.

takeoff fittings and end cap fittings for drip tape
takeoff valves for drip irrigation system

At the end of each run of drip tape, an End Cap Fitting is needed. Both the takeoff and end cap fittings attach by sliding the drip tape onto the fitting, then tightening the clasp over the drip tape.

Tube Stakes

Both the tubing and drip tape need to be secured down with stakes. These stakes comes in either 6” or 8” lengths. I like to install them every 5 to 10 feet. Since the system is low pressure, things don’t move around too much. But you’ll definitely want to pick up enough stakes to make sure everything stays in place and you’re not creating trip hazards in your garden.

stakes for drip irrigation system

And those are the basic components of a drip tape irrigation system! The beauty is that once you have it all setup, it’s easy to replicate year after year in your garden space.

Drip Irrigation Frequently Asked Questions

Who is drip irrigation for?

We firmly believe that drip irrigation is for everyone! Even if you are just starting out as a gardener, a simple drip irrigation system can really simplify your watering world. And the components can adapt and be reconfigured as your garden layout changes over time. Make the investment upfront and avoid the hassle and inefficiency of other watering options.

How much does a drip irrigation system cost?

Our system with 1,000’ of drip tape, 100’ of tubing, and all the other basic components needed cost about $200 a few years ago. Prices have risen a bit since then, but not much. We already had an automatic watering timer, garden hoses, and a hose manifold. Of course, your cost will depend on your gardening setup. It’s possible to get a very basic system for a small garden for $100 or less. 

watering potatoes with drip irrigation

Are there drip irrigation kits?

Yes! Drip Depot offers a wide array of Drip Irrigation Kits to fit many different applications. These include kits for: container gardening, greenhouses, hanging baskets, landscaping, raised beds, row crops, small farms, trees, vegetable gardens, vineyards, window boxes, and more. The pre-bundled kits offer great value and highlight how versatile drip irrigation systems can be!

How long will a drip irrigation system last?

While most components on a drip irrigation system will last for years or decades, the drip tape itself can be the one exception. Drip tape, due to its constant sun exposure, tends to become brittle and crack over time. The longevity of drip tape is also dependent on the wall thickness you purchase. Thicker walls will last longer; thinner walls will have a shorter lifespan. Some replace their drip tape every year to avoid the cracking. We are on year 3 of using ours. There are some cracks, but the tape still works fine for our purposes. And locating the cracks and covering over them with heavy duty tape is always an option.

roll of 5/8" drip tape from drip depot

My garden is already planted!… Can I still install drip irrigation?

Yes! You can install a drip irrigation system at ANY point throughout the growing season. In fact, we’ve only ever installed them after our gardens are planted. This allows you to plant all your seeds or seedlings without the drip tape in your way. We’d recommend trying to get your system in before plants are too mature, for ease of laying down the tape without too much foliage in the way. But no time is too late for drip irrigation and then you’ll have it for future years!

What if I have multiple garden spaces or raised beds?

As you can see from some of the kits, like the Raised Bed Kits, drip irrigation can be very customizable. There are tons of fittings that allow you to split off your system into as many areas or zones as needed. The drip tape itself is designed to run in straight lines only. But with fittings that allow for bends you can configure your drip tape into almost any shape.

Garden On, Friends!

So go check out the Drip Depot website and see the possibilities for yourself!

Have fun customizing your very own drip irrigation system and see the stress of watering throughout the growing season disappear.

fresh organic garden basil

And while I’ve intended for this post to be somewhat of a plug-and-play template for a basic garden setup, you should still do your research and make sure you are buying the right parts for your application. 

If have questions you can check out their Customer Support or Contact Us pages, or feel free to ask us below! We can’t guarantee we have all the answers, but we’re happy to share more about our experience using drip irrigation and Drip Depot!

Happy gardening!

Some of the above links are affiliate links. This means we earn a small commission on qualifying purchases at no cost to you. We are so appreciative of your support!

May 27, 2023 0 comment
0 FacebookTwitterPinterestEmail
how to store potatoes from garden
Food PreservationGardeningHomestead How-to'sNourishing Recipes

How To Store Potatoes From The Garden Long Term

by From Scratch Farmstead November 10, 2022

Few foods store better than homegrown potatoes. With the proper storage steps and conditions that is! We’ll break down how to store potatoes from the garden and the best tips and methods to keep them firm and fresh for months.

Growing and Preserving Potatoes for the Whole Year

When our family moved to our 5 acre homestead we were determined to learn what it meant to truly live off the land and feed our family year round from what we produced on our own or could find locally.

Potatoes have been a main contributor. In fact, we grow around 1,000 lbs. of potatoes each year in our 1/4 self sufficient homestead garden.

And they have required relatively minimal effort for us to grow them. While it may not be optimal, we plant a couple roughly 150′ rows of potatoes in the spring, don’t weed them much or mound them, and harvest plenty in the fall to feed our growing family.

My how we love potatoes! They are delicious and versatile in the kitchen, a great source of energy and nutrition, and truly allow for year round eating.

So let’s dig into potato storage methods.

Where to Store Potatoes from the Garden Without a Root Cellar

Garden potatoes will stay firm and fresh for up to 8 months when stored properly. Potatoes store best in a cool, dark, and dry space that stays around 45-50°F. If kept above 60°F for more than 2 weeks, or when exposed to too much sunlight, they will begin to sprout.

adirondack blue potatoes from the garden

If you have a root cellar, then you’re in business! This underground storage space has the ideal temperature and humidity levels to keep your potatoes fresh for the long haul.

But many don’t have one – us included! Here’s some other options of where to store your potatoes:

Basement

An unheated basement can be a great option for storing potatoes. We store ours on storage shelves in our basement and have been able to keep potatoes into the late spring or early summer months. And no need to worry about high humidity. Potatoes are composed of a high percentage of water and higher humidity levels will help keep them from shriveling.

potato storage racks covered with beed sheets
Sheets draped around shelves of potatoes to keep them dark
long term potato storage system in basement
Our basement potato storage system

Crawlspace

While less ideal than a basement, a crawl space can also provide the cool environment needed to keep potatoes fresh for months. Keep it dark and cool and your crawlspace can keep your spuds fresh for months.

Garage

In many areas a basement or crawlspace isn’t practical or feasible. In these instances, depending on your climate, a garage can also provide the right conditions for potato storage. Just remember, you don’t want your potatoes to get above 60°F or to freeze. Since a garage can have less stable temperatures, you’ll want to monitor your potatoes more closely when stored in the garage.

Other Options

Working with what you have is the most simple solution, even when it’s not the most ideal. We’ve had great success using our basement for potato storage, and have heard from others that have long term storage success in the crawlspace or garage. If none of those are an option, you may need to look into building a cold storage area or DIY root cellar.

Storage Container Options for Potatoes

When it comes to what you store your spuds in, potatoes are not picky. The most important thing is that they can breathe. So plastic bags won’t work. Here are some options:

Crates

Milk crates or even wooden crates can be common to come by and provide a sturdy and breathable container for potato storage. I haven’t tried this yet, but rumor has it that you can track down free crates galore at Costco!

Food Storage Bins

Plastic food storage bins are the ideal container for harvesting, transporting, and storing any produce from the garden, including potatoes. They are durable, stack well, and are plenty open on the sides to allow potatoes to breathe. Keep an eye out on Facebook marketplace or Craigslist for grocery stores, restaurants, or food distributors looking to unload their stock. Or, talk to your local veggie farmer about where they find them. These foldable storage bins are also a great option and stowaway conveniently when not in use.

bins of potatoes on storage racks

Cardboard Boxes

Sturdy cardboard boxes also meet all the potato storage qualifications. They’ll provide a dry and dark storage space but the main thing to look out for is breathability. You’ll want to poke holes or cut openings in the box to allow for ventilation.

Brown Paper Bags

In her book The Resilient Gardener, Carol Deppe swears by brown paper bags for storing potatoes. We have used this method with great results. Large brown paper bags from the grocery store can be easy to come by. Even when closed on top, they tend to breathe well. But you may still want to poke some holes in the bags to allow for airflow.

Best Potato Varieties for Long Term Storage

Look for potatoes that are late-maturing varieties with thick skins for optimal long term storage. White and yellow potatoes will store better than red or purple potatoes. 

Our favorite storage potato is the Elba. This late season white potato has a very thick skin and stores beautifully. We have been able to continue eating them through June of the following year. Even though they’ve softened some by that point, they’re still fine for mashed potatoes where the texture doesn’t matter as much.

storing poatoes long term in basement
Labeling potatoes can help identify them months later

We grow other potato varieties – Carola, Magic Molly, Adirondack Blue, and Red Endeavor – that are not as well suited for storage, but still will keep well into the winter. We start harvesting and eating these varieties first and harvest the Elba potatoes last for longer term storage.

Harvesting and Curing Potatoes for Long Term Storage

Potato storage begins at harvest. Some important steps and precautions should be taken well before you tuck those taters away to maximize their storage.

Don’t wash them!

Rule number one of potato storage is to not wash them. Knock off as much soil as you can while harvesting, but unwashed potatoes will store WAY longer than washed potatoes will. You can just wash as needed for use throughout the winter months.

Wait until they dieback

Once the potato plants’ foliage on top dies back and shrivels, the plant will shift its energy toward growing those tubers underground and start thickening up their skin. We tend to wait at least a couple weeks after dieback occurs so mother nature has plenty of time to naturally prepare those spuds for storage.

Don’t wait too long

One, you don’t want them to freeze. Take advantage of those nice fall days and bring in that potato haul. The closer you get to winter the more you’ll deal with the chance of snowfall or your potatoes freezing, which could ruin their storability. And two, you might also run into more pest pressure taking their share of your prized potatoes the closer you get to winter.

bins of carola potatoes from the garden

Try not to damage them

When harvesting by hand, a knick from a pitchfork or shovel could ruin their chance for storage. Always start wide when harvesting around your potato plants. Tubers can sometimes sprawl far from the above ground plant. There’s nothing worse than the crunch of a pitchfork piercing an otherwise perfect potato!

Ditch the green ones

Potatoes that are too close to the surface (or exposed to too much light in storage) will turn green and bitter due to the buildup of a chemical called solanine. When consumed it can be toxic. If only the skin of the potato has turned green or has minor green inside, the green part can be cut off and the rest of the potato can be consumed. If a large portion is green, add it to the compost pile.

Sort the good and the blemished

The best suited potatoes for storage are ones that are fully intact without any bites or blemishes. We tend to harvest with 2 separate bins. One bin is for the perfect potatoes that we’ll keep for long term storage. The second we call our “blemish” bin that collects potatoes with any sort of marks or abrasions. These are still perfectly fine to eat, so we’ll eat through the blemish bin first and keep the unblemished beauties to eat later or save for seed.

Allow them to cure

Curing potatoes is the process of allowing their skins to thicken and any imperfections to heal before tucking them away for long term storage. Similar to curing squash, lay your potatoes out in a single layer on racks, shelves, or tables so that they are not touching each other and have plenty of airflow. Temperatures should be a bit higher during curing; around 60-65°F. They’ll cure in this fashion after 7-10 days and can be moved to crates, bins, boxes, or bags for long term storage afterward. 

Other Potato Storage Tips

Once your potatoes are in storage, you have a wonderful crop of high energy and delicious food at your disposal to last you until next growing season! But there are some considerations to best preserve your potatoes and make sure they taste great!

Make sure it’s dark

Storage potatoes and light don’t get along. Light can both cause a toxic chemical response from your potatoes as described above or cause them to sprout prematurely. To prevent this, create a light barrier. We drape sheets over our storage shelves to keep light away but still allow for airflow.

covering storage potatoes with bed sheets

Keep them separate

Apples and other fresh fruits release gases that will cause your potatoes to sprout and spoil more quickly. Onions are especially dangerous – onions and potatoes each emit gasses that will cause the other to have a decreased shelf life. So find a spot where those potatoes can live in solitude and be separate from those items.

Check them regularly

One bad potato can ruin the whole batch if not caught in time. It’s best to check your potatoes at least once a month, if not more frequently, to make sure none have gone rotten. If any have, remove the rotten potatoes and any others around it that have been compromised.

Label your varieties

If you are growing more than one variety of potato, label them! We grow 5 different varieties. While we might be able to easily recall their placement now, after a few months you’re likely to forget. Especially if they’ve shriveled a bit and don’t look the same. A piece of masking tape on their storage container and a permanent marker does the trick.

potato storage bins in basement

Remove the sprouts

A potatoes goal is to survive and replenish itself. Sprouting, or growing eyes, is the start of that process. Removing the sprouts can help keep a potato from dehydrating to remain fresh longer.

Let them recondition before eating

Potatoes in storage change their physical makeup by converting their starch into sugar. Removing potatoes from storage 4-7 days prior to eating will reverse this process and restore their full flavor.

Create Your Own Grocery Store

We’ve been amazed in this homesteading journey that we now rarely need to make trips to the grocery store – even during the winter. We have our own ‘grocery store’ right in our basement!

Wherever you are at, potatoes are one of the best ways to move toward a more resilient and self sufficient life.


For more information on how we feed our family all year round, check out these posts:

Beginners Guide To Self Sufficient Homesteading

How To Create A Quarter Acre Self Sufficient Homestead Garden

Urban Homesteading | 25 Ways To Begin Today

Some of the above links are affiliate links. This means we earn a small commission on qualifying purchases at no cost to you. We are so appreciative of your support!

November 10, 2022 0 comment
2 FacebookTwitterPinterestEmail

About Us

About Us

So Glad You're Here!

Hi! We are Jim and Joelle. We love sharing homestead how-to’s, from scratch recipes, and natural do-it-yourself projects to help you nourish your family. To learn about our story, click the image above!

Stay Up-To-Date

Popular Posts

  • How Many Cows Per Acre On A Small Farm

    May 26, 2022
  • Chicken Tractor Plans for 25 Chickens

    May 1, 2022
  • Easy Farmhouse Cheddar Hard Cheese Recipe

    July 17, 2022
  • Predator Proof Chicken Coop Essentials You Need To Know

    February 11, 2023
  • How To Make Quick and Natural Mozzarella Cheese with Vinegar

    August 7, 2022

Follow Along!

  • Email
  • Facebook
  • Instagram
  • YouTube

Instagram

  • Facebook
  • Instagram
  • Youtube
  • Email
  • About
  • Privacy Policy

© 2021-2023 From Scratch Farmstead | As an Amazon Associate we earn from qualifying purchases.


Back To Top
From Scratch Farmstead
  • About
  • Homestead How-to’s
    • Family Milk Cow
    • Gardening
    • Chickens
    • Small Scale Farming
    • Buying A Homestead
    • Homestead Living
  • Nourishing Recipes
    • Home Dairy
    • Food Preservation
    • Breakfast
    • Main Course
    • Sides
    • Dessert
    • Sauces & Condiments
  • Natural Living
    • Skin Care
    • Home Essentials
    • Living On A Budget
    • Our Healing Journey
    • Homestead Skills
    • DIY
    • AGA Stove