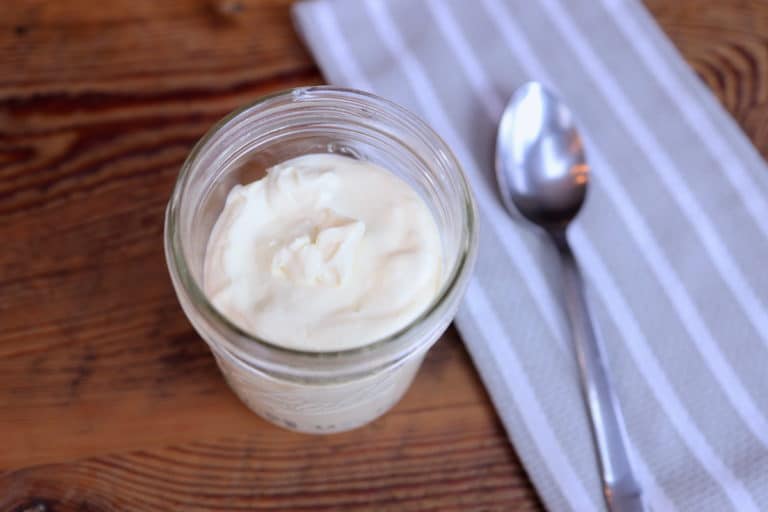
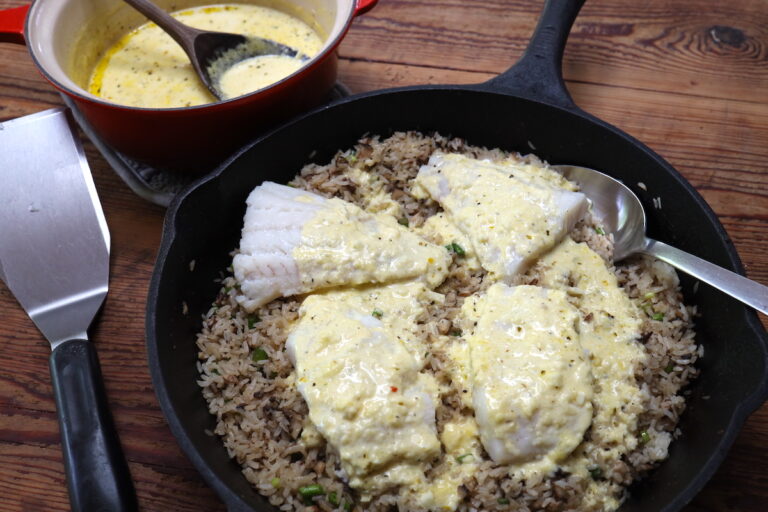
From Scratch Farmstead
  • About
  • Homestead How-to’s
    • Family Milk Cow
    • Gardening
    • Chickens
    • Small Scale Farming
    • Buying A Homestead
    • Homestead Living
  • Nourishing Recipes
    • Breakfast
    • Main Course
    • Sides
    • Dessert
    • Sauces & Condiments
    • Home Dairy
  • Natural Living
Tag:

home dairy

how to make natural mozzarella cheese with vinegar
Home DairyNourishing Recipes

How To Make Quick and Natural Mozzarella Cheese with Vinegar

by From Scratch Farmstead August 7, 2022

Looking for a quick, natural, and authentic mozzarella cheese recipe to try at home? This is the one! We share how to make mozzarella cheese with vinegar (or lemon juice) after years of perfecting our techniques and learning how to source the freshest and most natural ingredients!

Jump To Recipe

Making Natural Mozzarella Cheese at Home

Mozzarella cheese requires few ingredients and little equipment, making it the perfect cheese for the beginning cheesemaker.

In fact, this is exactly where we began our cheesemaking journey almost a decade ago. We started purchasing raw milk from a local farm and the vast new galaxy of home dairy creations left us mesmerized. 

Yogurt, ice cream, pudding, butter, and yes, CHEESE – all things we had to try!

For whatever reason though, cheese seemed like the most intimidating of all of those. But we figured a basic mozzarella recipe seemed like the right place to start. 

homemade mozzarella cheese with vinegar

So, we searched the internet, looked for a recipe that didn’t involve modern gadgets like microwaves or other unnatural seeming ingredients, and were so thrilled in the end to have made something that looked even remotely close to a smooth, fresh ball of mozzarella!

We’ve come a long way since then and have our own fresh dairy source now from our family milk cow. Below is our tried-and-true method of how to make mozzarella cheese with vinegar.

Can I use vinegar instead of citric acid for mozzarella?

Yes! In fact, we recommend it. In all our recipes we are committed to sourcing the best and most natural ingredients for true from scratch cooking with the tastiest results.

First, it’s important to know why we acidify the milk to make mozzarella. When a curd is formed out of acidic milk and then heated to above 110°, that curd releases its calcium. Calcium gives cheese its firmness and shape. So, without the calcium, the cheese is free to stretch giving it the plasticity that melted mozzarella is known for.

how to make natural mozzarella cheese ingredients

We started making mozzarella using citric acid, which is what most recipes call for. But after reading David Asher’s book, The Art of Natural Cheesemaking, we have since switched to using vinegar to acidify the milk – and with great results!

To quote Asher:

“Most cheesemaking guidebooks suggest using citric acid, a common food additive, to achieve the ideal acidity for making fast mozzarella. The addition of this ingredient, seemingly harmless, raises two concerns. First, it makes a mozzarella that’s almost completely tasteless – the citric acid adds no flavor to the cheese, which itself has only a very slight milky flavor. Second, citric acid is often a genetically modified ingredient. Using this GM ingredient, just like using GM rennet, in turn makes a cheese genetically modified.”

Our rationale with sourcing any ingredients is typically asking what would have been used to make this recipe 100+ years ago. What would cheesemakers in our area have used before citric acid was even around? The answer – vinegar! And specifically, apple cider vinegar which we’ll talk more about.

Sourcing Ingredients for the Most Natural Mozzarella

Milk

Using the freshest and least processed milk you can find will result in the best mozzarella cheese. You can use store bought milk, but be sure to find milk that’s not ultra-pasteurized. Your best bet with any cheesemaking is to find a local dairy farmer or homesteader in your community to get raw milk from. Or, if you’re interested in having a family milk cow for your own source of fresh dairy, we have several posts here that can get you going!

hand milking family milk cow

Vinegar (or Lemon Juice)

Apple cider vinegar, balsamic vinegar, and standard white vinegar will all work for acidifying milk to make mozzarella. This recipe is based on using apple cider vinegar, which we prefer both for taste and the fact we always have it on hand in the kitchen. To gain the most health benefits, we choose organic, raw, unfiltered apple cider vinegar that comes “with the mother.” Keep in mind you may need to play with the ratios slightly if using other forms of vinegar. Fresh squeezed lemon juice is also a great alternative.

Rennet

Rennet contains the enzyme present in the fourth stomach of a calf (or other ruminants) that naturally coagulates milk to set it into a firm curd. Coagulated milk is easier to digest making nutrients more bioavailable. We use WalcoRen tablets. They offer a pure and natural form of animal rennet that we’ve found to be well suited for home cheesemaking. Many liquid rennet options are plant based and can contain genetically modified ingredients and other preservatives.

Salt

There are special cheesemaking salts but any granulated salt will work. We recommend an unprocessed sea salt option and use Redmond Real Sea Salt as our salt of choice.

Quick and Natural Mozzarella Cheese Recipe

Yield:

About 4 medium-sized mozzarella balls.

Equipment:

  • Stock pot
  • Medium Sauce Pan
  • Colander
  • Large bowl x2
  • Wooden spoon
  • Long-bladed knife
  • Curd spoon or large slotted spoon
  • Thermometer
  • Small liquid measuring cup
  • Large liquid measuring cup
  • Gloves
equipment used for making quick mozzarella cheese

Ingredients:

  • 1 gallon fresh, good milk
  • ½ cup vinegar*
  • Rennet**
  • 2-3 tsp salt
  • unchlorinated water
natural mozzarella cheese ingredients

*This recipe is based on using apple cider vinegar. See note above on alternative vinegar options in the section on Sourcing Ingredients. If using fresh squeezed lemon juice, also use ½ cup per gallon of milk.

**Use recommended dose or slightly above recommended dose. For mozzarella, I have had good results using a slightly higher ratio than what is listed on the packaging.

Directions:

Step 1

Pour cold milk into stock pot. Make sure your milk is COLD to start! Adding acidity directly to milk that is too warm will run the risk of curdling it.

freshly cut authentic mozzarella cheese
Step 2

Dilute vinegar (or lemon juice) in 2 cups of unchlorinated water. Pour into the cold milk and stir in briskly for a minute to acidify milk.

Step 3

Warm the acidic milk slowly to 90° F on a low-med stovetop. Stir regularly and be sure to not heat milk too quickly to prevent curdling.

Step 4

While milk is warming, dissolve rennet into ¼ cup unchlorinated water. I use about ¼ cup unchlorinated water per gallon of milk. Break up tablets as needed and stir until fully dissolved into water.

Step 5

Once acidic milk has reached 90°, remove from heat and pour in dissolved rennet. Stir immediately and thoroughly for 1 minute. Then place cover on stock pot and let sit undisturbed until a clean break is achieved – approximately 15-30 minutes. Apply low heat as needed or wrap pot in towels to maintain 90°.

Step 6

While waiting for a clean break, 1) fill large bowl about ½ full with cold water and stir in 2-3 tsp of salt until dissolved – then place in fridge to chill, and 2) fill a medium sauce pan about 2/3 full with warm water.

Step 7

After you have a clean break, slice the formed curd into ¾ – 1 inch cubes using a long-bladed knife. Slice top to bottom and left to right vertically, and also do your best to slice horizontally in ¾ – 1 inch increments. Any large curd chunks missed with the knife can be made smaller during stirring.

cutting mozzarella curd after clean break
Step 8

Stir the cubed curd with a wooden spoon for about 15 minutes. The curd will release its whey during this time and you’ll observe the edges of the curd going from sharp to rounded. Once the curd has the consistency of a poached egg, you are ready to move on.

Step 9

Scoop the curd into waiting colander atop a large bowl to catch the whey. If the holes of your colander are too large, you might consider lining it with a cheesecloth to hold the curd.

Optional – Pull curd toward center of colander with curd spoon to remove excess whey. Perform this technique around the outside of the curd keeping curd intact.

Let curd rest in colander for 15-30 minutes until curd is knit together.

removing excess whey from curd making mozzarella
Step 10

While waiting, heat hot water bath in saucepan to 160-180°.

Step 11

Once you have one solid curd, cut into thick slices that will be used to form your balls of mozzarella cheese. Place a couple slices of curd into 160-180° hot water bath. Wait 3-5 minutes.

Step 12

After waiting attempt a “stretch test” by removing a slice of curd from the hot water bath and pulling it apart slowly. The cheese should stretch freely. If it does not, place back in hot water bath for another minute or so and try again.

performing strech test on mozzarella cheese
Step 13

Remove one slice of cheese at a time from the hot water bath shaping it into a mozzarella ball. Similar to kneading bread, work the ball with your hands tucking it back within itself establishing layers throughout the cheese. Work each ball for a short period of time, form ball into final shape, and place in waiting cold water bath with salty brine.

just formed mozzarella cheese ball
Step 14

Repeat steps 11-13 until all your curd is turned into fresh mozzarella balls.

Step 15

Place cold water bath back in fridge for a couple hours to continue to chill down mozzarella. Then remove mozzarella from cold water bath and store in container.

cold water bath chilling down mozzarella cheese balls

Frequently Asked Questions When Making Mozzarella Cheese

Why isn’t my curd stretching easily?

You might find that no matter how many stretch tests you perform, your curd seems to break apart rather than stretch. This unfortunately means your acidity level was off for this batch of mozzarella. You can continue with the rest of the steps and still come out with delicious balls of mozzarella cheese in the end. But they might not be smooth and pretty due to their lack of plasticity. You can dial in the amount of acidity you add over time as ratios can vary based on the type of vinegar and milk you are using.

What is the best way to store my mozzarella cheese?

Your cheese will store fresh for 1-2 weeks in the fridge. Some whey or liquid may continue to drain out of the mozzarella – pour this out of the container regularly for longest storage. We’ve also found that mozzarella freezes very well to preserve longer. Simply flash freeze the fresh mozzarella balls on a cookie sheet, then transfer to a Ziplock bag in the freezer. Remove cheese as needed a day or two before using to thaw.

quick and natural mozzarella cheese recipe

Do I need to wear gloves to make mozzarella?

Technically, no. If you keep your hot water bath around 150 deg. you will likely be able to shape your cheese without the use of gloves. However, I have had best results when working with a hot water bath between 160-180°. At these temps, your hands will be quite uncomfortable without the use of gloves.

Bon Appetit!

For a truly authentic mozzarella experience, you can always skip the fridge and enjoy fresh sliced mozzarella while still a touch warm. Otherwise, there is no wrong way to enjoy this cheese. We use it on so many dishes, but especially our Deep Dish Sourdough Cast Iron Pizza!

Have other questions? Drop them in the comments below or let us know how your cheese turned out. We’d love to hear from you!


And don’t be intimidated to give hard cheese a try! Our farmhouse cheddar recipe is as basic as it gets. No fancy equipment required. Ingredients you have on hand. And the most simple of aging processes. Check out our Easy Farmhouse Cheddar Recipe!

Some of the above links are affiliate links. This means we earn a small commission on qualifying purchases at no cost to you. We are so appreciative of your support!

easy farmhouse cheddar hard cheese recipe

Easy Farmhouse Cheddar Hard Cheese Recipe

July 17, 2022

how to make natural mozzarella cheese with vinegar

How To Make Quick and Natural Mozzarella Cheese with Vinegar

Yield: About 4 medium-sized mozzarella balls

Looking for a quick, natural, and authentic mozzarella cheese recipe to try at home? This is the one! We share how to make mozzarella cheese with vinegar (or lemon juice) after years of perfecting our techniques and learning how to source the freshest and most natural ingredients!

Ingredients

  • 1 gallon fresh, good milk
  • ½ cup vinegar*
  • Rennet**
  • 2-3 tsp salt
  • unchlorinated water

Instructions

  1. Pour cold milk into stock pot. Make sure your milk is COLD to start! Adding acidity directly to milk that is too warm will run the risk of curdling it.
  2. Dilute vinegar (or lemon juice) in 2 cups of unchlorinated water. Pour into the cold milk and stir in briskly for a minute to acidify milk.
  3. Warm the acidic milk slowly to 90° F on a low-med stovetop. Stir regularly and be sure to not heat milk too quickly to prevent curdling.
  4. While milk is warming, dissolve rennet into ¼ cup unchlorinated water. I use about ¼ cup unchlorinated water per gallon of milk. Break up tablets as needed and stir until fully dissolved into water.
  5. Once acidic milk has reached 90°, remove from heat and pour in dissolved rennet. Stir immediately and thoroughly for 1 minute. Then place cover on stock pot and let sit undisturbed until a clean break is achieved – approximately 15-30 minutes. Apply low heat as needed or wrap pot in towels to maintain 90°.
  6. While waiting for a clean break, 1) fill large bowl about ½ full with cold water and stir in 2-3 tsp of salt until dissolved – then place in fridge to chill, and 2) fill a medium sauce pan about 2/3 full with warm water.
  7. After you have a clean break, slice the formed curd into ¾ - 1 inch cubes using a long-bladed knife. Slice top to bottom and left to right vertically, and also do your best to slice horizontally in ¾ - 1 inch increments. Any large curd chunks missed with the knife can be made smaller during stirring.
  8. Stir the cubed curd with a wooden spoon for about 15 minutes. The curd will release its whey during this time and you’ll observe the edges of the curd going from sharp to rounded. Once the curd has the consistency of a poached egg, you are ready to move on.
  9. Scoop the curd into waiting colander atop a large bowl to catch the whey. If the holes of your colander are too large, you might consider lining it with a cheesecloth to hold the curd. Optional - Pull curd toward center of colander with curd spoon to remove excess whey. Perform this technique around the outside of the curd keeping curd intact. Let curd rest in colander for 15-30 minutes until curd is knit together.
  10. While waiting, heat hot water bath in saucepan to 160-180°.
  11. Once you have one solid curd, cut into thick slices that will be used to form your balls of mozzarella cheese. Place a couple slices of curd into 160-180° hot water bath. Wait 3-5 minutes.
  12. After waiting attempt a “stretch test” by removing a slice of curd from the hot water bath and pulling it apart slowly. The cheese should stretch freely. If it does not, place back in hot water bath for another minute or so and try again.
  13. Remove one slice of cheese at a time from the hot water bath shaping it into a mozzarella ball. Similar to kneading bread, work the ball with your hands tucking it back within itself establishing layers throughout the cheese. Work each ball for a short period of time, form ball into final shape, and place in waiting cold water bath with salty brine.
  14. Repeat steps 11-13 until all your curd is turned into fresh mozzarella balls.
  15. Place cold water bath back in fridge for a couple hours to continue to chill down mozzarella. Then remove mozzarella from cold water bath and store in container.

Notes

*This recipe is based on using apple cider vinegar. See note above on alternative vinegar options in the section on Sourcing Ingredients. If using fresh squeezed lemon juice, also use ½ cup per gallon of milk.

**Use recommended dose or slightly above recommended dose. For mozzarella, I have had good results using a slightly higher ratio than what is listed on the packaging.

Equipment:

  • Stock pot
  • Medium Sauce Pan
  • Colander
  • Large bowl x2
  • Wooden spoon
  • Long-bladed knife
  • Curd spoon or large slotted spoon
  • Thermometer
  • Small liquid measuring cup
  • Large liquid measuring cup
  • Gloves

© From Scratch Farmstead
August 7, 2022 0 comment
0 FacebookTwitterPinterestEmail
easy farmhouse cheddar hard cheese recipe
Home DairyNourishing Recipes

Easy Farmhouse Cheddar Hard Cheese Recipe

by From Scratch Farmstead July 17, 2022

Making hard cheese at home does not need to be intimidating. In fact, you might have everything you need on hand already! This yogurt-cultured farmhouse cheddar recipe is a tasty and versatile hard cheese that you’ll come back to time and time again.

Jump To Recipe

Make Your Own Cheddar Cheese at Home!

Our family started in cheesemaking several years ago. Our real food journey led us to source the highest quality, locally produced farm goods – including milk!

Living in the suburbs at the time, raw milk was a luxury. But we’d go out of our way to buy it and enjoyed making homemade mozzarella occasionally.

Then we got a family milk cow on our homestead and milk was no longer in short supply! Cheesemaking became a weekly activity and venturing into the world of hard cheeses was inevitable. 

milking cow by hand in a field

But where to start? All the recipes I came across involved special cultures, expensive cheese presses, long aging times and techniques, and unnatural seeming ingredients.

At the time we were living in the middle of Amish country, and these simple and resourceful people gave us the inspiration we needed!

Farmhouse, or farmstead, cheddar originated with the Amish. I was thrilled to find, 1) it only needed a basic starter culture like yogurt or kefir, 2) I was actually able to rig up an easy homemade cheese press with items I already had in the kitchen, and 3) this cheese has a very short and uncomplicated aging process.

Natural Cheesemaking

I can’t talk about cheesemaking without mentioning David Asher and his book, The Art of Natural Cheesemaking. Every cheesemaker needs this book on their shelf!

book on the art of natural cheesemaking

Modern cheesemaking techniques have strayed far from their traditional forms. Cheddar is a perfect example. In fact, the bright orange coloring of cheddar we are used to seeing is a byproduct of industrial farming practices and the addition of annatto: A coloring agent used to cover up the vitamin deficiencies of non-pastured cows milk. 

Asher explains,

“Cows make colorful cheese when they feed on fresh green grass. Carotene, an essential vitamin as well as pigment in grass, colors the milk and the cheeses of pastured cows. But confined cows do not get their daily dose of carotene in their hay, haylage, or grains, and their milk shows its vitamin deficiencies when made into cheese: A cheddar made with pastured cows’ milk has a beautifully creamy color because of its carotene content; cheese made with milk from confined cattle is unnaturally white.”

While this farmhouse cheddar recipe is not found in Ashers book, his philosophies and techniques have influenced how I view the cheesemaking process and the type of natural cheese I want to make to feed and nourish my family.

How To Use Farmhouse Cheddar

Farmhouse cheddar has a mildly sharp taste. It’s texture is hard, but it will melt when shredded or sliced thin and is still smooth and creamy enough to enjoy fresh.

sliced farmhouse cheddar cheese

We use this cheese for about everything! You can dice it to top a creamy soup, savory porridge, or even a fresh salad. Thin slices go perfectly on any sandwich, or better yet, melted on a grilled cheese or toasted sandwich. And our absolute favorite is combining it with our homemade mozzarella on our deep-dish sourdough cast iron pizza!

This cheese also grates well and has hints of a parmesan. Farmhouse cheddar is truly versatile!

best deep dish cast iron pizza

DEEP DISH SOURDOUGH CAST IRON PIZZA

April 21, 2022

How Long Does It Take to Make Farmhouse Cheddar?

Traditional cheddar ages between 6 months to 1 year. This farmhouse cheddar recipe is ready in 3-5 weeks.

The cheese itself is made in just a couple hours. Then it undergoes a drying process for a few days. Once dried, the outside of the cheese is coated in butter to form a rind and preserve the cheese for aging.

aged farmhouse cheddar cheese

We age ours for about 4 weeks. The longer the cheese ages, the sharper the taste will get. The rind will also continue to dry out and get harder the longer you wait. We’ve found 4 weeks of aging to typically be the right amount.

Sourcing Ingredients

Both from David Ashers book and from experience, we’ve learned a lot about how to source the highest quality and most natural cheesemaking ingredients.

Milk

Cheesemaking pairs best with fresh milk that is as close to its natural form as possible. Finding raw milk from a local farm with cows raised on pasture is your best bet. Or, looking for milk that is not ultra-pasteurized and/or non-homogenized is an alternative. The beauty of this farmhouse cheddar recipe is that the milk never gets above 90° F. This preserves the native bacteria inside raw milk making a truly raw cheese.

fresh cows milk for making cheese at home

Yogurt/Kefir

Any plain yogurt or plain Greek yogurt will work to culture this farmhouse cheddar recipe. For best results, look for options without added thickeners or artificial ingredients. Culturing with kefir also works. Kefir will actually contain a higher quantity of the bacteria needed to culture your cheese.

Rennet

Rennet contains the enzyme from the fourth stomach of a calf that naturally coagulates milk to set it into a firm curd. Coagulated milk is easier to digest making nutrients more bioavailable. Nearly all cheesemaking requires rennet. We use WalcoRen tablets. They offer a pure and natural form of dried chymosin (enzyme from calf stomachs) with minimal additives. Many liquid rennet options are plant based and can contain genetically modified ingredients and other preservatives.

farmhouse cheddar cheese ingredients

Butter

Farmhouse cheddar ages with a thorough coating of butter. Raw milk butter will age best with the cheese. Lard can also be used to coat your cheese. If your sourcing of butter or lard is questionable, you may want to scrape off or cut off the rind once the cheese is aged before you eat it. We use homemade butter with milk from our cow and don’t remove the rind.

Salt

There are special cheesemaking salts that are more course. But any granulated salt will work. We recommend an unprocessed sea salt option and use Redmond Real Sea Salt as our salt of choice.

Do I need to buy cheesemaking equipment?

As I was thrilled to find out, you may not need to buy anything to make this farmhouse cheddar recipe! If you have a large stock pot, wooden spoon, slotted spoon, food thermometer, colander, strainer, drying rack, cookie sheet, and some other basic kitchen items, you likely have what you need!

Here are some equipment considerations:

Cheese Press

If you have a cheese press – great! If not, they can range from $50 up to hundreds of dollars to purchase. I don’t own a cheese press and have been making this cheese for years without one. We have a stainless-steel colander that came with our stock pot. I found a pot we had lying around that fits snuggly within that colander that acts as a follower. To apply weight, I simply add three (kombucha) filled quart sized mason jars to the follower pot. As more weight is needed, I stack heavy books on top of that. There are many ways to rig up a homemade cheese press and this system has worked perfectly so far!

simple homemade cheese press

Cheese Cave

Because of the low aging time of this cheese, your aging conditions are very forgiving. Typically, cheeses are aged in a cheese cave that maintains a temperature of 50° with high humidity. However, a cool basement will work for farmhouse cheddar, or even just a spot on your countertop. We have found it easy to forget about your cheese in the basement and have had fine results on the countertop. Aging in your fridge is also an option.

Thermometer

Any kitchen thermometer should work – especially considering that traditionally cheesemakers just used their finger to gauge temperatures! However, we did purchase this thermometer that works very well with cheesemaking.

farmstead cheddar cheese equipment

Curd Spoon

For years I used a standard large slotted spoon to scoop curd out of the pot. It works! But recently I did upgrade to this curd spoon which, I’ll admit, makes the process go much smoother and quicker!

Cheese Cloth

Picking up some cheese cloth is helpful for squeezing or straining out some whey from your curd. Butter muslin also works, or even a smooth thin cotton towel.

Farmhouse Cheddar Recipe

Equipment:

  • Stock pot
  • Cheese press*
  • Long handled wooden spoon
  • Long-bladed knife
  • Curd spoon or large slotted spoon
  • Thermometer
  • 1 cup liquid measuring cup
  • Strainer
  • Large bowl
  • Drying rack
  • Stock pot larger than the pot your milk will be in (or double boiler)
  • Cookie sheet
  • Cheesecloth for pressing
  • Smooth thin cotton towel for lining press
  • Cloth napkin to cover aging cheese

*If you don’t have a cheese press, see note earlier in post about making your own with common kitchen items.

Ingredients:

  • 2.5 gallons fresh, good milk*
  • 1/3 cup plain yogurt or active kefir**
  • Rennet (use dose that corresponds with milk quantity)
  • 2-3 Tbsp salt
  • 1/2-3/4 cup unchlorinated water
  • 3-5 Tbsp butter or lard

*The minimum amount of milk you will want to use is 2 gallons. Our stock pot fits 2.5 gallons, hence the 2.5 gallons for the recipe. Anywhere from 2-5+ gallons, depending on your equipment capacity, is great.

**Use around 1/8–1/4 cup active culture (yogurt or kefir) per gallon of milk used.

homemade aged farmhouse cheddar

Directions:

This recipe is broken down into many simple steps. Don’t be intimidated! Take it one step at a time.

Step 1

Pour milk into stock pot and place on medium heat stove top. Heat milk slowly to 90° F stirring often. 

Step 2

As milk is heating, dilute 1/3 cup yogurt or kefir with a couple tablespoons of fresh milk (I just use the milk that settles at the bottom of the milk jugs). Stir.

Step 3

Once milk has reached 90°, remove milk from stovetop. Pour in diluted yogurt or kefir. Stir immediately for about a minute. Place cover on stock pot and let milk sit undisturbed for 10 minutes to culture.

Step 4

Add rennet to unchlorinated water in a liquid measuring cup. I generally use about a ¼ cup of water per gallon of milk. Make sure tablets are fully dissolved.

rennet tablets being disolved in water
Step 5

Create a double boiler system to keep your milk at 90°. I do not have a double boiler and use a second larger stock pot filled about ¼-1/3 with 90-100° tap water. Once milk is cultured, place that stock pot inside the larger pot so the pot with the cultured milk is mostly surrounded by water.

Step 6

Pour in rennet and water. Stir quickly for about a minute. Place cover back on stock pot and let milk sit undisturbed for 20-40 minutes, or until a clean break* is achieved.

homemade double boiler for cheesemaking
Step 7

Once you have a clean break, slice the formed curd into roughly 1-inch cubes using a long-bladed knife. Slice top to bottom and left to right vertically, and also do your best to slice horizontally in 1-inch increments. Any large curd chunks missed can be made smaller during stirring.

Step 8

Stir the cubed curd for 15-20 minutes with a wooden spoon to release the whey. If large curd chunks that missed being cut are observed, break them into smaller pieces with your spoon. The curd cubes will go from having sharp edges to rounded edges. Once the curd is roughly the consistency of a poached egg, the curd is ready.

Step 9

Scoop a baseball sized portion of curd into a waiting strainer lined with cheesecloth. Be sure your strainer is sitting on top of a large bowl to catch the whey. Gather up the cheese cloth and gently squeeze the curd to drain some whey. This step is just to remove some excess whey; the cheese press will remove any remaining whey. Place ball of curd into waiting cheese press (or colander if using my cheese press method mentioned above) lined with smooth thin cloth. Place cheese press on top of a cookie sheet to collect whey.

scooping curd into strainer to strain whey
straining curd to go into cheese press
Step 10

After 2-3 balls of curd are added to your press, sprinkle about a tablespoon of salt on top of your curd. Work salt into the curd with your hand. Repeat this step along the way until all your curd is in the press and salt is thoroughly distributed throughout.

Step 11

Add follower to cheese press. Apply just enough weight to your press to see steady drips of whey flowing below. Let sit in press for 12 hours increasing weight gently to remove whey. Your cookie sheet collecting whey may need to be emptied during this process.

homemade cheese press using colander

Step 12

After 12 hours, remove cheese from press, flip it, and reinsert into press. Apply weight again to gently remove whey and let sit another 12 hours.

Step 13

Remove cheese from press. Place on drying rack and cover fully with cloth napkin. Allow cheese to dry out for 3-5 days flipping a few times daily.

Note: As cheese dries, it may form mold on the surface. This is normal. Wash down moldy spots with apple cider vinegar.

Step 14

After the outside of the cheese dries or mold has formed (clean as noted above), coat the cheese thoroughly in butter (or lard). Room temperature butter works best. Place buttered cheese back on drying rack and cover with cloth napkin.

spreading butter on wheel of cheese
Step 15

Put cheese away to age for 3-4 weeks, flipping once a day.**

*If you are new to cheesemaking, like I was, the term “clean break” won’t make sense. Essentially, this is just the home cheesemakers method knowing if the curd has set. To check for a clean break, simply insert your finger into the top of the curd 1-2” at a 45 degree angle. Lift your finger out, pulling on the curd. If the curd breaks clean and there is minimal or no curd remnants on your finger, then you have a clean break. If the curd is not yet separated, or fully separated, wait 5-10 more minutes then try again.

**Should cheese form moldy spot while aging, spot clean the moldy area with apple cider vinegar and reapply butter (or lard) coating.

A Note on How To Use Whey and Why

Whey is the natural byproduct of cheesemaking. Milk contains curd plus whey; making cheese separates the two. Whey is a nutrient rich food that contains protein along with vitamins and minerals.

Because of this, don’t just discard your whey! Pouring it down the drain is a missed opportunity to use this amazing food.

scooping curd while making cheddar at home

Here are some ways we use leftover whey:

  • As a stock for soups, stews, or porridge.
  • To cook things like rice, beans, and oats in.
  • As a water replacement in breadmaking or baking.
  • Pour in garden or landscape areas for fertilizer.
  • Feed to animals like pigs or chickens. (Dogs or cats will appreciate it too – just in small quantities to not upset their stomach!)

Best Hard Cheese Recipe for Beginners

In my opinion, this is the best hard cheese recipe out there for the beginning cheesemaker.

The steps and techniques are remarkably forgiving and entry level. Over time you’ll dial in the process to end up with just the right flavor and consistency for your liking. And, regardless of how your cheese ends up looking, your family and friends will be blown away that you made your own hard cheese at home.

Enjoy this farmhouse cheddar recipe and drop us a comment if you have any questions!

Some of the above links are affiliate links. This means we earn a small commission on qualifying purchases at no cost to you. We are so appreciative of your support! 


Looking for more home dairy recipes?

  • HOW TO MAKE BUTTER FROM RAW MILK IN A BLENDER
  • HOMEMADE DULCE DE LECHE WITHOUT SWEETENED CONDENSED MILK
  • THE BEST VANILLA RAW MILK ICE CREAM
  • HOW TO MAKE CROCK POT YOGURT
easy farmhouse cheddar hard cheese recipe

EASY FARMHOUSE CHEDDAR HARD CHEESE RECIPE

Yield: Approx. 2 lbs. of cheese

Making hard cheese at home does not need to be intimidating. In fact, you might have everything you need on hand already! This yogurt-cultured farmhouse cheddar recipe is a tasty and versatile hard cheese that you’ll come back to time and time again.

Ingredients

  • 2.5 gallons fresh, good milk*
  • 1/3 cup plain yogurt or active kefir**
  • Rennet (use dose that corresponds with milk quantity)
  • 2-3 Tbsp salt
  • 1/2-3/4 cup unchlorinated water
  • 3-5 Tbsp butter or lard

Instructions

    1. Pour milk into stock pot and place on medium heat stove top. Heat milk slowly to 90° F stirring often.
    2. As milk is heating, dilute 1/3 cup yogurt or kefir with a couple tablespoons of fresh milk (I just use the milk that settles at the bottom of the milk jugs). Stir.
    3. Once milk has reached 90°, remove milk from stovetop. Pour in diluted yogurt or kefir. Stir immediately for about a minute. Place cover on stock pot and let milk sit undisturbed for 10 minutes to culture.
    4. Add rennet to unchlorinated water in a liquid measuring cup. I generally use about a ¼ cup of water per gallon of milk. Make sure tablets are fully dissolved.
    5. Create a double boiler system to keep your milk at 90°. I do not have a double boiler and use a second larger stock pot filled about ¼-1/3 with 90-100° tap water. Once milk is cultured, place that stock pot inside the larger pot so the pot with the cultured milk is mostly surrounded by water.
    6. Pour in rennet and water. Stir quickly for about a minute. Place cover back on stock pot and let milk sit undisturbed for 20-40 minutes, or until a clean break* is achieved.
    7. Once you have a clean break, slice the formed curd into roughly 1-inch cubes using a long-bladed knife. Slice top to bottom and left to right vertically, and also do your best to slice horizontally in 1-inch increments. Any large curd chunks missed can be made smaller during stirring.
    8. Stir the cubed curd for 15-20 minutes with a wooden spoon to release the whey. If large curd chunks that missed being cut are observed, break them into smaller pieces with your spoon. The curd cubes will go from having sharp edges to rounded edges. Once the curd is roughly the consistency of a poached egg, the curd is ready.
    9. Scoop a baseball sized portion of curd into a waiting strainer lined with cheesecloth. Be sure your strainer is sitting on top of a large bowl to catch the whey. Gather up the cheese cloth and gently squeeze the curd to drain some whey. This step is just to remove some excess whey; the cheese press will remove any remaining whey. Place ball of curd into waiting cheese press (or colander if using my cheese press method mentioned above) lined with smooth thin cloth. Place cheese press on top of a cookie sheet to collect whey.
    10. After 2-3 balls of curd are added to your press, sprinkle about a tablespoon of salt on top of your curd. Work salt into the curd with your hand. Repeat this step along the way until all your curd is in the press and salt is thoroughly distributed throughout.
    11. Add follower to cheese press. Apply just enough weight to your press to see steady drips of whey flowing below. Let sit in press for 12 hours increasing weight gently to remove whey. Your cookie sheet collecting whey may need to be emptied during this process.
    12. After 12 hours, remove cheese from press, flip it, and reinsert into press. Apply weight again to gently remove whey and let sit another 12 hours.
    13. Remove cheese from press. Place on drying rack and cover fully with cloth napkin. Allow cheese to dry out for 3-5 days flipping a few times daily.

      Note: As cheese dries, it may form mold on the surface. This is normal. Wash down moldy spots with apple cider vinegar.
    14. After the outside of the cheese dries or mold has formed (clean as noted above), coat the cheese thoroughly in butter (or lard). Room temperature butter works best. Place buttered cheese back on drying rack and cover with cloth napkin.
    15. Put cheese away to age for 3-4 weeks, flipping once a day.**

Notes

*If you are new to cheesemaking, like I was, the term “clean break” won’t make sense. Essentially, this is just the home cheesemakers method knowing if the curd has set. To check for a clean break, simply insert your finger into the top of the curd 1-2” at a 45 degree angle. Lift your finger out, pulling on the curd. If the curd breaks clean and there is minimal or no curd remnants on your finger, then you have a clean break. If the curd is not yet separated, or fully separated, wait 5-10 more minutes then try again.

**Should cheese form moldy spot while aging, spot clean the moldy area with apple cider vinegar and reapply butter (or lard) coating.

© From Scratch Farmstead
July 17, 2022 0 comment
1 FacebookTwitterPinterestEmail

About Us

About Us

So Glad You're Here!

Hi! We are Jim and Joelle. We love sharing homestead how-to’s, from scratch recipes, and natural do-it-yourself projects to help you nourish your family. To learn about our story, click the image above!

Stay Up-To-Date

Popular Posts

  • Chicken Tractor Plans for 25 Chickens

    May 1, 2022
  • How Eating Liver Changed My Life

    March 31, 2022
  • Why a 5 Acre Homestead is the Perfect Size for a Beginner

    March 20, 2022
  • Cornish Cross vs. Freedom Ranger Chickens

    February 27, 2022
  • Deep Dish Sourdough Cast Iron Pizza

    April 21, 2022

Follow Along!

  • Email
  • Facebook
  • Instagram
  • YouTube

Instagram

  • Facebook
  • Instagram
  • Youtube
  • Email

As an Amazon Associate we earn from qualifying purchases.


Back To Top
From Scratch Farmstead
  • About
  • Homestead How-to’s
    • Family Milk Cow
    • Gardening
    • Chickens
    • Small Scale Farming
    • Buying A Homestead
    • Homestead Living
  • Nourishing Recipes
    • Breakfast
    • Main Course
    • Sides
    • Dessert
    • Sauces & Condiments
    • Home Dairy
  • Natural Living