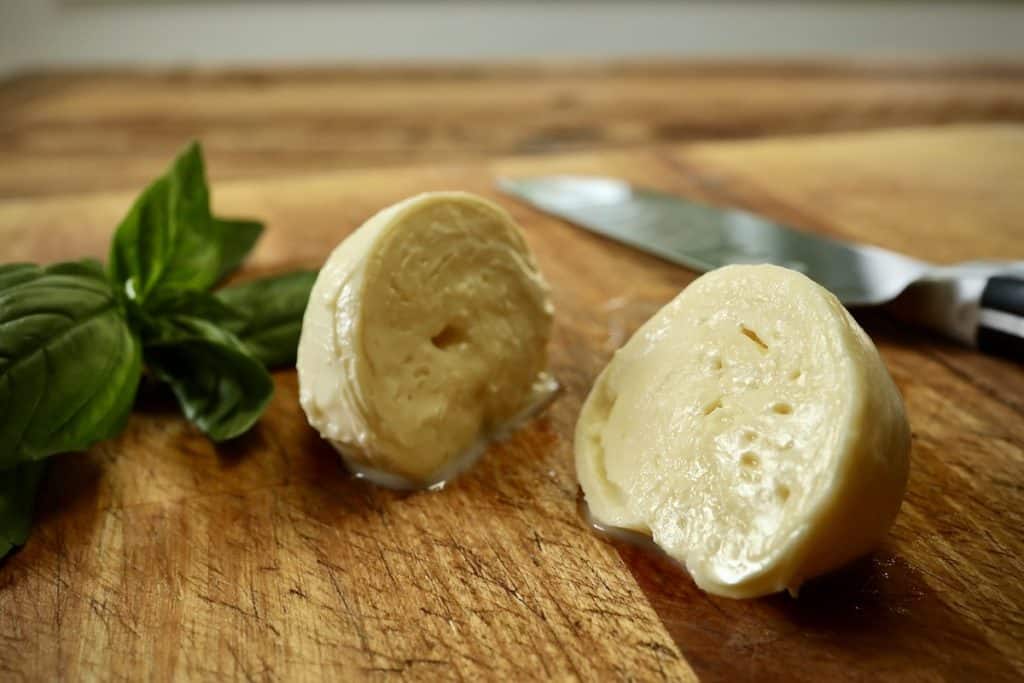
How To Make Quick and Natural Mozzarella Cheese with Vinegar
Looking for a quick, natural, and authentic mozzarella cheese recipe to try at home? This is the one! We share how to make mozzarella cheese with vinegar (or lemon juice) after years of perfecting our techniques and learning how to source the freshest and most natural ingredients!
Making Natural Mozzarella Cheese at Home
Mozzarella cheese requires few ingredients and little equipment, making it the perfect cheese for the beginning cheesemaker.
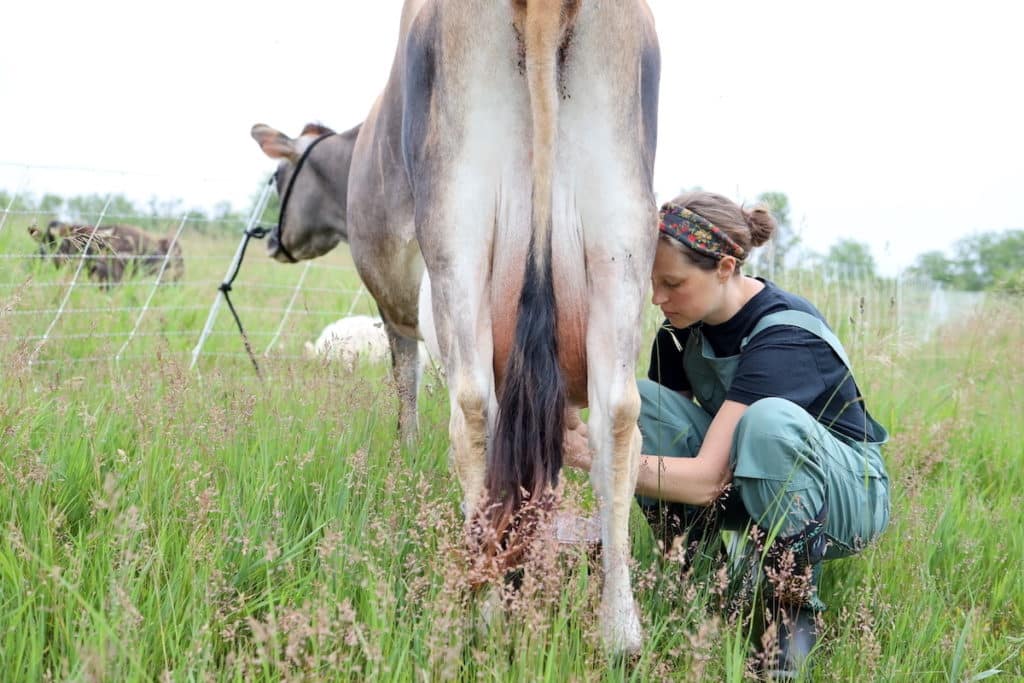
In fact, this is exactly where we began our cheesemaking journey almost a decade ago. We started purchasing raw milk from a local farm and the vast new galaxy of home dairy creations left us mesmerized.
Yogurt, ice cream, pudding, butter, and yes, CHEESE – all things we had to try!
For whatever reason though, cheese seemed like the most intimidating of all of those. But we figured a basic mozzarella recipe seemed like the right place to start.

So, we searched the internet, looked for a recipe that didn’t involve modern gadgets like microwaves or other unnatural-seeming ingredients, and were so thrilled in the end to have made something that looked even remotely close to a smooth, fresh ball of mozzarella!
We’ve come a long way since then and have our own fresh dairy source now from our family milk cow. Below is our tried-and-true method of how to make mozzarella cheese with vinegar.
Can I use vinegar instead of citric acid for mozzarella?
Yes! In fact, we recommend it. In all our recipes we are committed to sourcing the best and most natural ingredients for true from scratch cooking with the tastiest results.
First, it’s important to know why we acidify the milk to make mozzarella. When a curd is formed out of acidic milk and then heated to above 110°, that curd releases its calcium. Calcium gives the cheese its firmness and shape. So, without the calcium, the cheese is free to stretch giving it the plasticity that melted mozzarella is known for.
We started making mozzarella using citric acid, which is what most recipes call for. But after reading David Asher’s book, The Art of Natural Cheesemaking, we have since switched to using vinegar to acidify the milk – and with great results!
To quote Asher:
“Most cheesemaking guidebooks suggest using citric acid, a common food additive, to achieve the ideal acidity for making fast mozzarella. The addition of this ingredient, seemingly harmless, raises two concerns. First, it makes a mozzarella that’s almost completely tasteless – the citric acid adds no flavor to the cheese, which itself has only a very slight milky flavor. Second, citric acid is often a genetically modified ingredient. Using this GM ingredient, just like using GM rennet, in turn makes a cheese genetically modified.”
Our rationale for sourcing any ingredients is typically asking what would have been used to make this recipe 100+ years ago. What would cheesemakers in our area have used before citric acid was even around? The answer – vinegar! And specifically, apple cider vinegar which we’ll talk more about.
Sourcing Ingredients for the Most Natural Mozzarella
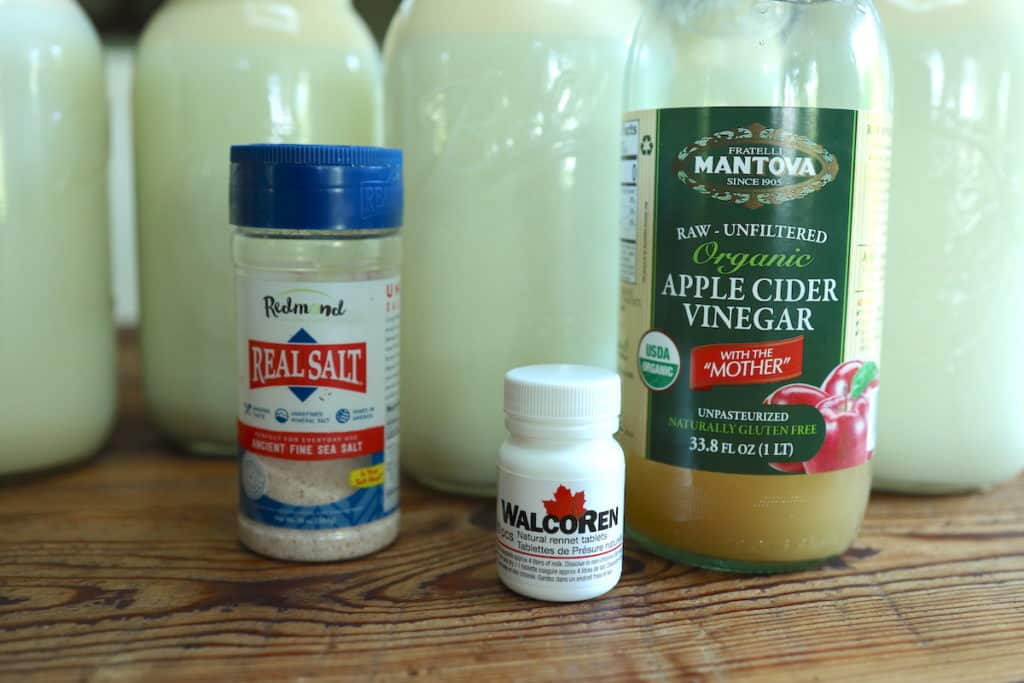
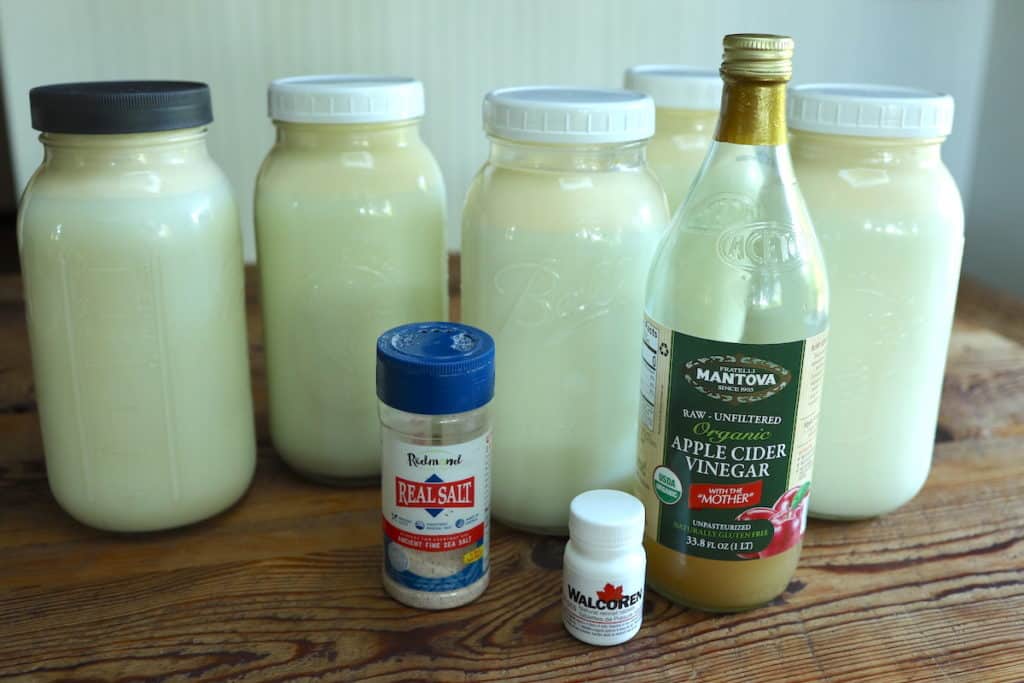
Milk – Using the freshest and least processed milk you can find will result in the best mozzarella cheese. You can use store bought milk, but be sure to find milk that’s not ultra-pasteurized. Your best bet with any cheesemaking is to find a local dairy farmer or homesteader in your community to get raw milk from. Or, if you’re interested in having a family milk cow for your own source of fresh dairy, we have several posts here that can get you going!
Vinegar (or Lemon Juice) – Apple cider vinegar, balsamic vinegar, and standard white vinegar will all work for acidifying milk to make mozzarella. This recipe is based on using apple cider vinegar, which we prefer both for taste and the fact we always have it on hand in the kitchen. To gain the most health benefits, we choose organic, raw, unfiltered apple cider vinegar that comes “with the mother.” Keep in mind you may need to play with the ratios slightly if using other forms of vinegar. Fresh squeezed lemon juice is also a great alternative.
Rennet – Rennet contains the enzyme present in the fourth stomach of a calf (or other ruminants) that naturally coagulates milk to set it into a firm curd. Coagulated milk is easier to digest making nutrients more bioavailable. We use WalcoRen tablets. They offer a pure and natural form of animal rennet that we’ve found to be well suited for home cheesemaking. Many liquid rennet options are plant based and can contain genetically modified ingredients and other preservatives.
Salt – There are special cheesemaking salts but any granulated salt will work. We recommend an unprocessed sea salt option and use Redmond Real Sea Salt as our salt of choice.
Frequently Asked Questions When Making Mozzarella Cheese
Why isn’t my curd stretching easily?
You might find that no matter how many stretch tests you perform, your curd seems to break apart rather than stretch. This unfortunately means your acidity level was off for this batch of mozzarella. You can continue with the rest of the steps and still come out with delicious balls of mozzarella cheese in the end. But they might not be smooth and pretty due to their lack of plasticity. You can dial in the amount of acidity you add over time as ratios can vary based on the type of vinegar and milk you are using.
What is the best way to store my mozzarella cheese?
Your cheese will store fresh for 1-2 weeks in the fridge. Some whey or liquid may continue to drain out of the mozzarella – pour this out of the container regularly for longest storage. We’ve also found that mozzarella freezes very well to preserve longer. Simply flash freeze the fresh mozzarella balls on a cookie sheet, then transfer to a Ziplock bag in the freezer. Remove cheese as needed a day or two before using to thaw.
Do I need to wear gloves to make mozzarella?
Technically, no. If you keep your hot water bath around 150 deg. you will likely be able to shape your cheese without the use of gloves. However, I have had best results when working with a hot water bath between 160-180°. At these temps, your hands will be quite uncomfortable without the use of gloves.
Quick and Natural Mozzarella Cheese Recipe
Yield: About 4 medium-sized mozzarella balls.
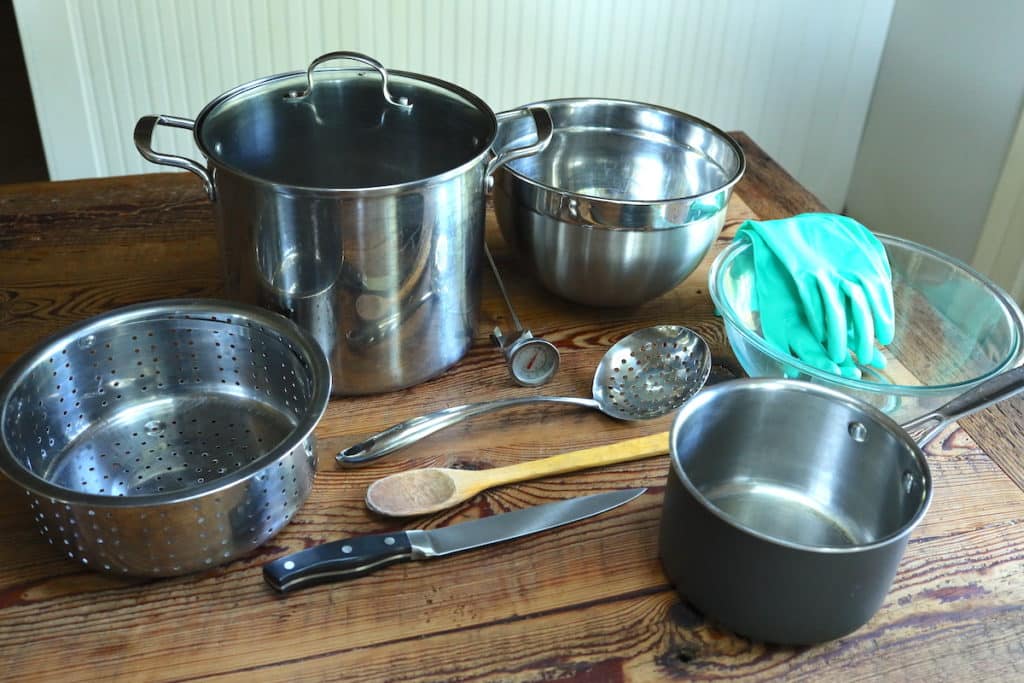
Equipment:
– Stock pot
– Medium Sauce Pan
– Colander
– Large bowl x2
– Wooden spoon
– Long-bladed knife
– Curd spoon or large slotted spoon
– Thermometer
– Small liquid measuring cup
– Large liquid measuring cup
– Gloves
Ingredients:
– 1 gallon fresh, good milk
– ½ cup vinegar*
– Rennet**
– 2-3 tsp salt
– Unchlorinated water
*This recipe is based on using apple cider vinegar. See the note above on alternative vinegar options in the section on Sourcing Ingredients. If using freshly squeezed lemon juice, also use ½ cup per gallon of milk.
**Use the recommended dose or slightly above the recommended dose. For mozzarella, I have had good results using a slightly higher ratio than what is listed on the packaging.
Directions:
1. Pour cold milk into stock pot. Make sure your milk is COLD to start! Adding acidity directly to milk that is too warm will run the risk of curdling it.
2. Dilute vinegar (or lemon juice) in 2 cups of unchlorinated water. Pour into the cold milk and stir in briskly for a minute to acidify milk.
3. Warm the acidic milk slowly to 90°F (32°C) on a low-med stovetop. Stir regularly and be sure to not heat milk too quickly to prevent curdling.
4. While milk is warming, dissolve rennet into ¼ cup unchlorinated water. I use about ¼ cup of unchlorinated water per gallon of milk. Break up tablets as needed and stir until fully dissolved in water.
5. Once acidic milk has reached 90°, remove from heat and pour in dissolved rennet. Stir immediately and thoroughly for 1 minute. Then place the cover on the stock pot and let sit undisturbed until a clean break is achieved – approximately 15-30 minutes. Apply low heat as needed or wrap the pot in towels to maintain 90°.
6. While waiting for a clean break, 1) fill a large bowl about ½ full with cold water and stir in 2-3 tsp of salt until dissolved – then place in the fridge to chill, and 2) fill a medium sauce pan about 2/3 full with warm water.
7. After you have a clean break, slice the formed curd into ¾ – 1 inch cubes using a long-bladed knife. Slice top to bottom and left to right vertically, and also do your best to slice horizontally in ¾ – 1 inch increments. Any large curd chunks missed with the knife can be made smaller during stirring.
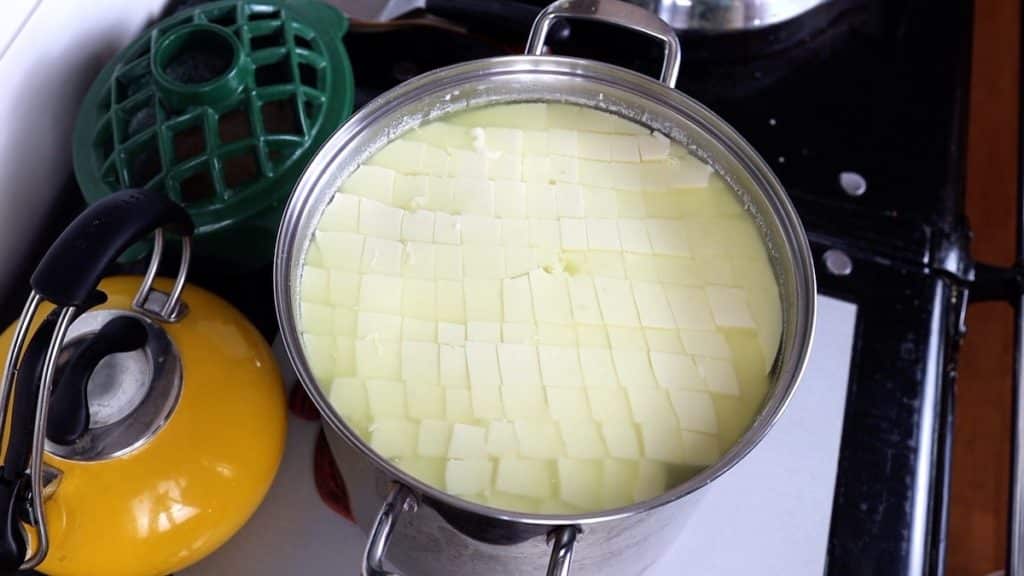
8. Stir the cubed curd with a wooden spoon for about 15 minutes. The curd will release its whey during this time and you’ll observe the edges of the curd going from sharp to rounded. Once the curd has the consistency of a poached egg, you are ready to move on.
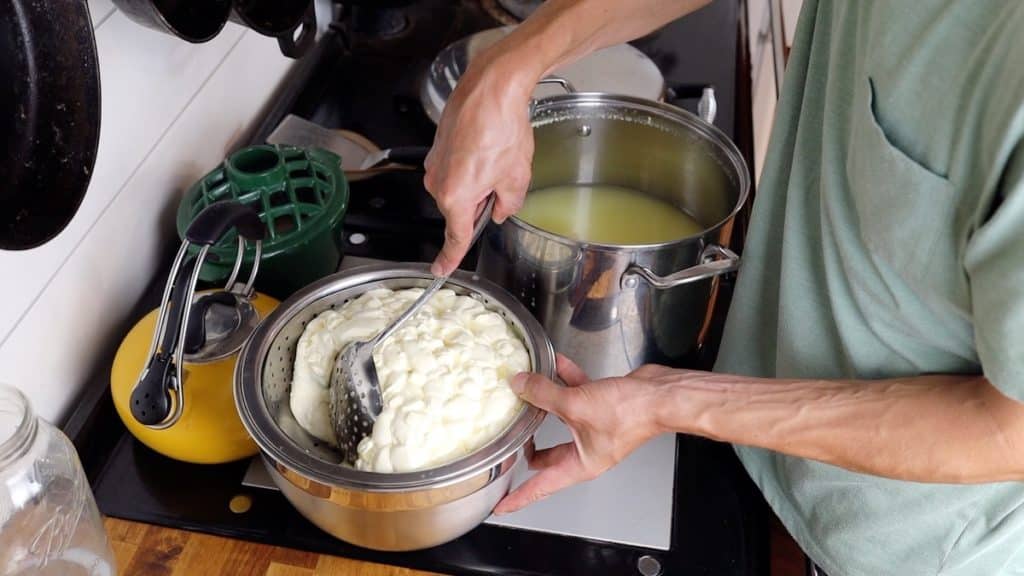
9. Scoop the curd into a waiting colander atop a large bowl to catch the whey. If the holes of your colander are too large, you might consider lining it with a cheesecloth to hold the curd.
Optional – Pull curd toward the center of the colander with a curd spoon to remove excess whey. Perform this technique around the outside of the curd keeping the curd intact.
Let curd rest in a colander for 15-30 minutes until curd is knit together.
10. While waiting, heat a hot water bath in a saucepan to 160-180°F (71-82°C).
11. Once you have one solid curd, cut it into thick slices that will be used to form your balls of mozzarella cheese. Place a couple of slices of curd into 160-180°F (71-82°C) hot water bath. Wait 3-5 minutes.
12. After waiting attempt a “stretch test” by removing a slice of curd from the hot water bath and pulling it apart slowly. The cheese should stretch freely. If it does not, place back in hot water bath for another minute or so and try again.
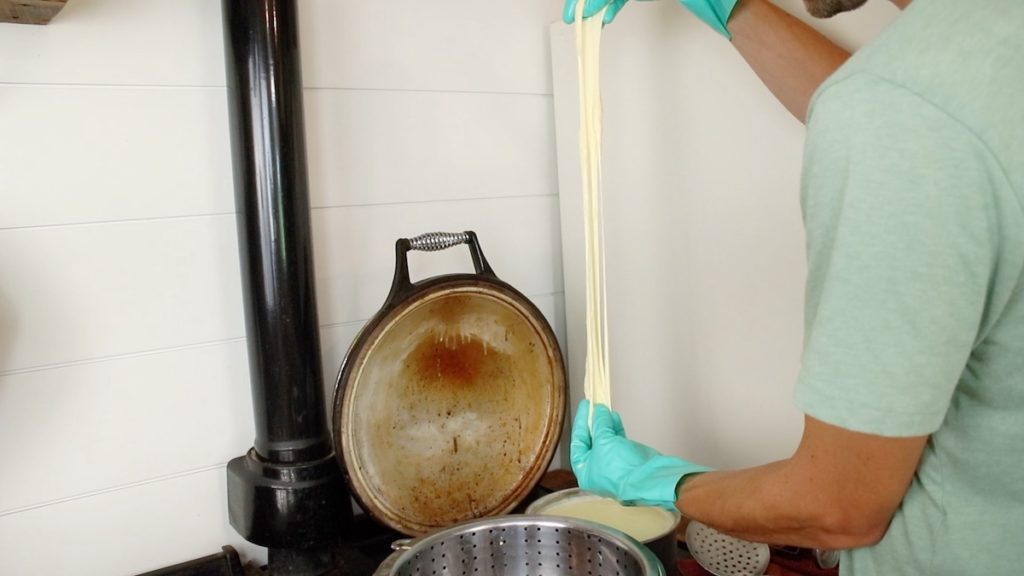
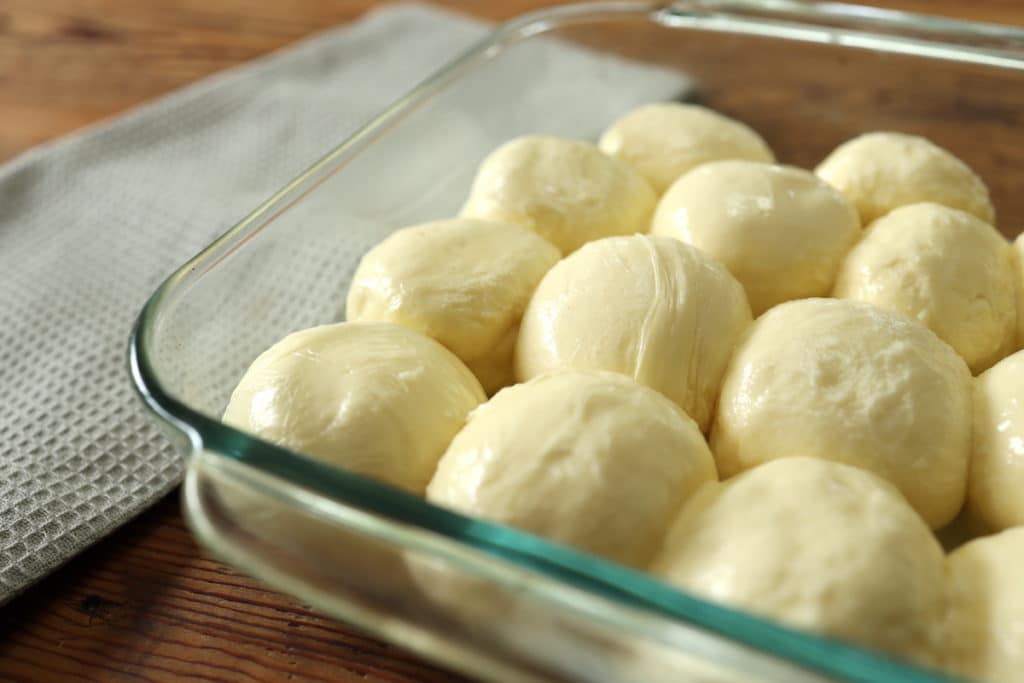
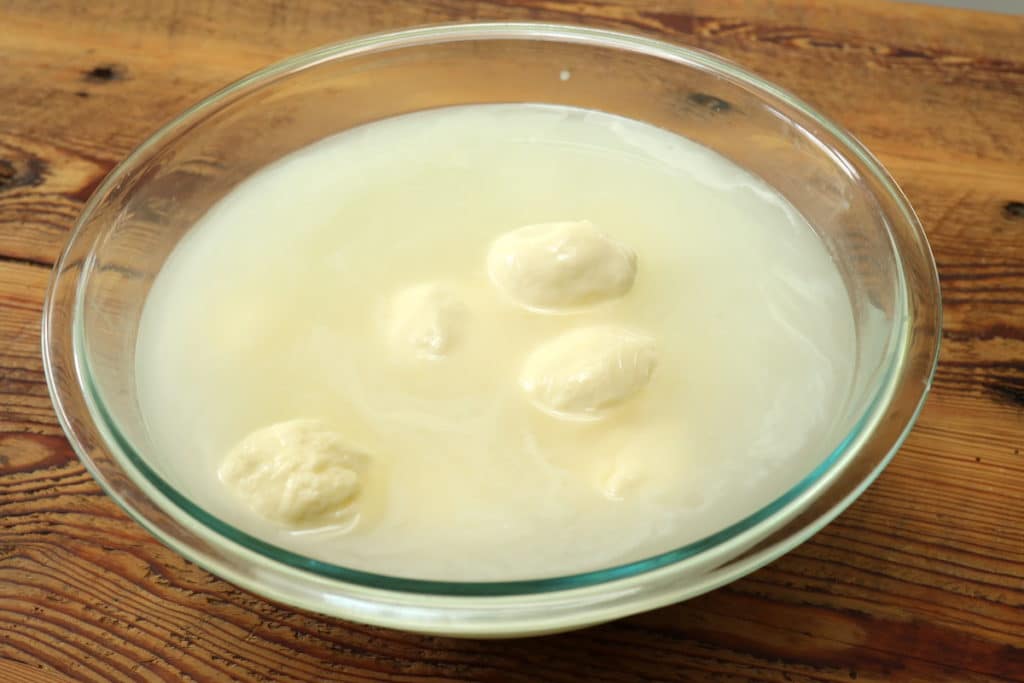
13. Remove one slice of cheese at a time from the hot water bath shaping it into a mozzarella ball. Similar to kneading bread, work the ball with your hands tucking it back within itself establishing layers throughout the cheese. Work each ball for a short period of time, form the ball into its final shape, and place it in a waiting cold water bath with salty brine.

14. Repeat steps 11-13 until all your curd is turned into fresh mozzarella balls.
15. Place the cold water bath back in the fridge for a couple of hours to continue to chill down the mozzarella. Then remove the mozzarella from the cold water bath and store it in a container.
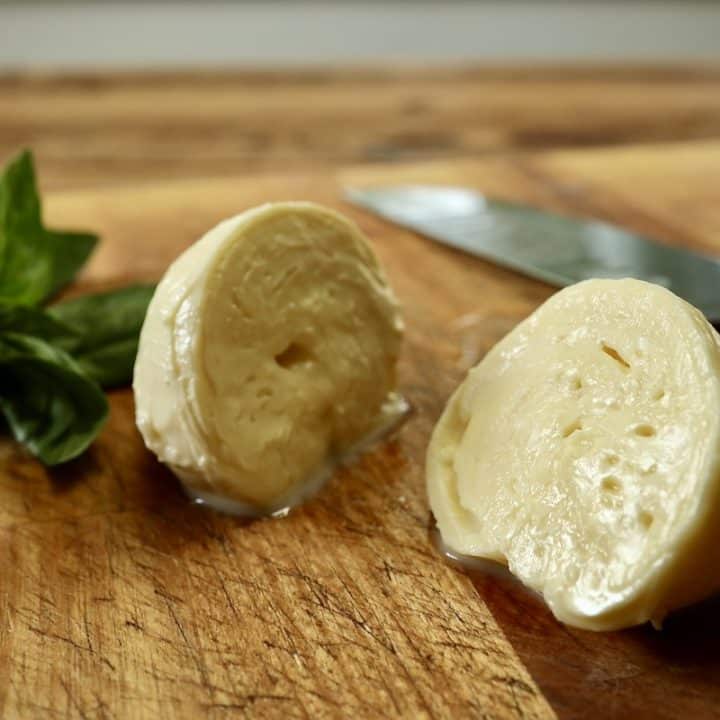
Bon Appetit!
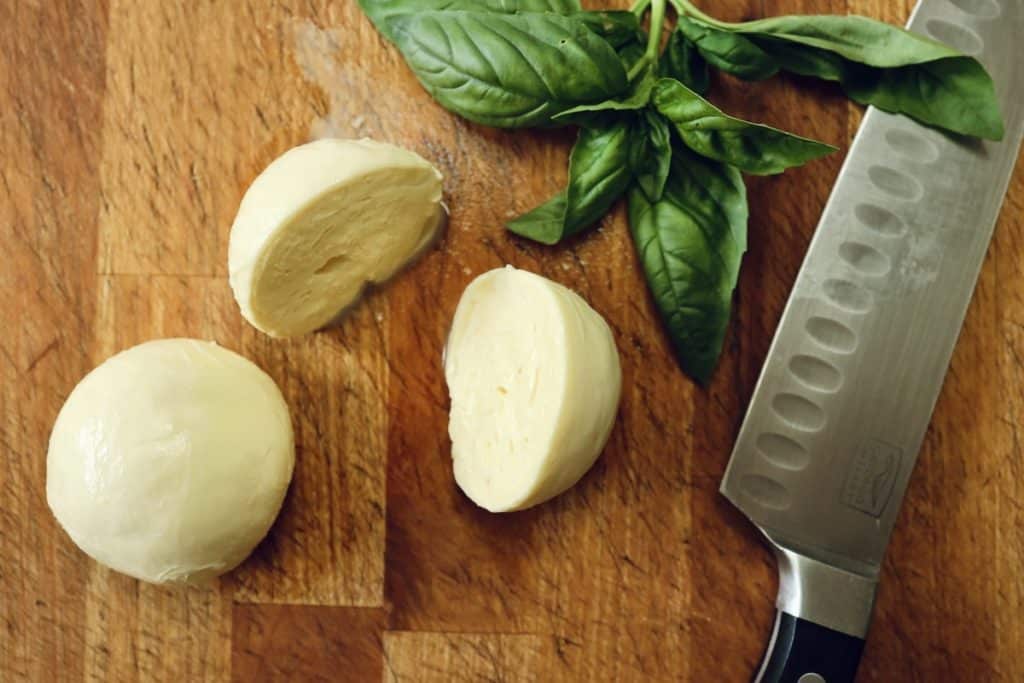
For a truly authentic mozzarella experience, you can always skip the fridge and enjoy fresh sliced mozzarella while still a touch warm. Otherwise, there is no wrong way to enjoy this cheese. We use it on so many dishes, but especially our Deep Dish Sourdough Cast Iron Pizza!
Have other questions? Drop them in the comments below or let us know how your cheese turned out. We’d love to hear from you!
Some of the above links are affiliate links. This means we earn a small commission on qualifying purchases at no cost to you. We are so appreciative of your support!
Check out more of our favorite dairy recipes:
- Easy Farmhouse Cheddar Recipe
- How To Make Crock Pot Yogurt
- The Best Vanilla Raw Milk Ice Cream
- How To Make Butter From Raw Milk In A Blender
How To Make Quick and Natural Mozzarella Cheese with Vinegar
Looking for a quick, natural, and authentic mozzarella cheese recipe to try at home? This is the one! We share how to make mozzarella cheese with vinegar (or lemon juice) after years of perfecting our techniques and learning how to source the freshest and most natural ingredients!
Ingredients
- 1 gallon fresh, good milk
- ½ cup vinegar*
- Rennet**
- 2-3 tsp salt
- unchlorinated water
Instructions
- Pour cold milk into stock pot. Make sure your milk is COLD to start! Adding acidity directly to milk that is too warm will run the risk of curdling it.
- Dilute vinegar (or lemon juice) in 2 cups of unchlorinated water. Pour into the cold milk and stir in briskly for a minute to acidify milk.
- Warm the acidic milk slowly to 90° F on a low-med stovetop. Stir regularly and be sure to not heat milk too quickly to prevent curdling.
- While milk is warming, dissolve rennet into ¼ cup unchlorinated water. I use about ¼ cup unchlorinated water per gallon of milk. Break up tablets as needed and stir until fully dissolved into water.
- Once acidic milk has reached 90°, remove from heat and pour in dissolved rennet. Stir immediately and thoroughly for 1 minute. Then place cover on stock pot and let sit undisturbed until a clean break is achieved – approximately 15-30 minutes. Apply low heat as needed or wrap pot in towels to maintain 90°.
- While waiting for a clean break, 1) fill large bowl about ½ full with cold water and stir in 2-3 tsp of salt until dissolved – then place in fridge to chill, and 2) fill a medium sauce pan about 2/3 full with warm water.
- After you have a clean break, slice the formed curd into ¾ - 1 inch cubes using a long-bladed knife. Slice top to bottom and left to right vertically, and also do your best to slice horizontally in ¾ - 1 inch increments. Any large curd chunks missed with the knife can be made smaller during stirring.
- Stir the cubed curd with a wooden spoon for about 15 minutes. The curd will release its whey during this time and you’ll observe the edges of the curd going from sharp to rounded. Once the curd has the consistency of a poached egg, you are ready to move on.
- Scoop the curd into waiting colander atop a large bowl to catch the whey. If the holes of your colander are too large, you might consider lining it with a cheesecloth to hold the curd. Optional - Pull curd toward center of colander with curd spoon to remove excess whey. Perform this technique around the outside of the curd keeping curd intact. Let curd rest in colander for 15-30 minutes until curd is knit together.
- While waiting, heat hot water bath in saucepan to 160-180°.
- Once you have one solid curd, cut into thick slices that will be used to form your balls of mozzarella cheese. Place a couple slices of curd into 160-180° hot water bath. Wait 3-5 minutes.
- After waiting attempt a “stretch test” by removing a slice of curd from the hot water bath and pulling it apart slowly. The cheese should stretch freely. If it does not, place back in hot water bath for another minute or so and try again.
- Remove one slice of cheese at a time from the hot water bath shaping it into a mozzarella ball. Similar to kneading bread, work the ball with your hands tucking it back within itself establishing layers throughout the cheese. Work each ball for a short period of time, form ball into final shape, and place in waiting cold water bath with salty brine.
- Repeat steps 11-13 until all your curd is turned into fresh mozzarella balls.
- Place cold water bath back in fridge for a couple hours to continue to chill down mozzarella. Then remove mozzarella from cold water bath and store in container.
Notes
*This recipe is based on using apple cider vinegar. See note above on alternative vinegar options in the section on Sourcing Ingredients. If using fresh squeezed lemon juice, also use ½ cup per gallon of milk.
**Use recommended dose or slightly above recommended dose. For mozzarella, I have had good results using a slightly higher ratio than what is listed on the packaging.
Equipment:
- Stock pot
- Medium Sauce Pan
- Colander
- Large bowl x2
- Wooden spoon
- Long-bladed knife
- Curd spoon or large slotted spoon
- Thermometer
- Small liquid measuring cup
- Large liquid measuring cup
- Gloves
Pin it for later!

If you use vinegar or lemon juice to curdle the milk, why do you also need rennet?
The curdling you would get from adding vinegar or lemon juice to warm milk wouldn’t have the same effect as rennet would. Rennet, when used in the right dose, gives you a full coagulation and separated curd that you can work with. My understanding is that the curdled milk would separate some but not entirely. Plus, the milk may not acidify correctly leaving you with a mozzarella that doesn’t stretch. Hope that helps! Happy cheesemaking!
Amazing recipe, one question where can I adjust the ratios of the ingredients? Since I need to use a bit less milk?
Thanks! You can definitely scale all the ingredients according to how much you’re making. It might be easiest to work in half gallon increments, but you can also adjust to something more specific. The quantities are somewhat forgiving, so just do your best to adjust based on how much milk you’re using. With less milk, I’d also recommend you keep a closer eye on temperatures as things will heat up more quickly.
I’d be using fresh raw milk, can I skim the cream for butter and use what’s left for cheese?
Hi! Yes, you definitely can. But your yield might be less and I’ve heard skimmed milk might not give as good a stretch for your mozzarella. We typically don’t skim the cream before making cheese.
Heya! I’m a newbie cheesemaker here. Yesterday exactly I’m making mozzarella cheese from citric acid recipe, and now I’m seeing your natural cheesemaking with vinegar as acid. I see above, Charles asking the using of rennet for vinegar cheesemaking, and now i intend to put it to the test. But im gonna use a different vinegar, a kombucha made, fermented tea to be exact. Would it do good or not? im excited to find out
Oooh, that sounds like it could be really yummy! I don’t see a reason why it wouldn’t work. The vinegar is what can really add a unique flavor to the cheese. Happy cheesemaking!
What about kefir whey instead of the vinegar, would it work?
I honestly can’t speak to the acidity level of kefir whey, but if it has enough acidity it should work. The trickiest part would be dialing in the right ratio to add to properly acidify the milk. It took me a while when I started making mozzarella to get the amount of vinegar right. Too little acidity and the cheese won’t stretch properly. Too much and the curd might not setup right. If you give it a try, let me know how it’s goes!
My curds looked solid before putting into the water but they are not stretching and are crumbly even after putting back into the hot water and trying the stretch again. Did I fail?
Not at all a fail! Think of it as a learning opportunity! I seriously had this same thing happen on and off for a couple years before I dialed in the ratios. And the cheese will still taste great!.. even if the texture is off a bit. My issue was usually not adding enough acid to the milk. Or possibly even not giving it enough time to properly acidify. I’d increase your vinegar (or other acid) amount next time and see if that does the trick. Even though Mozzarella has the reputation of being really beginner friendly, it’s actually a fairly difficult cheese to get right. So don’t give up!! You got this!
What kind of gloves do you use and where did you get them?
I believe these are the ones I bought: https://cheesemaking.com/products/food-grade-gloves. I love them! If you clean them well and take care of them they’ll last you for years! Plus they come on and off so much easier than the tight latex gloves.
Help!! I tried following this recipe and ended up with not great cottage cheese. I made it all the way to Step 5, and after letting it sit I had a pot full of whey and curds. What happened? (I followed your instructions exactly, using ingredients suggested, the milk was only a few days old, raw, skimmed).
Hmmm, so the milk was not curdled when you added in the rennet? But then instead of forming a solid curd, it turned into a more separated cottage cheese like curd? The first thing that comes to mind is that the milk was skimmed. Most recommend full cream milk for mozzarella and I’ve heard it can throw off the texture of mozzarella quite a bit if skimming the cream. It’s also possible the skimming it changed the level of acid needed and the milk was overly acidic. So sorry that happened but hope those thoughts might help for next time!
Hi I also tried the recipe today and followed but the curds didn’t form correctly, more like the cottage cheese …. My milk was not skimmed and was yesterday’s milk .. but I continued on with the recipe and it actually worked out great !!
That’s so interesting! I wonder what type of rennet you are using and if that can affect things? Glad it worked out for you in the end 🙂
Thank you for sharing this recipe. I have made it twice now, once with cow’s and once with goat’s milk. The first time it curdled after I added the rennet. I still followed the rest of the recipe and it did turn into mozzarella balls. The second time I heated it slower and didn’t stir for a full minute after adding the rennet and it worked much better. The cheese itself was still a bit rubbery though. Is that normal or do I need to work it more/less when shaping?
Thanks for sharing your experience and glad the recipe is working out! Yes, I’d say the cheese can come out a bit rubbery but there’s some things you can try to reduce that. Working it for less time will definitely help. It doesn’t need much. You can also try using a bit less rennet. I like a slightly higher dose of rennet because that makes the cheese itself easier to work with. But less rennet should produce a less firm cheese. You can also try less stirring time for the cubed curd. If the cheese retains more whey it should be more stretchy and less rubbery. Hope that helps!
Thank you for a wonderful recipe! Though lemons are really expensive in my country — can I mix lemon with white vinegar instead of purely using either one? Thanks!
You’re welcome! Yes, I don’t see why you couldn’t mix lemon juice and vinegar together. I don’t think the quantity that you’ll need should change much, but you might need to dial it on depending on what your ratio is. That’s usually true for mozzarella regardless though. Good luck and thanks for stopping by!
I followed recipe but upon adding rennet the milk instantly turned into grainy curds. I let it sit for 30 minutes but it never coagulated. I ended up removing it and going with rest of process but I haven’t tasted yet. Do you have any idea what I did wrong?
Hmmm, to be honest I’m really not sure. I’ve heard of it curdling when adding the acid, but it seems odd to do it that instantly when adding the rennet. My hunch would be that either the milk was over acidified, or the concentration of rennet was too much. Just some thoughts to try for next time. Hope that helps!
This was my first time to attempt to make mozzarella cheese. Mine also turned out like cottage cheese. I added 4 rennet tablets to a gallon of milk. Can the cottage cheese be eaten?
Oh no! Cottage cheese isn’t the goal! Yes, it should still be fine to eat. I’m not sure what rennet you are using, but make sure you’re using the recommended dosage for 1 gallon (or slightly higher). In the video I am making 2.5 gallons worth and use 4 rennet tablets for that amount. For 1 gallon you’ll likely need in the 1-2 rennet tablet range. I wonder if that could have affected the results. Hope that helps!
We’re having leftover flavor of the vinegar after following the recipe and it coming out exactly as it’s supposed to including the stretch test. Any thoughts on how to reduce that vinegar flavor in the final cheese?
Hey there! So glad to hear the mozzarella is turning out! I hear you on the vinegar flavor and I’m not sure there’s a way to completely avoid it. One option might be use a white vinegar or something with less taste. Our family likes the ACV taste, but white viengar might tone it down a bit. Lemon juice would also give it more of a lemony taste. The only other option to not give it any taste would be to use citric acid instead of the vinegar. Hope that helps!
Can I use liquid rennet? I tried doing everything you said and my curds went to the bottom rather than on top like your. I took the cream first also. Would that make any difference? Thanks!
Yes, liquid rennet should work fine! I’ve had that happen before too where the curd sinks to the bottom… it should still be fine. I’m not quite sure what causes this, but I do seem to recall it happened most when I used to use liquid rennet. Not sure if that is it or not. And as for cream, the quality and texture of your mozzarella will be directly related to the amount of cream in your milk. You can skim the cream, but you’ll end up with rubbery mozzarella. Full cream will give you a smoother, stretchier cheese in the end. Hope that helps!
Hi there! I was wondering if there anything else that I could replace the rennet with? Thanks
Hey! So, you can use alternatives to animal rennet like plant rennets. Many of the liquid rennets out there are plant based. There’s also tutorials out there of how you can make your own rennet with plants like nettle. Aside from that, the rennet is really an essential part of making mozzarella using this technique since the acid and the rennet do two separate tasks needed to achieve the stretch. There are other recipes out there for mozzarella that avoid rennet. But for a truly authentic mozzarella you need to first acidify, then separate the curd with the rennet. Hope that helps! Happy cheesemaking to you! 🧀
When you speak about the acidity being incorrect, you say you dial in the amount of citric acid. I don’t understand what you mean. I don’t have a dial. Where is the dial, please?
If the curd doesn’t stretch, do I need more citric acid/apple cider vinegar or do I need less? I followed the recipe but the curd would not stretch. I used 8 UK pints (160 fluid ounces) of whole, pasteurisation milk.
Hello! Two thoughts here. First is that if you ask most cheesemakers they will tell you mozzarella is NOT a beginner friendly cheese. I like to mention this because it seems so basic, but it can actually be rather complex and tedious to perfect. The second thing is that the level of acidity needed can vary significantly based on things like the cream content of the milk or the vinegar being used. That said, most of the issues I have had resulted from not using enough vinegar. I would personally try adding more next time. It is possible, however, to over acidify, also resulting in the cheese not stretching, so I wouldn’t add too much. If the milk is ultra-pasteurized, the proteins in the milk may also be denatured to the point where they are no longer good for cheesemaking. Hope this helps!
Do you use full fat milk or do you skim some cream off first?
We use full fat. I’ve heard of issues with the curd for mozzarella not forming/stretching properly after skimming the cream. Thanks for stopping by!
In my quest to replace citric acid, a common acidic ingredient in many recipes, with vinegar, I came across your blog. Following your suggestion, I used the recommended amount of 5% vinegar, and the cheese turned out well. This was my first time using rennet to coagulate milk proteins. Thank you for your guidance.
Wonderful! I’m so glad it turned out well!
We’ve recently started sourcing our milk from the neighbour’s organic dairy herd (no antibiotics, plus everything else the term ‘organic farming’ represents). And boy-oh-boy do I love your site. Especially the videos – I made mozzarella today, and watching the ‘how’ really added to just reading the recipe. Made Farmhouse Cheddar 3 weeks ago – love your makeshift press, because that’s what I wound up doing. And I’m using your crockpot yoghurt method from now on – it worked so well, far better than the other ways I’ve been doing it.
So thank you. A lot. My cheese-loving husband also thanks you and would like to know if you will adopt him 🙂
Love this!! Thanks so much for the support and fun comment 😊. This makes doing what we do totally worth it. Thanks friends!
Hi,
I’m planning on making mozzarella tomorrow. My fresh raw milk comes from Jersey cows and has a6-7% percentage of fat which is higher than regular milk cows. Should I skim some of adjust amount of vineyard?
I so love your website and advice 🧡🙏
Hi there! Sounds awesome! You could skim some, but you might not get the same yield or stretch as you would with the full fat milk. We always just leave the cream, but I also wouldn’t say we always have a really high cream line. I would say to start out by making it as-is and use the amount of vinegar the recipe calls for. If something doesn’t turn out quite right, then you can always try adjusting in the future. Hope that helps and happy cheesemaking!