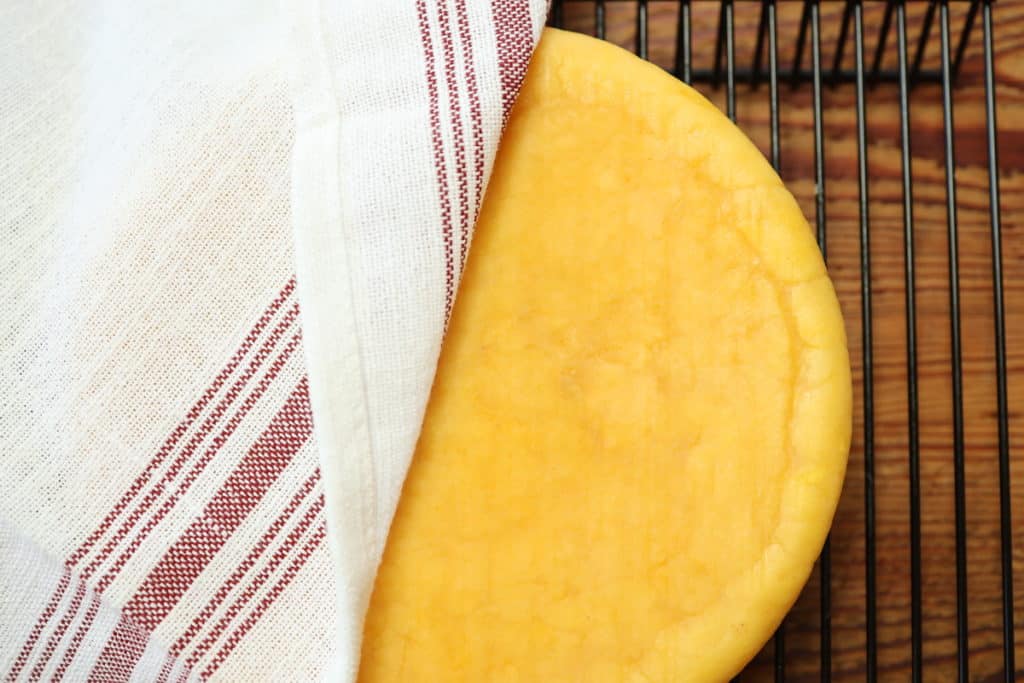
Easy Farmhouse Cheddar Hard Cheese Recipe
Making hard cheese at home does not need to be intimidating. In fact, you might have everything you need on hand already! This yogurt-cultured farmhouse cheddar recipe is a tasty and versatile hard cheese that you’ll come back to time and time again.
Make Your Own Cheddar Cheese at Home!
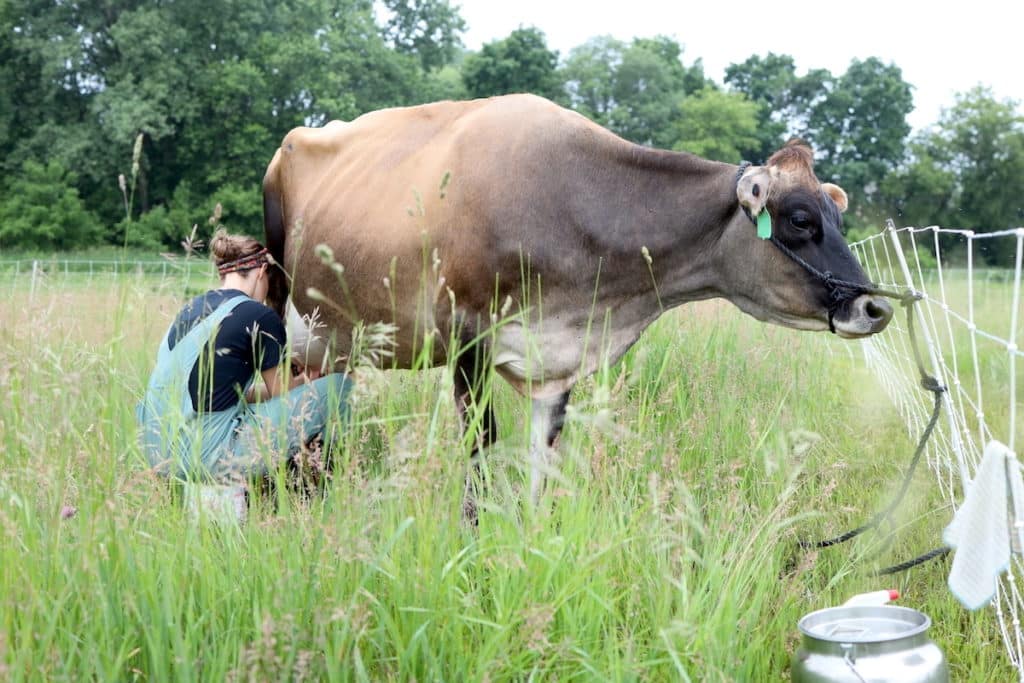
Our family started in cheesemaking several years ago. Our real food journey led us to source the highest quality, locally produced farm goods – including milk!
Living in the suburbs at the time, raw milk was a luxury. But we’d go out of our way to buy it and enjoyed making homemade mozzarella occasionally.
Then we got a family milk cow on our homestead and milk was no longer in short supply! Cheesemaking became a weekly activity and venturing into the world of hard cheeses was inevitable.
But where to start? All the recipes I came across involved special cultures, expensive cheese presses, long aging times and techniques, and unnatural-seeming ingredients.
At the time we were living in the middle of Amish country, and these simple and resourceful people gave us the inspiration we needed!
Farmhouse, or farmstead, cheddar originated with the Amish. I was thrilled to find, 1) it only needed a basic starter culture like yogurt or kefir, 2) I was actually able to rig up an easy homemade cheese press with items I already had in the kitchen, and 3) this cheese has a very short and uncomplicated aging process.
Natural Cheesemaking
I can’t talk about cheesemaking without mentioning David Asher and his book, The Art of Natural Cheesemaking. Every cheesemaker needs this book on their shelf!
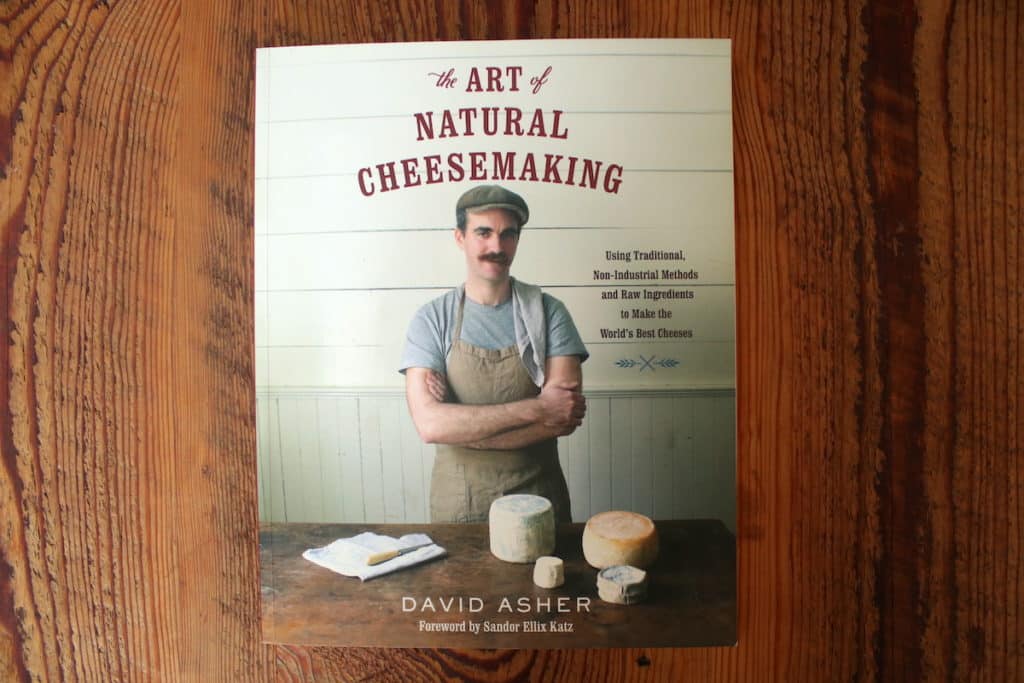
Modern cheesemaking techniques have strayed far from their traditional forms. Cheddar is a perfect example. In fact, the bright orange coloring of cheddar we are used to seeing is a byproduct of industrial farming practices and the addition of annatto: A coloring agent used to cover up the vitamin deficiencies of non-pastured cows milk.
Asher explains,
“Cows make colorful cheese when they feed on fresh green grass. Carotene, an essential vitamin as well as pigment in grass, colors the milk and the cheeses of pastured cows. But confined cows do not get their daily dose of carotene in their hay, haylage, or grains, and their milk shows its vitamin deficiencies when made into cheese: A cheddar made with pastured cows’ milk has a beautifully creamy color because of its carotene content; cheese made with milk from confined cattle is unnaturally white.”
While this farmhouse cheddar recipe is not found in Ashers book, his philosophies and techniques have influenced how I view the cheesemaking process and the type of natural cheese I want to make to feed and nourish my family.
How To Use Farmhouse Cheddar
Farmhouse cheddar has a mildly sharp taste. It’s texture is hard, but it will melt when shredded or sliced thin and is still smooth and creamy enough to enjoy fresh.
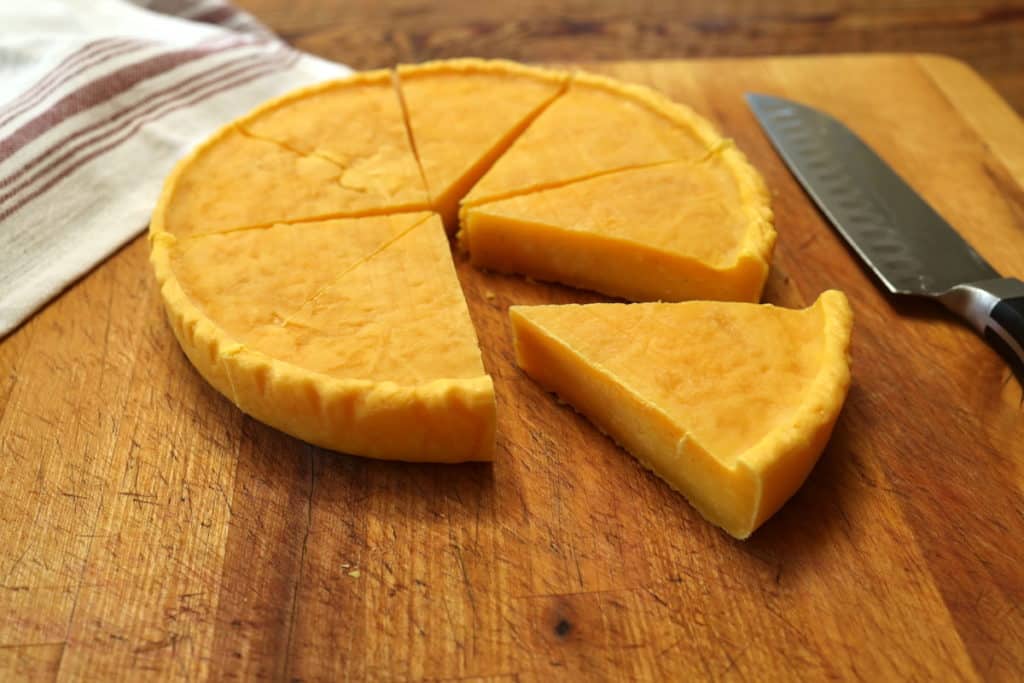
We use this cheese for about everything! You can dice it to top a creamy soup, savory porridge, or even a fresh salad. Thin slices go perfectly on any sandwich, or better yet, melted on a grilled cheese or toasted sandwich. And our absolute favorite is combining it with our homemade mozzarella on our deep-dish sourdough cast iron pizza!
This cheese also grates well and has hints of a parmesan. Farmhouse cheddar is truly versatile!
How Long Does It Take to Make Farmhouse Cheddar?
Traditional cheddar ages between 6 months to 1 year. This farmhouse cheddar recipe is ready in 3-5 weeks.
The cheese itself is made in just a couple hours. Then it undergoes a drying process for a few days. Once dried, the outside of the cheese is coated in butter to form a rind and preserve the cheese for aging.
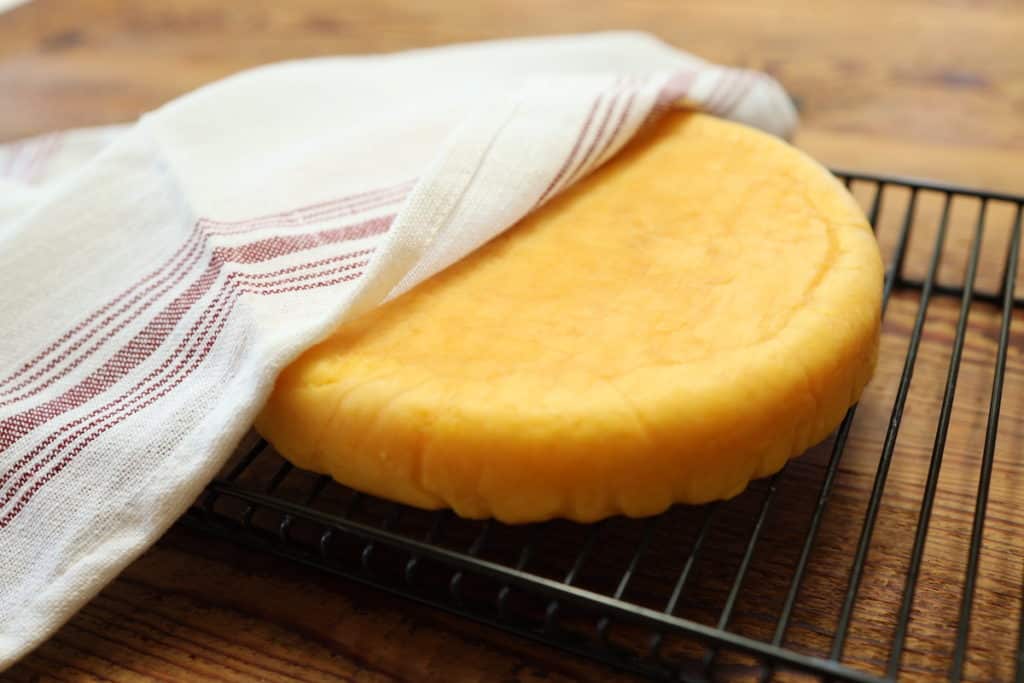
We age ours for about 4 weeks. The longer the cheese ages, the sharper the taste will get. The rind will also continue to dry out and get harder the longer you wait. We’ve found 4 weeks of aging to typically be the right amount.
Sourcing Ingredients
Both from David Ashers book and from experience, we’ve learned a lot about how to source the highest quality and most natural cheesemaking ingredients.
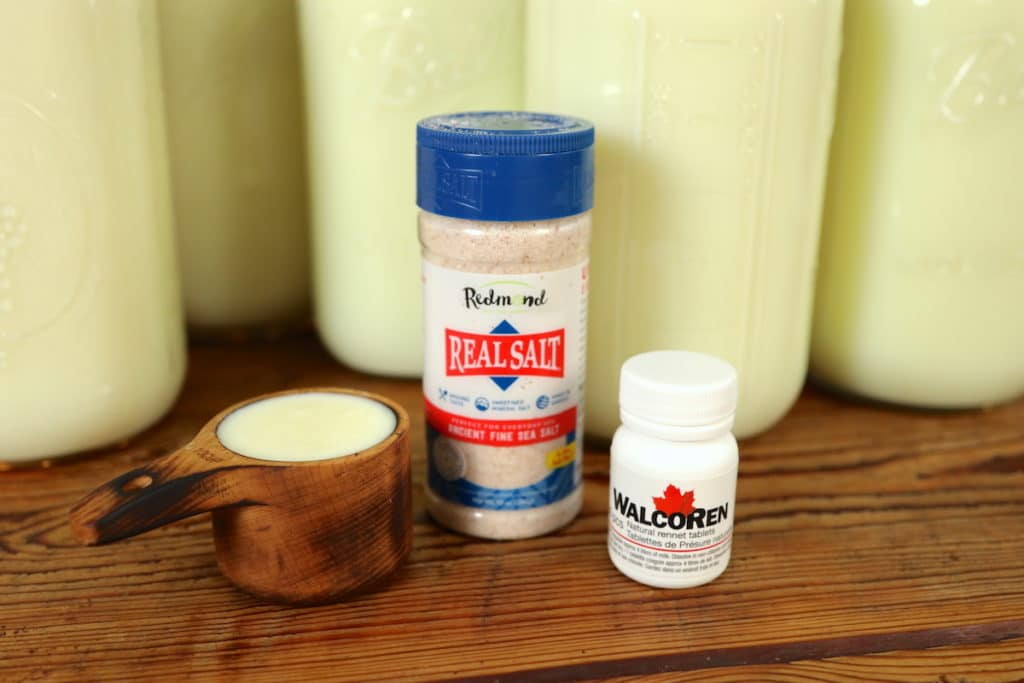
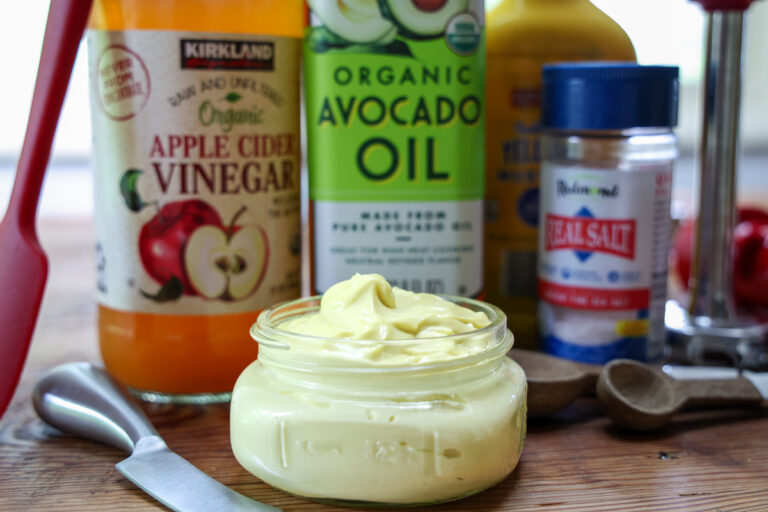
Milk – Cheesemaking pairs best with fresh milk that is as close to its natural form as possible. Finding raw milk from a local farm with cows raised on pasture is your best bet. Or, looking for milk that is not ultra-pasteurized and/or non-homogenized is an alternative. The beauty of this farmhouse cheddar recipe is that the milk never gets above 90° F. This preserves the native bacteria inside raw milk making a truly raw cheese.

Yogurt/Kefir – Any plain yogurt or plain Greek yogurt will work to culture this farmhouse cheddar recipe. For best results, look for options without added thickeners or artificial ingredients. Culturing with kefir also works. Kefir will actually contain a higher quantity of the bacteria needed to culture your cheese.
Rennet – Rennet contains the enzyme from the fourth stomach of a calf that naturally coagulates milk to set it into a firm curd. Coagulated milk is easier to digest making nutrients more bioavailable. Nearly all cheesemaking requires rennet. We use WalcoRen tablets. They offer a pure and natural form of dried chymosin (enzyme from calf stomachs) with minimal additives. Many liquid rennet options are plant based and can contain genetically modified ingredients and other preservatives.
Butter – Farmhouse cheddar ages with a thorough coating of butter. Raw milk butter will age best with the cheese. Lard can also be used to coat your cheese. If your sourcing of butter or lard is questionable, you may want to scrape off or cut off the rind once the cheese is aged before you eat it. We use homemade butter with milk from our cow and don’t remove the rind.
Salt – There are special cheesemaking salts that are more course. But any granulated salt will work. We recommend an unprocessed sea salt option and use Redmond Real Sea Salt as our salt of choice.
Do I need to buy cheesemaking equipment?
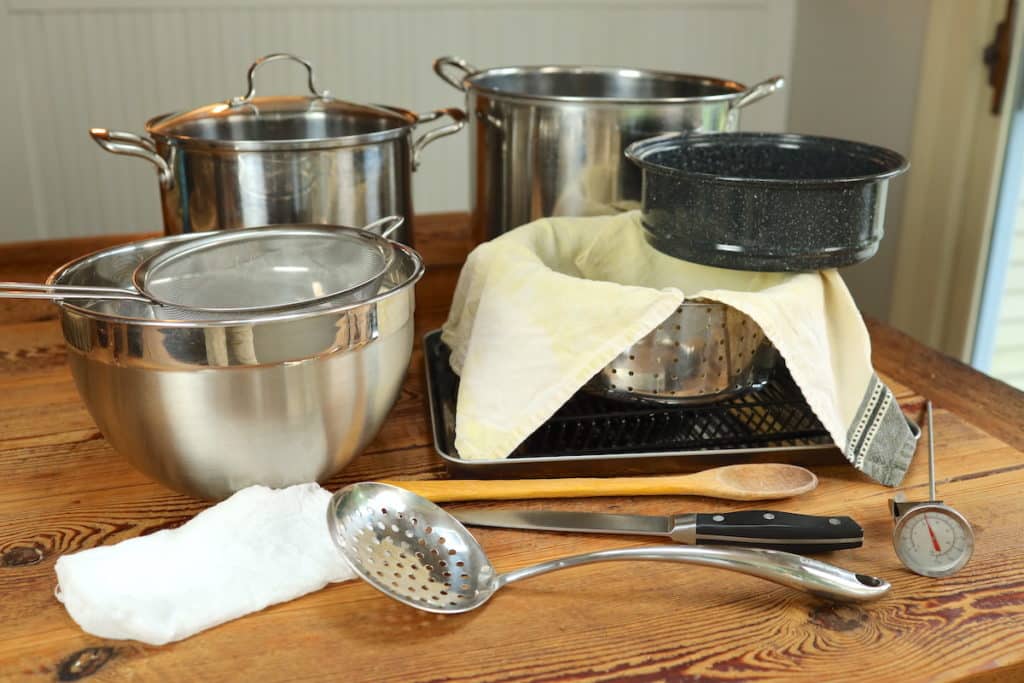
As I was thrilled to find out, you may not need to buy anything to make this farmhouse cheddar recipe! If you have a large stock pot, wooden spoon, slotted spoon, food thermometer, colander, strainer, drying rack, cookie sheet, and some other basic kitchen items, you likely have what you need!
Here are some equipment considerations:
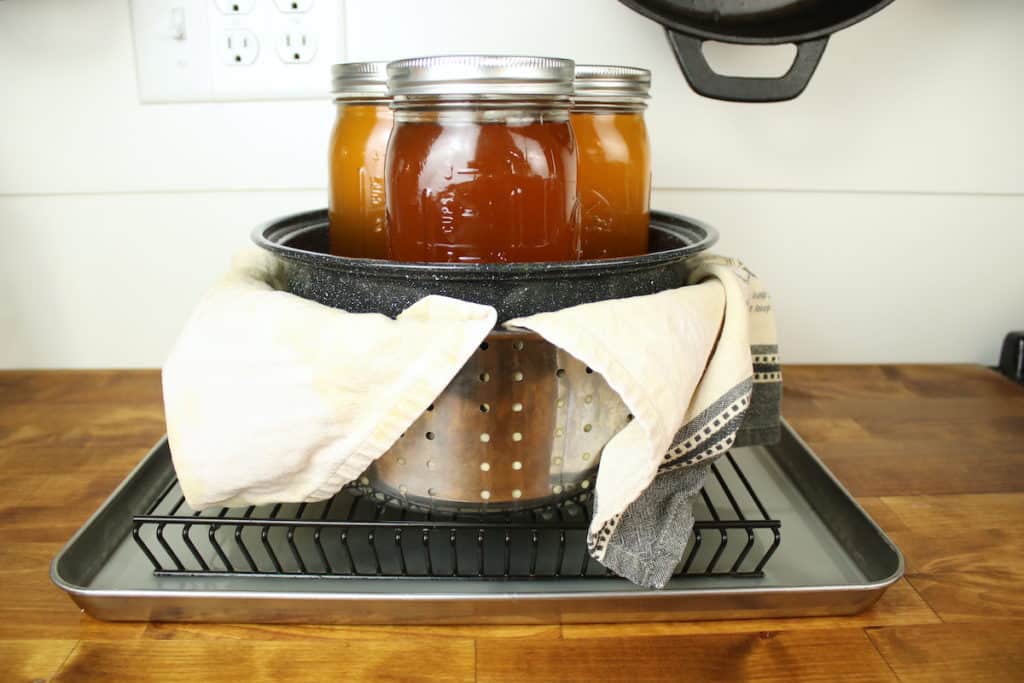
Cheese Press – If you have a cheese press – great! If not, they can range from $50 up to hundreds of dollars to purchase. I don’t own a cheese press and have been making this cheese for years without one. We have a stainless-steel colander that came with our stock pot. I found a pot we had lying around that fits snuggly within that colander that acts as a follower. To apply weight, I simply add three (kombucha) filled quart sized mason jars to the follower pot. As more weight is needed, I stack heavy books on top of that. There are many ways to rig up a homemade cheese press and this system has worked perfectly so far!
Cheese Cave – Because of the low aging time of this cheese, your aging conditions are very forgiving. Typically, cheeses are aged in a cheese cave that maintains a temperature of 50° with high humidity. However, a cool basement will work for farmhouse cheddar, or even just a spot on your countertop. We have found it easy to forget about your cheese in the basement and have had fine results on the countertop. Aging in your fridge is also an option.
Thermometer – Any kitchen thermometer should work – especially considering that traditionally cheesemakers just used their finger to gauge temperatures! However, we did purchase this thermometer that works very well with cheesemaking.
Curd Spoon – For years I used a standard large slotted spoon to scoop curd out of the pot. It works! But recently I did upgrade to this curd spoon which, I’ll admit, makes the process go much smoother and quicker!
Cheese Cloth – Picking up some cheese cloth is helpful for squeezing or straining out some whey from your curd. Butter muslin also works, or even a smooth thin cotton towel.
A Note on How To Use Whey and Why
Whey is the natural byproduct of cheesemaking. Milk contains curd plus whey; making cheese separates the two. Whey is a nutrient rich food that contains protein along with vitamins and minerals.
Because of this, don’t just discard your whey! Pouring it down the drain is a missed opportunity to use this amazing food.
Here are some ways we use leftover whey:
- As a stock for soups, stews, or porridge.
- To cook things like rice, beans, and oats in.
- As a water replacement in breadmaking or baking.
- Pour in garden or landscape areas for fertilizer.
- Feed to animals like pigs or chickens. (Dogs or cats will appreciate it too – just in small quantities to not upset their stomach!)
Best Hard Cheese Recipe for Beginners
In my opinion, this is the best hard cheese recipe out there for the beginning cheesemaker.
The steps and techniques are remarkably forgiving and entry level. Over time you’ll dial in the process to end up with just the right flavor and consistency for your liking. And, regardless of how your cheese ends up looking, your family and friends will be blown away that you made your own hard cheese at home.
Farmhouse Cheddar Recipe
Equipment:
– Stock pot
– Cheese press*
– Long handled wooden spoon
– Long-bladed knife
– Curd spoon or large slotted spoon
– Thermometer
– 1 cup liquid measuring cup
– Strainer
– Large bowl
– Drying rack
– Stock pot larger than the pot your milk will be in (or double boiler)
– Cookie sheet
– Cheesecloth for pressing
– Smooth thin cotton towel for lining press
– Cloth napkin to cover aging cheese
*If you don’t have a cheese press, see note earlier in post about making your own with common kitchen items.
Ingredients:
– 2.5 gallons fresh, good milk*
– 1/3 cup plain yogurt or active kefir**
– Rennet (use dose that corresponds with milk quantity)
– 2-3 Tbsp salt
– 1/2-3/4 cup unchlorinated water
– 3-5 Tbsp butter or lard
*The minimum amount of milk you will want to use is 2 gallons. Our stock pot fits 2.5 gallons, hence the 2.5 gallons for the recipe. Anywhere from 2-5+ gallons, depending on your equipment capacity, is great.
**Use around 1/8–1/4 cup active culture (yogurt or kefir) per gallon of milk used.
Directions:
This recipe is broken down into many simple steps. Don’t be intimidated! Take it one step at a time.
1. Pour milk into stock pot and place on medium heat stove top. Heat milk slowly to 90°F (32°C) stirring often.
2. As milk is heating, dilute 1/3 cup yogurt or kefir with a couple tablespoons of fresh milk (I just use the milk that settles at the bottom of the milk jugs). Stir.
3. Once milk has reached 90°F (32°C), remove milk from stovetop. Pour in diluted yogurt or kefir. Stir immediately for about a minute. Place cover on stock pot and let milk sit undisturbed for 10 minutes to culture.
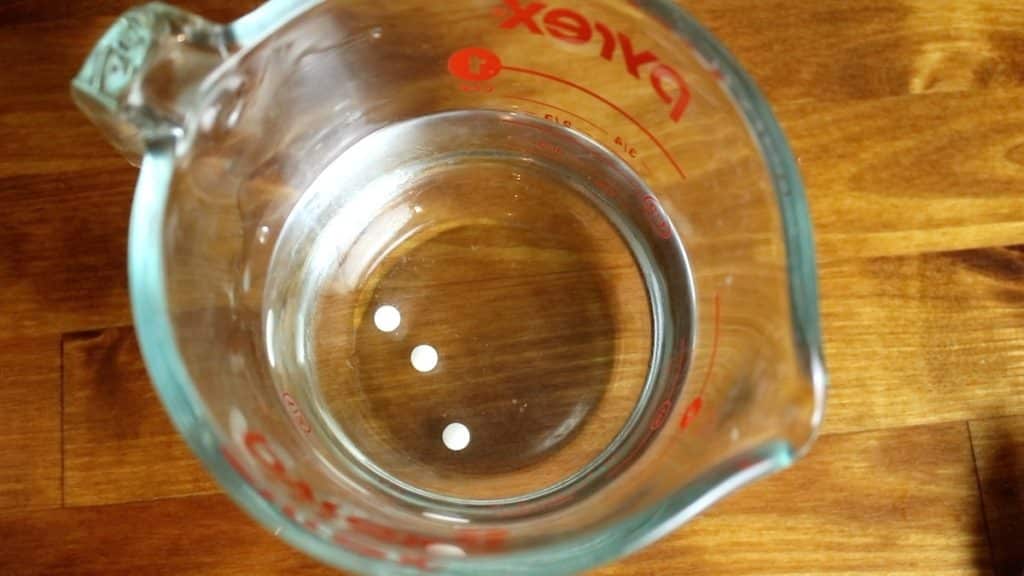
4. Add rennet to unchlorinated water in a liquid measuring cup. I generally use about a ¼ cup of water per gallon of milk. Make sure tablets are fully dissolved.
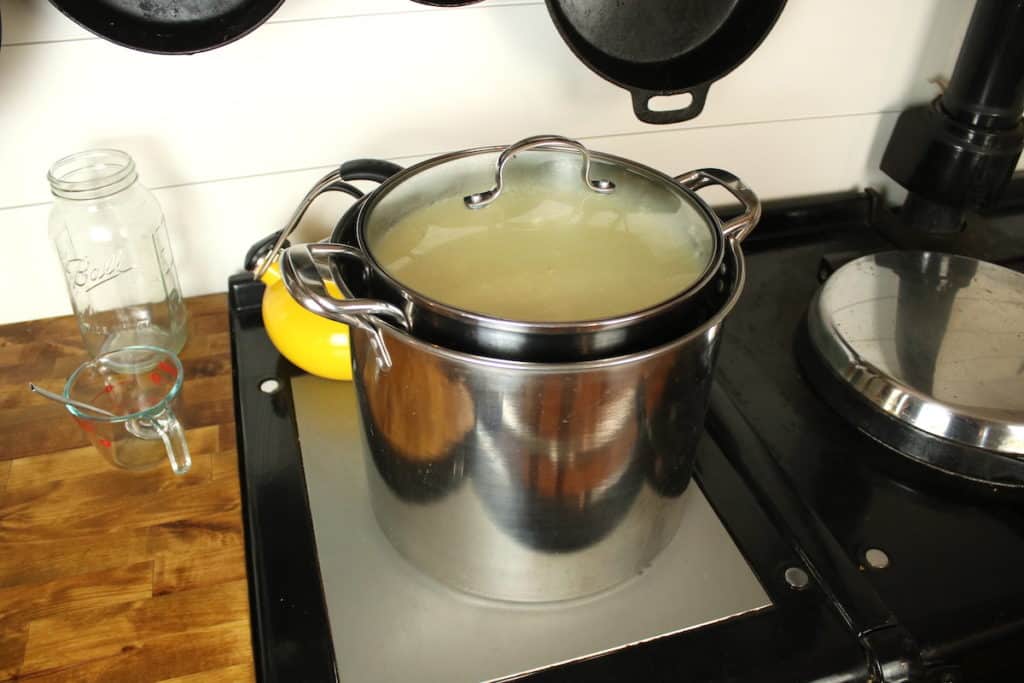
5. Create a double boiler system to keep your milk at 90°F (32°C). I do not have a double boiler and use a second larger stock pot filled about ¼-1/3 with 90-100°F (32-38°C) tap water. Once milk is cultured, place that stock pot inside the larger pot so the pot with the cultured milk is mostly surrounded by water.
6. Pour in rennet and water. Stir quickly for about a minute. Place cover back on stock pot and let milk sit undisturbed for 20-40 minutes, or until a clean break* is achieved.
7. Once you have a clean break, slice the formed curd into roughly 1-inch cubes using a long-bladed knife. Slice top to bottom and left to right vertically, and also do your best to slice horizontally in 1-inch increments. Any large curd chunks missed can be made smaller during stirring.
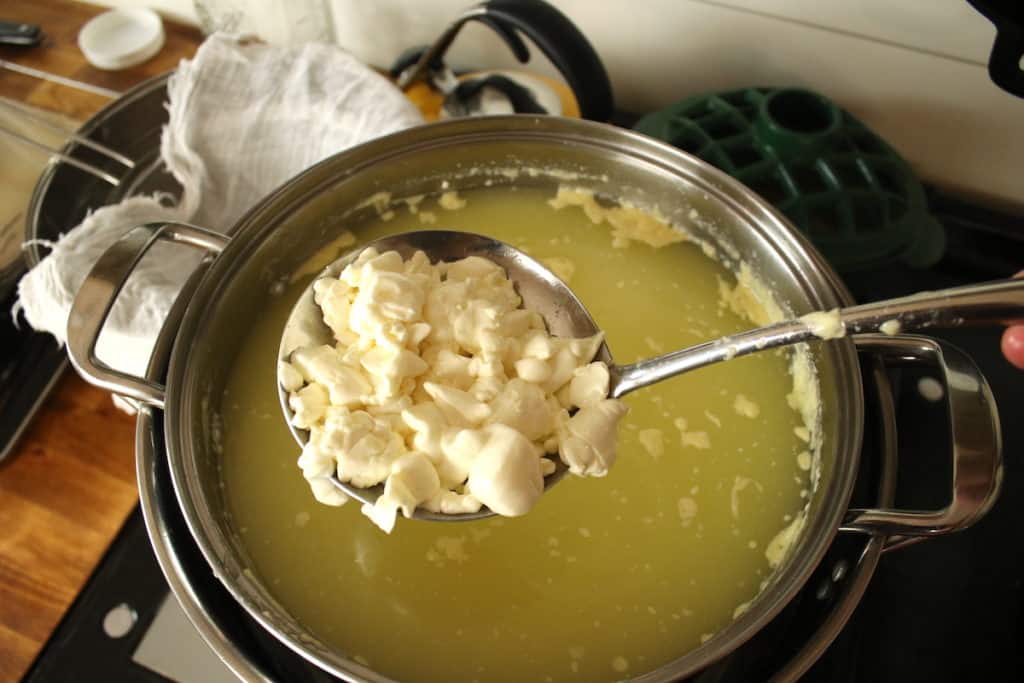
8. Stir the cubed curd for 15-20 minutes with a wooden spoon to release the whey. If large curd chunks that missed being cut are observed, break them into smaller pieces with your spoon. The curd cubes will go from having sharp edges to rounded edges. Once the curd is roughly the consistency of a poached egg, the curd is ready.
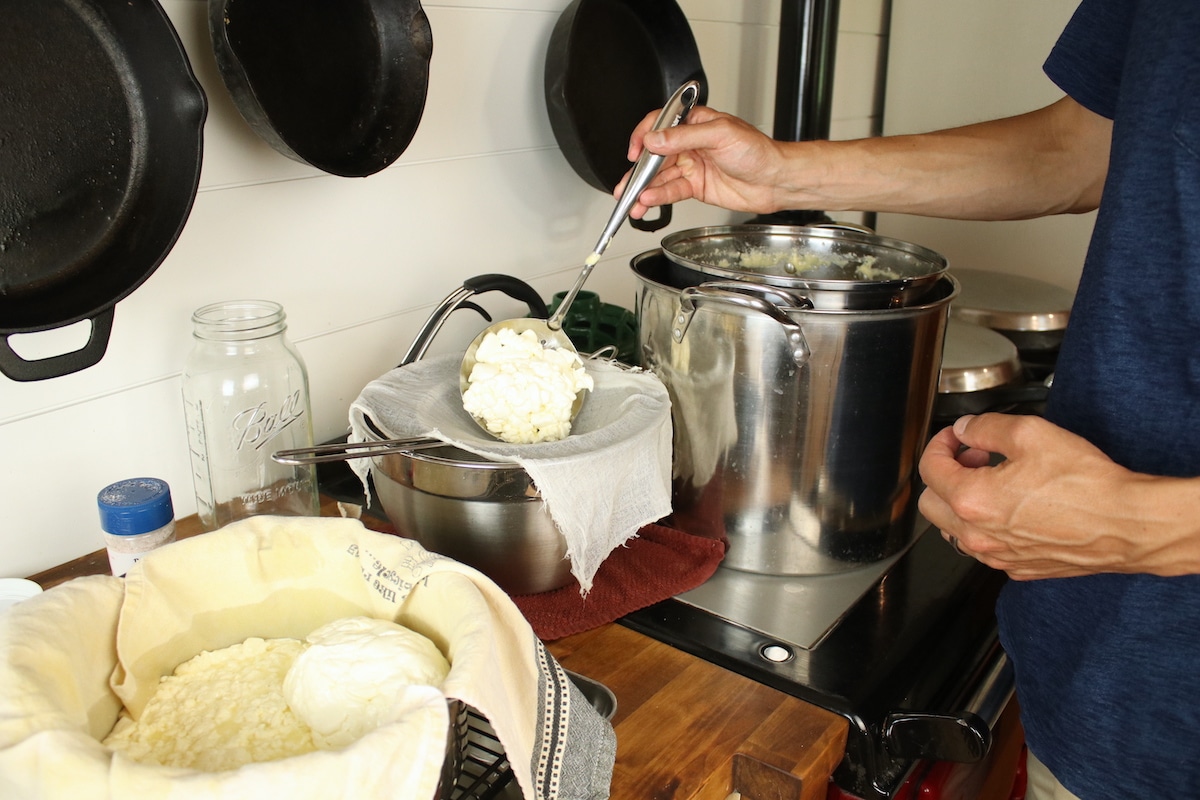
9. Scoop a baseball sized portion of curd into a waiting strainer lined with cheesecloth. Be sure your strainer is sitting on top of a large bowl to catch the whey. Gather up the cheese cloth and gently squeeze the curd to drain some whey. This step is just to remove some excess whey; the cheese press will remove any remaining whey. Place ball of curd into waiting cheese press (or colander if using my cheese press method mentioned above) lined with smooth thin cloth. Place cheese press on top of a cookie sheet to collect whey.
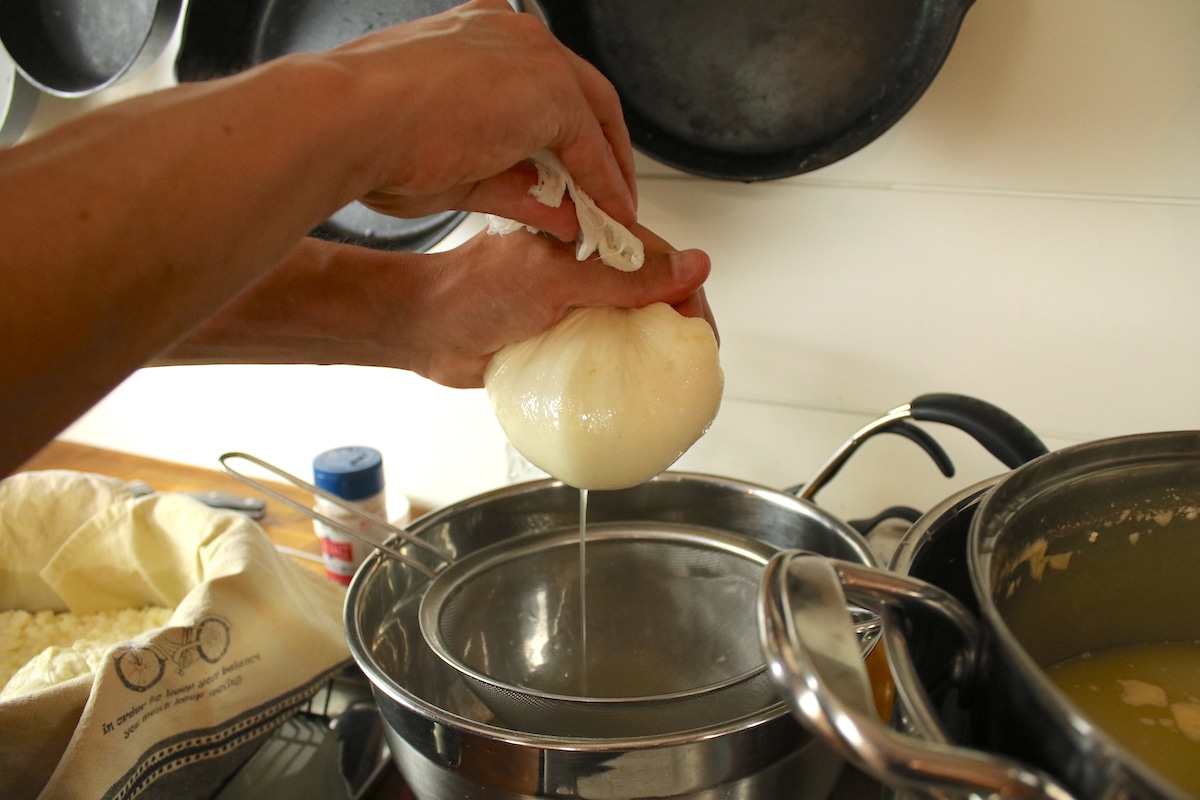
10. After 2-3 balls of curd are added to your press, sprinkle about a tablespoon of salt on top of your curd. Work salt into the curd with your hand. Repeat this step along the way until all your curd is in the press and salt is thoroughly distributed throughout.
11. Add follower to cheese press. Apply just enough weight to your press to see steady drips of whey flowing below. Let sit in press for 12 hours increasing weight gently to remove whey. Your cookie sheet collecting whey may need to be emptied during this process.
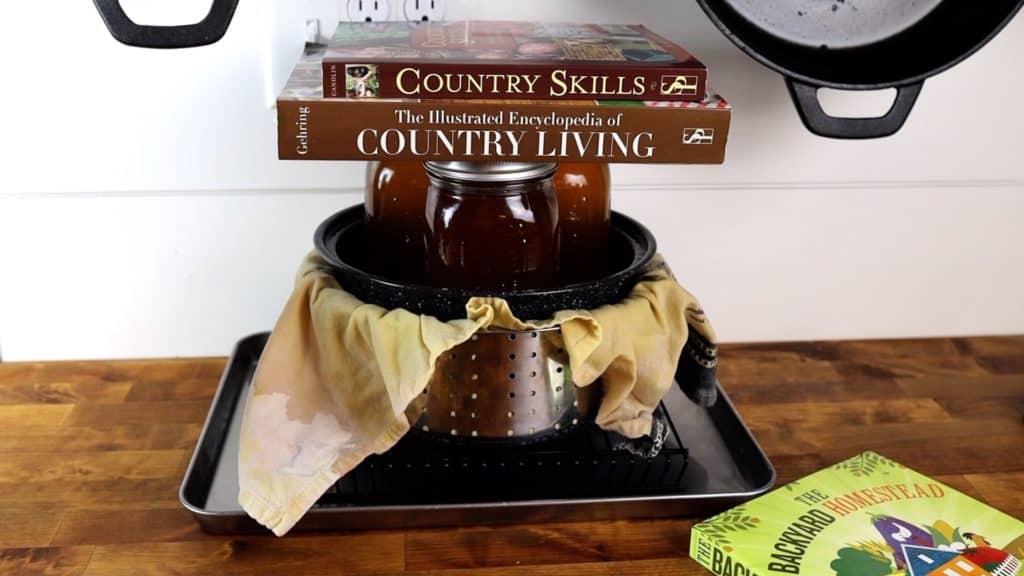
12. After 12 hours, remove cheese from press, flip it, and reinsert into press. Apply weight again to gently remove whey and let sit another 12 hours.
13. Remove cheese from press. Place on drying rack and cover fully with cloth napkin. Allow cheese to dry out for 3-5 days flipping a few times daily.
Note: As cheese dries, it may form mold on the surface. This is normal. Wash down moldy spots with apple cider vinegar.
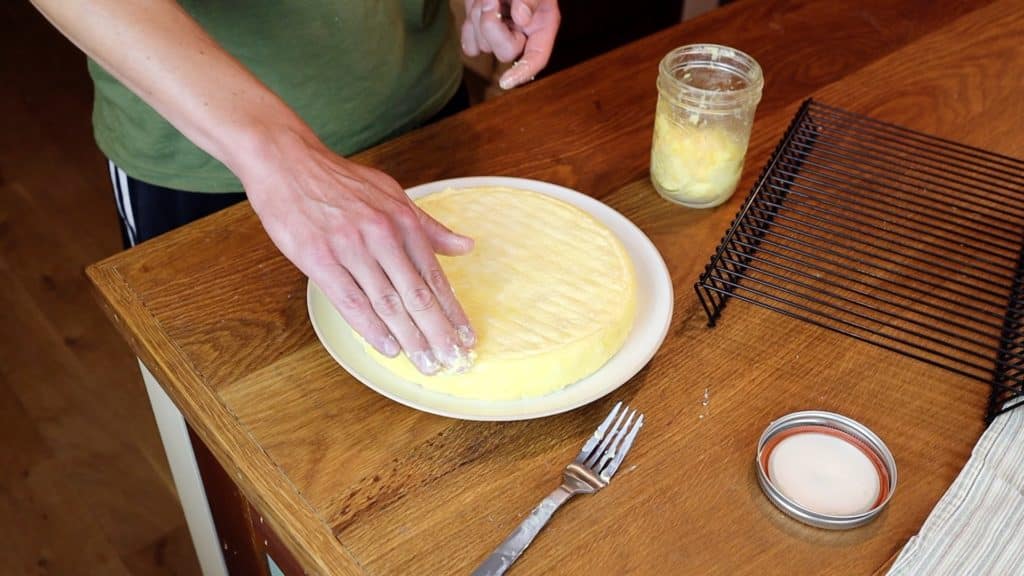
14. After the outside of the cheese dries or mold has formed (clean as noted above), coat the cheese thoroughly in butter (or lard). Room temperature butter works best. Place buttered cheese back on drying rack and cover with cloth napkin.
15. Put cheese away to age for 3-4 weeks, flipping once a day.**
*If you are new to cheesemaking, like I was, the term “clean break” won’t make sense. Essentially, this is just the home cheesemakers method knowing if the curd has set. To check for a clean break, simply insert your finger into the top of the curd 1-2” at a 45 degree angle. Lift your finger out, pulling on the curd. If the curd breaks clean and there is minimal or no curd remnants on your finger, then you have a clean break. If the curd is not yet separated, or fully separated, wait 5-10 more minutes then try again.
**Should cheese form moldy spot while aging, spot clean the moldy area with apple cider vinegar and reapply butter (or lard) coating.
Enjoy this farmhouse cheddar recipe and drop us a comment if you have any questions!
Some of the above links are affiliate links. This means we earn a small commission on qualifying purchases at no cost to you. We are so appreciative of your support!
Looking for more home dairy recipes?
- HOW TO MAKE QUICK AND NATURAL MOZZARELLA CHEESE WITH VINEGAR
- HOW TO MAKE BUTTER FROM RAW MILK IN A BLENDER
- HOMEMADE DULCE DE LECHE WITHOUT SWEETENED CONDENSED MILK
- THE BEST VANILLA RAW MILK ICE CREAM
- HOW TO MAKE CROCK POT YOGURT

EASY FARMHOUSE CHEDDAR HARD CHEESE RECIPE
Making hard cheese at home does not need to be intimidating. In fact, you might have everything you need on hand already! This yogurt-cultured farmhouse cheddar recipe is a tasty and versatile hard cheese that you’ll come back to time and time again.
Ingredients
- 2.5 gallons fresh, good milk*
- 1/3 cup plain yogurt or active kefir**
- Rennet (use dose that corresponds with milk quantity)
- 2-3 Tbsp salt
- 1/2-3/4 cup unchlorinated water
- 3-5 Tbsp butter or lard
Instructions
- Pour milk into stock pot and place on medium heat stove top. Heat milk slowly to 90°F (32°C) stirring often.
- As milk is heating, dilute 1/3 cup yogurt or kefir with a couple tablespoons of fresh milk (I just use the milk that settles at the bottom of the milk jugs). Stir.
- Once milk has reached 90°F (32°C), remove milk from stovetop. Pour in diluted yogurt or kefir. Stir immediately for about a minute. Place cover on stock pot and let milk sit undisturbed for 10 minutes to culture.
- Add rennet to unchlorinated water in a liquid measuring cup. I generally use about a ¼ cup of water per gallon of milk. Make sure tablets are fully dissolved.
- Create a double boiler system to keep your milk at 90°F (32°C). I do not have a double boiler and use a second larger stock pot filled about ¼-1/3 with 90-100°F (32-38°C) tap water. Once milk is cultured, place that stock pot inside the larger pot so the pot with the cultured milk is mostly surrounded by water.
- Pour in rennet and water. Stir quickly for about a minute. Place cover back on stock pot and let milk sit undisturbed for 20-40 minutes, or until a clean break* is achieved.
- Once you have a clean break, slice the formed curd into roughly 1-inch cubes using a long-bladed knife. Slice top to bottom and left to right vertically, and also do your best to slice horizontally in 1-inch increments. Any large curd chunks missed can be made smaller during stirring.
- Stir the cubed curd for 15-20 minutes with a wooden spoon to release the whey. If large curd chunks that missed being cut are observed, break them into smaller pieces with your spoon. The curd cubes will go from having sharp edges to rounded edges. Once the curd is roughly the consistency of a poached egg, the curd is ready.
- Scoop a baseball sized portion of curd into a waiting strainer lined with cheesecloth. Be sure your strainer is sitting on top of a large bowl to catch the whey. Gather up the cheese cloth and gently squeeze the curd to drain some whey. This step is just to remove some excess whey; the cheese press will remove any remaining whey. Place ball of curd into waiting cheese press (or colander if using my cheese press method mentioned above) lined with smooth thin cloth. Place cheese press on top of a cookie sheet to collect whey.
- After 2-3 balls of curd are added to your press, sprinkle about a tablespoon of salt on top of your curd. Work salt into the curd with your hand. Repeat this step along the way until all your curd is in the press and salt is thoroughly distributed throughout.
- Add follower to cheese press. Apply just enough weight to your press to see steady drips of whey flowing below. Let sit in press for 12 hours increasing weight gently to remove whey. Your cookie sheet collecting whey may need to be emptied during this process.
- After 12 hours, remove cheese from press, flip it, and reinsert into press. Apply weight again to gently remove whey and let sit another 12 hours.
- Remove cheese from press. Place on drying rack and cover fully with cloth napkin. Allow cheese to dry out for 3-5 days flipping a few times daily.
Note: As cheese dries, it may form mold on the surface. This is normal. Wash down moldy spots with apple cider vinegar. - After the outside of the cheese dries or mold has formed (clean as noted above), coat the cheese thoroughly in butter (or lard). Room temperature butter works best. Place buttered cheese back on drying rack and cover with cloth napkin.
- Put cheese away to age for 3-4 weeks, flipping once a day.**
Notes
*If you are new to cheesemaking, like I was, the term “clean break” won’t make sense. Essentially, this is just the home cheesemakers method knowing if the curd has set. To check for a clean break, simply insert your finger into the top of the curd 1-2” at a 45 degree angle. Lift your finger out, pulling on the curd. If the curd breaks clean and there is minimal or no curd remnants on your finger, then you have a clean break. If the curd is not yet separated, or fully separated, wait 5-10 more minutes then try again.
**Should cheese form moldy spot while aging, spot clean the moldy area with apple cider vinegar and reapply butter (or lard) coating.
Pin it for later!


I have this cheese doing its first draining right now and I’m very excited! One question, though: after the 3-4 week ageing process, what then? Once you’ve sliced the cheese should it be wrapped in clingfilm and kept in the fridge, or…? How long will it last?
Thanks!
Awesome, hope you love it! So what we do is store a couple of the wedges in a container in the fridge that we know we’ll eat within a couple weeks, and the rest we put in a ziplock bag and freeze for later use. The taste and texture is still great after it thaws. It’s likely that the cheese will last longer than a couple weeks in the fridge, and maybe even continue to age some, but we’ve found it easier just to freeze and take it out as needed. Hope that helps and happy cheesemaking!
I’m just writing to let you know how difficult your website is to read, especially on an iPad.
I have a fourth top of the page and a fourth of the bottom of the page with advertisements blinking off and on.
On the right side of my page, it takes up about 2/3 of the page with constant videos. Then of course you’ve got your F and P log off to the left.
I understand you need to make a dollar off your website but this is ridiculous.
I’m not even gonna finish reading. I just wanted to let you know this.
I’m gonna find a recipe somewhere else where I’m not constantly bombarded with videos and Blinky advertisements.
Hi there! Thank you for this feedback. We really do value it and can understand your thoughts. We have made a very intentional attempt to not make the ads too obtrusive on our site. As you mentioned, the ads do generate revenue for us which our family relies on for our full time source of income. It’s the best way we, and many other content creators out there, are able to offer their content for free. We’re always grateful for any visitors we have here and want to continue to make our site as useful as possible, so thanks again for dropping a note!
Can you use beef tallow to cover the chesse to cure.
Yes, tallow is a great option as well! I’ve used it before and it worked great. You’ll just want to make sure to let it sit out to be at room temperature so it’s easier to spread.
Can I use plain store bought milk?
I have not tried personally with store bought milk, but you should be able to! Make sure it is not ultra-pasteurized. The difference will be that raw milk is already starting with live and actives cultures within it where the yogurt/kefir culture is fortifying what’s already there. With store bought, pasteurized milk you’re starting with nothing. If you go this route, I’d recommend allowing some extra time for the milk to culture while maintaining a steady 90°F temp. Probably in the 30-60 minute range to really make sure the culture establishes. Hope that helps and happy cheesemaking!
I don’t know where you live of course, but Whole Foods, Trader Joes, and Sprouts all carry raw, unpasturized milk, if that helps. I’m sure other stores carry it too but I haven’t been to them. P.S. I’ve made cheese before and there is a vast difference in process, ingredients, time, etc. using raw milk versus pasturized milk. You really can’t make this cheese properly without using raw.
Can you clarify the correct amount of rennet for the 2 1/2 gallons of milk? based on your photo of 3 tabs, that’s 6 ml’s of liquid rennet? That sounds like a lot.
I suppose it’s a little on the high side. My bottle says approximately 1 tablet per 4 liters of milk. So the 3 tablets I use converts to roughly 3.17 gallons. So that’s higher than what’s recommended for the 2 1/2 gallons I use but it produces a nice consistency in the curd. Hope that helps!
Hi,
Thanks for the interesting recipe.
I have a couple of questions:
1. You don’t mention any boiling/cooling of the milk before the process. Is it healthy to use raw milk without boiling it first?
2. Can I halve the ingredients? (for 5 liter pot)
3. How much cheddar do you get for 2.5 gallons of milk?
Thanks in advance
You bet!
1. Pasteurization of milk came to be because of unsanitary practices and urban sprawl before refrigeration was used to transport milk. That definitely wasn’t safe. Fresh milk from small farms that treat their animals well and keep things clean can be completely safe, even much more beneficial than pasteurized milk because of the natural healthy bacteria that are preserved. We use the milk from our cow, so we feel completely safe with the end product. But you should definitely do what you feel comfortable with. If you do your own pasteurizing, it can be done at temps less than boiling to not scorch the milk.
2. You can halve it, but I would try to find as small of a press as possible in this case. The flatter the final product, the more it dries out and gets hard. 2.5 gallons is already a bit on the low side for a hard cheese.
3. We typically get around a 2 lb. wheel of cheese.
Hope that helps! Thanks for stopping by and happy cheesemaking! ????
Thank you for sharing this recipe. When you say “work salt into the curd with hands” should I be breaking up the curd to rub the salt in? I hope so, because that’s what I just did. I tasted a little, and it’s already delicious.
You bet! Yes, you do have to press into and break up the curd a bit to work the salt in. There’s probably other ways to incorporate the salt and keep the curd more in tact, but this has always been the most efficient for me and the curd knits back together just fine in the press. Hope it turns out great for you!
I don’t access to raw milk.
Can I use store -bought milk instead?
What kind do I need? Whole milk, half n half?
Many thanks for posting this recipe! ????????
Good questions! Yes, you should be able to use store bought milk. I think I mention this in the post, but look for milk that is not ultra-pasteurized and non-homogenized. But any store bought milk should still produce a comparable hard cheese. Whole milk would probably be what I would go with. If using pasteurized milk, I recommend allowing a longer culture period of 30-60 minutes when adding the yogurt/kefir while maintaining a constant 90°F. Hope that helps and let me know how it goes!
My apartment is pretty warm. Will this affect how the cheese ages?
Our home is pretty warm too when we make this cheese during the summer months. I haven’t seen it affect the aging too much. Something to watch out for is that the higher temps could lead to mold forming more quickly, so just keep a close eye on it. It may also dry things out more making for a harder cheese in the end. One option would be to move it to the fridge to finish aging if it becomes a concern. Hope that helps and happy cheesemaking! ????
Thanks for you help! It appears a small mouse went after it while it was sitting on the counter last night. I’m going to transfer it to a Dutch oven that they can’t access. Is it still ok to eat the each cheese? I cleaned the spot they nibbled with vinegar and rebuttered the area.
Oh no!! Yes, I think the cheese should still be fine if you pinpointed the spot, cleaned it and reapplied the butter. I like the dutch oven idea! Hope it turns out great!
Thanks for the cool recipe. The “professional” ones could be pretty intimidating, yours seems more simple and forgiving.
Do you think I could achieve some results with 1 or 1.5 gallons of milk? I don’t have a pot big enough for 2+ gallons…
I could make the cheese a bit taller maybe?
Hey! So glad you found it helpful and accessible! Yes, I think a lesser quantity of milk is possible. I’d definitely try for as much as you can fit in your pot. Like you said, your best results will be with a smaller diameter press so it makes a taller/thicker cheese. But even if it ends up on the thinner side, you can just age it a bit on the shorter side so it doesn’t get too hard and should still have a great tasting cheese. Good luck!
What sort of environment to age the cheese for the 3-4 weeks? Just in a dark pantry, covered up with a tea towel, or…?
Woops, I saw after posting this the note about where to age it! That’ll teach me to scroll straight to the recipe! 🙂
Thanks for sharing this recipe. I really appreciate the video because I like to see the process.
One question I have from my first attempt is I noticed a lot of butterfat left in the whey. Is this typical or does it mean I use too much rennet? Basically what would cause this?
I’ve tried googling but I don’t know enough about process to know if I found the answer. My first attempt is just now in the press.
Thank you for you time
Thanks for the feedback and glad you found the post and video helpful! That is a great question on the butterfat. We have had that happen too from time to time. My best guess is that it’s not related to the recipe/ingredients as much as it is a result of the milk content itself and diet of the cow. It seems to be a seasonal thing for us. Maybe when our cow recently switched from hay to fresh pasture and her milk becomes extra creamy. Or maybe after she calved or the calf recently weaned. That’s my two cents at least. It makes a yummy treat at the end of the process if you can scoop it up 🙂 Hope your cheese turns out great!
I used fresh raw milk from this week, temps were all good, followed the directions but I didn’t get a clean break. It was then I realized my husband ought vegetable rennet. So I have roughly 2 1/2 gallons of milk with culture and rennet. What can I do now?
Oh no! Sorry to hear that happened. Some rennets definitely work better than others. Assuming that the rennet never worked and coagulated the milk, the first thing that comes to mind is making yogurt with it. We have a crock pot yogurt recipe on our site – http://fromscratchfarmstead.com/how-to-make-crock-pot-yogurt/. You might also be able to make paneer, or a paneer like cream cheese, by bringing it to boil and adding an acid (http://fromscratchfarmstead.com/homemade-cream-cheese-2-ways/). Ricotta might also be possible. Hope you can salvage it!
If i age the cheese in the fridge at what temp should it be.
Can i use messophilic culture instead of yogurt
Regards
The ideal cheese cave temp is 45-55°F or 7.2-12.8°C. That can be a bit tricky to achieve in a fridge – you’d likely have to move the temperature dial on it all the way up, which isn’t practical if you have other things in the fridge. I’ve just put it a fridge at normal fridge temps with fine results. Fridges are usually colder toward the back, so keeping it toward the front can help. You likely could use a mesophilic culture, but I haven’t personally tried it. My guess is that you’d still get a fine hard cheese, but you may have better results with a recipe that specifically calls for that culture. Hope that helps and happy cheesemaking! ????
Hello! i just finished making this cheese and it is currently air drying, such a wonderful recipe! i was curious if you have ever vacuum sealed this cheese? either right after drying or after the 2-4 weeks of ageing for longer storage
Thanks! So, I have not vacuum sealed it and I’m not super familiar with the process. The only options I’ve done are coating it in butter or lard. I would think you’d want to vacuum seal it on the earlier end without coating it. Possibly even right out of the press. Hope it turns out great!
Hey, this is a great recipe. I have made a lot of cheese from several different animals and this is explained very well. I’m making each cheese wheel with 3 gallons of milk from our Holstein.
I do have a comment though: uses for the whey!
My favorite use: ricotta cheese. It’s very easy to make. Cover the whey and let it sit for 24 hours. It gets sparkly! Pour about 1/2c milk per gallon of whey, some recipes use a higher amount of milk. Using the milk helps pull more ricotta out of the whey. Ricotta means ‘recooked’ and what you do is just let the sparkling whey and added milk cook over high heat. I usually light the fire and forget about it for a couple hours. The ricotta makes these big fluffy curds and you strain it back through tight cheesecloth once it’s COOL. You can then use the whey for any other use, like watering chickens etc.
Last thing! Your stove. Is that a woodstove? Please share specs! We’re remodeling (ie turning our porch into a bigger jerry rigged kitchen) and I would love to look for a different wood cook stove since… mine is lovely… but 100 years old!!!
Thank you!
Hey! Thanks for your comment! And love the mention of ricotta. We’ve started making it a bit here and there ourselves now… such a good use for the whey! And the stove is an AGA cast iron cooker from the UK. It actually runs on gas. We have a separate video where we talk more about ours, but we love it SO much! And it’s the perfect companion for cheesemaking! There’s a warming tray on top that keeps milk right at 90 deg. when you set a pot on top of it. Good luck with the cheese and the remodel!
I forgot to ask; I don’t buy apple cider vinegar anymore since I make vinegar with kombucha. Is there any reason that you know of that using kombucha vinegar would not be okay for scrubbing the mold off the drying cheese? I hope not because I already used it, lolol. Also, any reason not to use rendered duck fat/ duck tallow in place of the butter? Our cow produces a lot of milk but not much cream so I don’t make butter… but we have lots of duck fat!
I think the kombucha vinegar should work just fine but let me know if you find out otherwise! And I don’t see why you can’t use duck fat in place of butter/lard. As long as it has similar traits of being shelf stable to what lard and butter offer you should be just fine. Thanks for stopping by!
Newbie question: What does “add follower to cheese press” mean, please? I just finished my first batch..it’s in the press now. I didn’t have a double boiler to keep the curds at 90 degrees while stirring so I’m a little worried. The curds were pretty firm but were broken into very small pieces by the time I finished.
Good question! The follower is the top part of the press that puts pressure or weight down on the cheese. The cheese sits in a form at the bottom of the press and the follower fits snugly within the form. In my case I just use a small pot that fits pretty snug within the colander I fit the cheese into. Once you get your curd into your press and add some weight to it they should all knit together into a solid cheese wheel. The recipe is pretty forgiving so I don’t think it will be a big issue if your temps dropped a bit after adding the rennet and taking it off heat. In the future you can always put the pot back on the burner briefly, or wrap them in towels to insulate and trap in heat. Hope it turns out great for you!
Why do you say the minimum amount of milk we should use is 2 gallons?
So, you could do less than 2 gallons, but you’d want to use a pretty small press. The reason I said to go at least 2 gallons was to avoid having too thin of a cheese which, from my experience, gets overly dry and hard. A thicker wheel has a better texture. So you can use less, but just be aware of that reality depending on how thick/thin it ends up. Happy cheesemaking!
I made a mistake and applied butter after removing from press. I did not wait 3-5 days then apply butter. Will this ruin the cheese? Also after placing on drying rack covered with towel for 2 days my cheese is still dripping some whey. Is this normal? Maybe I should have left cheese in press for longer than 24 hours?
Hi there! First of all, I don’t think anything is ruined. I don’t have personal experience with this exact situation, but my hunch is that the cheese will still dry out over time, it might just take longer since the butter is now trapping in some moisture. The one thing I’m unsure about is if you’ll experience a greater chance of mold forming from the excess moisture. I’d give it a couple days and see how it behaves. If it’s looking fine and starting to firm up, then you should be good. If lots of mold is forming, then you may need to try and wipe the butter away, clean it good with ACV, and at that point I’d try to let it dry out more maybe 1-3 days and then butter again. And the cheese typically will continue to drip some whey for a day or two once it’s out of the press. Flipping it fairly often helps with this. I’ve started putting a plate or something under it once out of the press to catch the drips. Hope that helps! There’s lots of learning opportunities along the way in cheesemaking, so don’t fret and cheese on!
I cleaned the butter off with ACV and let the cheese dry out for several days. Once dry I applied the butter again. After a few days of butter being on cheese there is a very stinky smell to the cheese. Is this a normal part of the process? No mold has formed, just a very pungent odor. Kind of a mixed smell of the ACV and what smells like rotten cheese to me, but may be normal. Would this be a cause for concern or would you say this is normal?
Hey there! If no mold has formed, and without being able to see/smell it, my guess is the smell is normal. It does have a somewhat strong smell. It shouldn’t be rotten, but as the cheese and butter are aging and culturing it could be mistaken for a rotten smell. If you have any concerns as you continue, you can always move your cheese to the fridge to age for the final couple weeks. And cutting or scraping off the rind around the cheese is always an option before consuming. My guess is the interior well preserved and fine. Hope that helps!
Hello! Thank you for this recipe! I attempted my first batch last night and the curds did not form a clean break, so I waited double the amount of time and I found the curds were in one large mass at the bottom of the pot. I attempted to proceed with the recipe but it turned out that the curds were very dry and crumbly when I strained them out. They did not form together after putting them in the press all night either and are still loose and separated this morning. I used raw frozen goat milk for this recipe, and I also used vegetable rennet. What do you think caused this outcome exactly? Is it because it was frozen? Or is it because of the vegetable rennet? Or both? I want to try again but I don’t know exactly where I went wrong, and I don’t want to mess up another 2.5 gallons! Thanks for your help!
Hey there! Sorry this happened! My guess would be the texture was off from the frozen milk. We’ve avoided making cheese with our frozen milk since the texture seems to change and I don’t think it’s optimal anymore for cheese. I don’t think the vegetable rennet would be the issue. But we’ve definitely had more consistency with animal rennet. Hope it turns out better next time for you!
Great recipe my first cheese. First I forgot to put the salt in after scoping 3 balls and did it after I had already squeezed some whey out so I have to break up the curds to salt. Will that affect the cheese from solidifying. Also do you cover the whole cheese and then put on rack or just put the cheese on rack and cover.
I bought the David Asher book it is really good. Thanks you.
Awesome! Hmm, so breaking up the curd after it’s been in the press for a bit could affect the final product. One, it knits together best before the whey is pressed out. If you caught it early enough it might still come together fine. And two, it also is good for the curd to still be somewhat warm entering the press. Once it’s cooled, it might not come together as well. I’m thinking you’ll be fine though. This cheese is really forgiving with the short aging time. Be careful flipping/handling it once out of the press since it might want to crack apart more easily if there are areas it didn’t come together. For covering, I just drape a cloth over it. There’s still a good amount of moisture when out of the press that you don’t necessarily want to trap in. Airflow is good to help dry it. Hope that helps! And enjoy that book–such a good one!
What a great lot of info on cheddar, thank you.
Can you comment on the need to sterilise equipment and cleanliness – the short workshop I did was emphatic about sterilising absolutely everything that comes into contact with the cheese. Is that what you do? I’m especially interested on how to sterilise a wooden spoon and my fingers!
Hi! So, some cheesemakers definitely emphasize sterilizing everything. This isn’t bad practice and shouldn’t hurt anything – especially if you are aging cheeses longer term. There’s also the thought that a healthy ecology within the milk should keep the competing cultures/bacteria in balance after you’ve cultured it. Which is why the quality of milk you use is so important. For thousands of years cheese was made in wooden vats using wooden utensils without the modern cleaning practices we have today. Those are just some thoughts, but you should definitely do what you feel most comfortable with. With our wooden utensils, we avoid any harsh dish soap and just hand wash them as best we can. One of the things this cheese has going for it is the very short aging time. I’ve not really run into issues with it culturing/aging properly because of this. Hope that helps! Thanks for stopping by and happy cheesemaking!
Trying this recipe for the first time. I have followed it to a T and it’s been 2hrs and still no solid curd at the top of the pot. There is curd at the bottom. Wait longer? Add more Rennet? Add heat?
Hey there! Hmm, it is possible for the curd to form on the bottom. Lots can potentially vary based on the milk, rennet, and temps used. I have had an instance or two where a curd took a long time to form and I added more rennet after 30 minutes or so and ended up with a fine curd. You can always try that, as well as checking the heat to make sure it’s maintaining at 90°F. In the case where the curd forms at the bottom, what I would probably do is pour off some of the whey so the curd is exposed, slice it, and stir from there.
Adding calcium chloride is necessary when using pasteurized milk from stores. Pasteurized milk does not form curds well on top. Instead you will end up with melty mozzarella looking curds on the bottom. So unless it’s fresh never frozen raw milk. It would probably be a good idea to add calcium chloride.
what is the best way to store the whey, and for how long?
I’m getting a lot of use from your milk recipes.
thanks, Randy
Hey, glad they’ve been helpful! We just pour the whey we’re keeping into 1/2 gallon mason jars and store them in the fridge. It’s best to use it within a week or two to stay fresh. But I’ve heard before that whey can last even several weeks in the fridge… we just haven’t tested it 🙂 I suppose another option would be to freeze it in plastic milk jugs and pull it out as needed.
I started this cheese yesterday, and went to redress and flip this morning. There were red spots on it – I think that’s a bad sign. Does that mean that it’s already growing bacteria or something that shouldn’t be there?!
I didn’t wash the cheese cloth before using – should I have? It’s brand new.
Hi there! That’s quicker than I’ve ever had any mold grow. Usually it would come up in the days after you take it out of the press while drying. I’d rinse anything off of it with ACV, finish pressing, and see how it does once you start drying out. I also have not typically seen anything red form, so it’s possible for some sort of contamination to have happened. Not sure if it would be related to the cheese cloth or not. I typically use without washing first too. Hope it turns out for you!
I don’t know about “red” but I have seen brilliant pink pinprick-sized dots grow in my yoghurt before. The yogurt was very old and I think that gave bad growths a chance to happen. Was your milk pretty old when you first made your cheese? David Asher reccomends using the milk still warm from the cow if possible. Or a week old at most. I have noticed that both times my curds turned out weird (gassy, floating, quick to grow weird colored dots) it was because my milk had already been in the fridge two weeks by the time I made my cheese.
Back to the brilliant pink experience; I looked it up and believe it was serratia marcescens, a harmful and very powerful spreader. So I threw away not only the yoghurt but also the plastic yoghurt container. The container was also very old, reused to store yoghurt many times, and s. marcescens does like to sink into your plastics. Was it an old plastic cheese press?
Yes definitely anytime you buy anything that will come in contact with food, wash it before using. The manufacturers do not wash the products, they make them in a big factory and seal them in plastic. There is no telling what kinds of things could have landed on or touched your cheesecloth in a big factory.
I am seriously on my guard when I see red in cheesemaking, I believe I saw s.
marcescens on aged cheese a couple weeks ago (my helper was supposed to brine-wipe and flip the cheese while I was away for 2 weeks. She kinda. . . forgot.), so I sadly composted the entire wheel and soaked the bamboo mat in vinegar for 2 days. I threw away the mat when I saw that some of the other bad molds on it weren’t coming out.
But I don’t know what color of red yours is, maybe it’s a different kind of bacteria/mold. I don’t know what edible red molds there are, if any.
Found your awesome tutorial on YouTube, now I’ve got my very own little wheel of cheese pressing right now! I bought a cheese press and the cheese mold is smaller but taller than what you used, making my wheel significantly thicker than yours (probably about twice as thick!). Do you know if this will affect drying/aging time? Thank you for this easy to follow guide!
Hey there! Yay, that’s awesome!! I wouldn’t say the times would change too drastically with a thicker wheel, but you may lean toward longer. I sometimes double what I have and do 5 gallons for a thicker wheel. In that case I might go an extra day on drying but I don’t know that I usually do that much longer with aging, but you certainly could. It would really depend on your cheese cave or aging setup. If you have a more official cheese cave, then aging longer shouldn’t hurt but only help the cheese develop more taste and sharpness. If you’re aging on the countertop like I do, the wheel ripens more quickly so it doesn’t necessarily help to age much longer in my experience. I think you’ll be happier with the thicker wheel from your press. Thinner wheels can dry out more than is my preference, but a thicker wheel usually gives a smoother, creamier wheel all around. Hope that helps and happy cheesemaking!
I don’t see anyone commenting on your recipe calling for 1/8-1/4 cup yogurt or kefir PER gallon of milk used.
Does this mean you would use 3/4 (on the high side) for 2 1/2 gallons of milk?
Hey! Good question. I typically use 1/3 – 1/2 cup for the 2.5 gallons. I left it a little loose in the recipe because it really doesn’t need to be exact. And also, depending on your milk situation, you might choose to use more or less as a culture. For instance, if I was using pasteurized milk, I’d probably want to use a bit more to culture it since there’s no native culture present. Hope that helps!
Oh sweet! I too have been devouring David Asher’s book (and the resultant cheeses)! Do you think tallow would work for the coating? I know beeswax is used for gouda. Tallow is kind of like a halfway point between a waxed rind and a fat rind, isn’t it?
Hey there! Yes, tallow definitely will work too! I’ve done it before and the end result is just as good as butter or lard. The thing I’ve found with tallow is that, since it stays in more of a solid form, it can be a bit trickier to get to the right consistency to spread. All the best to you!
There are so many adds I can’t even read the post.
Hey! Appreciate your feedback! We always try for the best experience possible for anyone visiting our site, so we’ll definitely take that into consideration. Producing free content on our site is our family’s full time gig so we also need to balance it with some form of compensation for what we put out there, hence having ads. Without them we’d need to either sell our content or require a subscription of some sort. But we do want to make sure the ads are not too obtrusive. Thanks for stopping by!
Hello! I am making this tomorrow, so for the 3-5 days aging just leave out on the counter? Currently 73 degrees in my house. For the 3-4 weeks aging do I leave out on the counter? Or put in my wine cave 55 degrees? TY IN ADVANCE.
Hey there! Awesome! Yes, you can just leave it out on the counter for to dry out initially before coating and aging. 73 should be fine. Just make sure to flip it and check it regularly. I’ve found it’s more prone to molding when I forget to flip it often in that stage. If you have a wine cave at 55 degrees, aging it in there should be perfect! I just don’t have one so I’ve done the counter for aging. Some add a bowl of water in there for some moisture so it doesn’t dry out too much. You could consider aging for longer than 3-4 weeks too with an actual cheese cave, but it’s totally up to you. Maybe cut it in half after 4 weeks and you can see if it’s to your liking… you could always experiment and age one half then a bit longer to see if helps develop a sharper flavor. Hope that helps!
How do I know if I have pressed my cheese with enough weight to get the right amount of whey out? I am drying the cheese, but it still seemed to have quite a bit of moisture on the surface.
Hey there! For me it’s mostly been trial and error on how much weight I add, so I’m not sure I have an exact weight to give you. That happens pretty often to me too where there’s still some of liquid on the cheese once out of the press. The drying process should take care of most of that over a few days. The thing I’ve found to be most helpful when it is wet like that is to flip it more often. Then maybe next time you make it, try adding a bit more weight in the press and see if that helps.
Hey there !
Made this recipe – after 3 days it is ‘dry’. But it has broken in quite a few areas, crumbled off.
Is it still salveable to butter and age? There are lots of cracks along it so I worry of it moulding, not aging or ‘sealing’ so to speak.
Thanks!
Hey! It can get a little crumbly after drying out. I usually try to butter it before it gets too too dry, but I definitely don’t think it’s a lost cause. I’d still go ahead and butter it. If you leave the butter out so it’s easily spreadable and spread on a nice thick coat you should be able to fill any cracks or gaps. Hope it turns out great!
Just made this being my first hard cheese. Thank you for the great detail! I was so scared to make a hard cheese till I came across your recipe. I had excess milk from my jersey today,
So I had to dive in and get it done. So far looking good. Let’s hope it turns out. Thanks again.
Wonderful!! I hope it turns out great for you!
We finally tried this yesterday with some local raw milk. I had some extra curd that didn’t fit in my press, so I made cheese curds with the residual, which turned out great. Basically, we cooked the curds at 116 for 1/2 hour, then pressed and added salt. Very good.
Thank you for sharing. I love all your videos.
Cheese curds sound amazing! Hope the cheese turns out great and thanks so much for the kind words!
Hi! I’m at the point where it says to put the cheese “away” to age. Put it away where?? Does that mean to leave it on the counter where I had it before I buttered it? For what it’s worth, I tried to search for specifics on this page but it keeps reloading on me and I’m struggling to be able to search. THANK YOU!
Hi there! The ideal would be to put it in an actual cheese cave to age. Many people convert a small fridge or wine fridge to maintain temps between 45-55°F for a cheese cave. Realizing most people don’t have that readily available, in the YT video tutorial I made, I explain a bit more on how I typically just age mine on the countertop with fine results. Since the aging time is short, this has worked well for me as long as the space it’s kept in isn’t too warm. Occasionally, I’ll move it to a fridge for the last couple weeks of aging. But the fridge can also dry the cheese out quickly too. Hope that helps!
Do you ever use wax instead of butter/lard to coat your cheese?
I haven’t used wax yet, but you certainly can! I would think you’d be able to age it longer too with the wax and develop a sharper, more developed taste. Good luck!
Hello! I made this cheese for the first time yesterday. I stopped pressing it after just 9hrs because there was no more whey coming out (and I used much heavier weight than you did). Then, I let it dry for another 18hrs and it was quite dry on the outside and starting to crack, so I went ahead and buttered it and put it in the fridge for aging.
I’m curious of why my cheese dried so quickly. Did I do something wrong before the pressing stage or could the temperature of my kitchen be a significant factor? We live in rural Uganda and our kitchen is probably >85F at the hottest part of the day (75–80 at the night). It’s also quite dry here right now. Would this be enough to cause it to dry much faster? Thanks in advance!
Hello! Fun hearing from people in different parts of the world! There could be a few factors. Like the rennet you used and initial separation you got. Or the timing of how long you stirred the curd to allow the whey to release. Or how much whey was squeezed out while getting into the press or in the press. But yes, I’m guessing the warmer, maybe drier, temperature also was a factor and helped it dry quickly. I don’t think the quicker dry time should hurt anything. Hope it turns out great for you!
Hello, thank you for the wonderful cheese recipe. We have made, aged, and (mostly) consumed our first wheel of cheese. I can’t believe how easy it was!
I have two more drying right now and am hoping you can help me troubleshoot the mold issue. When mold does grow, the apple cider vinegar will not scrub it off. I have ended up scraping it off, but wonder if that is ill-advised.
Do you have any ideas as to why it is not working? Am I not flipping the cheese enough. I am using a thin towel instead of a cloth napkin. Could the towel be too thick? Is scraping the cheese an okay method?
Again, thank you so much for the recipe.
Hi there! Glad you’ve enjoyed the cheese! Hmm, that’s interesting that it won’t wash/scrub off with the vinegar. I’ve had it where a few spots might not wipe away with ACV and I need to scrape it or cut off with a knife. So I think that should be fine as long as you’re removing it. I’d probably still make sure to wipe the surface down with ACV afterward to deter an further growth. I do think flipping more often can really help. You might also try pressing with a bit more weight to remove more whey so it dries quicker. Sometimes with the towel I try to prop it up a bit above the cheese so it doesn’t get pressed so tightly on top of the cheese and allows for airflow. Hope that helps!
Thank you! I wasn’t wiping it down with ACV after scraping, so I’m really glad I asked. I’m sure that will help. I appreciate your suggestions.
Can I wax the cheese and age longer?
Yep, definitely can! I don’t have personal experience waxing it. But I imagine you’d just wax similar to how you wax other cheeses and age for 3-6 months or more it should develop some more flavor.
I’m using yogourmet kefir powder. Is it ok to use if it’s only been 18-20 hours or does it need the full 24 hours?
Hi there! I can’t speak from experience since I haven’t used that product before. My guess, however, is that if you’re in the position where you need to use it and it’s already been around 20 hours it should be fine. Thought maybe not quite as strong as if you wait the full 24 hours. Hope it turns out great and thanks for stopping by!
Does it taste like English Cheddar? The thought thrills me. I’m in Costa Rica, mold here in the highlands given the high humidity is a concern. Can I wrap it in cloth and dry and age it in the fridge? Thank you.
I can’t say I’m super familiar with english cheddar, but from the description I read on it, they do seem similar! Yes, I think cloth wrapping and aging in the fridge would work. I’d probably still recommend drying a day or two outside of the fridge and flipping often if you can before wrapping. And I think some sort of coating (butter, lard) would still be best to combine with the wrapping. Hope it turns out great!
Hi. I no longer have a cow and Raw Milk is illegal in Canada.
I can buy non homogenized A2 milk that is 3.5 % milk fat. Would it work if I add citric acid like I do when making Fresh Mozza then carry on with with the rest of the process?
Hi! I’m not sure citric acid would be best for farmhouse cheddar. The milk doesn’t need to be acidic like when making mozzarella. I know many add calcium chloride when using pasteurized milk, but I have not personally tried it. Sorry you are not able to get raw milk. Hope it works for you!
Hi. Quick question before I make my first wheel. Is it possible to seal the wheel with organic raw honey instead of butter. We have a hive so this would be awesome to use
Hello! Oh, honey is something I haven’t thought of before! The thing about fats like butter or lard is that they’re fairly neutral. Honey will definitely have some sort of flavor impact… which may not be the worst thing 🙂 My other concern would be the potential for some other form of bacteria to be introduced from the honey. But hopefully the cheese would be stable enough by then. The other thing of course would just be the stickiness of it in needing to cover it and flip it regularly. You may want to try and do some research on it and see what you find. But in theory I don’t see why it couldn’t work. If you give it a go, let me know how it turns out!
I’ve left my last wheel age for about 9 months (that sounds better than ‘I just kept postponing checking if it was still ok to eat’ 🤭). I thought I’d have to throw it away but it tastes like and has the texture of Parmigiano 🤤👌🧡
Oh wow, so glad to hear it turned out for you after aging that long!! That’s awesome!