From Scratch Farmstead
  • About
  • Homestead How-to’s
    • Family Milk Cow
    • Gardening
    • Chickens
    • Small Scale Farming
    • Buying A Homestead
    • Homestead Living
  • Nourishing Recipes
    • Home Dairy
    • Food Preservation
    • Breakfast
    • Main Course
    • Sides
    • Dessert
    • Sauces & Condiments
  • Natural Living
    • Skin Care
    • Home Essentials
    • Living On A Budget
    • Our Healing Journey
    • Homestead Skills
    • DIY
    • AGA Stove
Tag:

meat chickens

beginners guide to processing chickens at home
ChickensHomestead How-to's

Beginners Guide to Processing Chickens at Home

by From Scratch Farmstead July 14, 2022

There are many great resources out there on how to process a chicken at home. But what about all the other details of processing day? Supplies, setup, storage, help? After a few rounds of processing chickens at home on our homestead, our formerly suburban family shares everything we’ve learned to get you fully ready for processing day.

You Got this! You Can Process Chickens at Home!

First off – you’re not crazy for considering processing chickens at home.

In fact, we admire you. We commend you. And we are here rooting you on!

Is it scary? Yes! Is it intimidating? You bet! But is it impossible? NO! 

You CAN process your own chickens!

Just a few years ago our family was living in the suburbs raising backyard chickens. We had a couple chickens that needed to be culled from the flock and considered butchering them ourselves. In the end, we couldn’t work up the gumption to do so. Off to a local farmer friend they went.

2021 was our first full year on our homestead and we dove in head first. We raised two rounds of chickens for meat with around 20 birds in each batch.

kids checking on the broilers

Processing day loomed. But we were bound and determined to figure it out, have our own supply of homegrown meat, and develop the skill of processing chickens at home.

Fast-forward to today, and we just completed successfully processing 60+ chickens right in the backyard of our 5-acre homestead.

If our suburban raised family with little or no experience can do this, you can too!

A Home Butchering Companion Guide

This post serves as a companion guide to processing chickens at home. It will not teach you how to actually process or butcher a chicken. There are plenty of good posts and videos out there on that. Rather, view this post as a companion guide to help you feel prepared and confident heading into butchering day.

(A quick note on that – there is no one way to process a chicken. For instance, you might find a resource that tells you to discard the organs, cut off the wing tips, and get rid of the feet. However, we keep the livers and hearts to make pate, leave the wing tips on the bird, and make the most delicious bone broth out of the feet. Develop a method that works for you!)

butchering chickens at home

What to Prepare For At Home Chicken Processing Day

We’ll get to butchering day. But here’s a list of what you’ll want to plan out well in advance:

1. Freezers

If you’re processing more than a couple chickens, you’ll most likely be freezing them. Be ready for this by having appropriate freezer space cleared out and organized. Plug in any freezers that haven’t been in use days before processing day. 

Note: Never fill a freezer entirely full of freshly processed chickens! The freezer will likely not be able to chill all the birds down in time before the meat goes bad. Instead, we fill a freezer half full with fresh chickens and then fill the rest of the space with already frozen items. This helps distribute the cold evenly so everything chills down quickly.

2. Packaging

Think through how you will package your chickens and order supplies ahead of time. We recommend using shrink wrap plastic bags. Here are the bags we use. Yep, we don’t like using plastic either – let alone packaging our food in it. But these bags seal up so nice and your chickens will stay fresh longer in the freezer.

homegrown chickens in shrink bags

The bags we use come with zip ties and labels. One method to shrink the bags utilizes a straw and you may consider picking up a few of these. They make straws specifically designed for this process. Or, we just used spare aluminum straws we already have.

Note: Pick up a few more bags than you’ll actually need (i.e., don’t order 50 if you have 50 birds). They take some getting used to and you may need to discard a bag or two that doesn’t seal up correctly and start with a fresh bag as you’re getting the hang of it.

3. Moving Your Chickens

The closer your chickens are to your processing setup, the less time you’ll spend running back and forth during processing. Whether you’re using a livestock trailer, dog crate, or a yard trailer, wheel barrow or cart with a cover, you’ll want to have a plan come processing day. Just moving a couple birds is manageable. But if you have 15 or more, make sure you have an efficient way to relocate them to be close by where you’ll be processing.

meat chickens being transported in dog crate
moving meat chickens in an atv

4. Cut Off Feed

You will want to cut off feeding your chickens the day prior. We’ve read anywhere between 8-24 hours. The butchering process goes much cleaner and smoother when they don’t have feed in their systems. If your birds are on pasture, you may still find their feed sacks filled with grass, plants, and insects. One option is taking them off pasture the day prior to avoid this. Make sure they always have access to water.

5. Gain Firsthand Experience

Unless you have experienced chicken processors helping out, you’ll want to create opportunities to go through the processing steps before tackling the job on your own. One way to do this is to process just one or two chickens at home yourself before butchering day. It won’t be efficient. But you’ll learn a lot and have the chance to go through each step of the butchering process firsthand.

Another great option is to reach out to a local farm or homesteading family that processes their own chickens and ask about helping out. Learning from seasoned pros is the best way to learn. You can also keep an eye out for chicken processing field days offered through local farm groups and organizations.

processing chickens for meat at home

Chicken Processing at Home – Setup & Equipment

Let’s walk through each processing station and what you need to think through and have on hand:

1. Draining the blood

The first step is humanely killing the chicken and draining the blood. We recommend the use of killing cones which can be screwed onto a tree, fence post, or any other stable structure that can easily be rinsed down. These can be purchased, fabricated at home, or, as we found out in our last chicken butchering, made from a 5-gallon bucket.

chicken killing cones fastened to tree

You will want one killing cone for every 5-10 chickens. The blood takes several minutes to drain so the more cones you have, the more efficient you will be. Too few cones will create a bottleneck at this station.

Here’s a list of what to have on hand:

  • Killing cones (one for every 5-10 chickens)
  • Screws and a drill (for fastening cones)
  • Box cutter with fresh blade or very sharp knife
  • Spray hose (to rinse off blood occasionally)

2. Scalding

Scalding your chickens loosens their feather for the next step which is plucking. Scalders come in different shapes and sizes but the basic components are a large pot and burner as a base. This can be anything from a large stock pot to a cauldron. A turkey fryer can work great. The more water it holds the easier it will be to maintain even temperature.

chicken scalder and plucker
scalding chicken in pot

Keep in mind, a very large scalder can take 1-2 hours to bring up to temperature. You’ll want to get this filled and heating well before you start processing chickens. 

Here’s a list of what to have on hand:

  • Scalding pot
  • Burner
  • Propane tank (plus a spare)
  • Lighter
  • Thermometer
  • Metal hook or pliers (in case chicken falls in)

3. Plucking

Plucking can either be the slowest or quickest part of the process. Hand plucking is slow and laborious. Using a drum plucker or other plucking machine makes this step a breeze. 

With a drum plucker you need a hose and spray nozzle on hand to rinse the chickens as they spin and wash down feathers. Depending on how many chickens you are processing, you may need to clear out the feathers midway through so the plucker doesn’t get jammed.

drum chicken plucker

They also make smaller plucking contraptions like this drill attachment plucker that could be a good middle ground.

Here’s a list of what to have on hand:

  • Plucker
  • Extension cord and power supply
  • Hose with spay nozzle
  • Rake for cleanup
  • Bin, bag, or bucket to collect feathers

4. Removing the Innards

Once plucked, your chickens move to a table where parts of the chicken are removed. This typically includes the head, feet, and guts inside the chicken. Having a stainless-steel table is ideal, but a sturdy folding table that is easily wiped down will also work.

Next to the table you will want a water supply to clean the birds after removing everything. A hose will suffice, but a sink is most ideal. We used a utility sink with a hose connected to it. This gives you use of both hands to thoroughly clean the birds inside and out.

sink and table for processing chickens
removing chicken innards during processing

This station is the other area where bottlenecks can occur, especially for beginners who are not yet efficient or confident at removing and identifying parts. Have as many people and cutting stations complete with a sharp knife and cutting board as you can.

We use a sharpened fillet knife for opening up the chicken and removing the insides and the feet. Have a few on hand. A meat cleaver is best for removing the head. One cleaver can typically be passed around and shared for smaller batches of birds.

processing chickens on stainless steel table

You will also want a few buckets to collect anything being discarded along with several towels to keep the space clean along the way. And if you are saving parts like the feet, livers, hearts, etc. consider having spare gallon zip lock bags or chicken bags.

Here’s a list of what to have on hand:

  • Sturdy, wipeable table (or multiple)
  • Sink and/or hose
  • Sharp knives (multiple)
  • Meat cleaver
  • Knife sharpener
  • Cutting boards (multiple)
  • Buckets or bins
  • Towels
  • Bags

5. Chilling Down the Birds

Once you are left with the chicken in its final form before packaging, you need to chill down the birds. You do this by submerging them in cold water. Multiple methods can be used – cleaned out sinks, stock tanks, or storage bins are fine options. Our preference is to use coolers.

We fill the coolers with cold water and submerge the birds fully in them. Coolers are also great because they have a cover to keep flies away. Make sure you have enough space to fit your birds in. If your chickens are going to be sitting in the coolers for more than a couple hours before making it to the freezer, we also recommend having ice or ice packs to add to the water and further chill the birds.

putting chickens in cooler to chill down

Here’s a list of what to have on hand:

  • Coolers (or another water holding option)
  • Hose
  • Bags of ice or ice packs (optional)

6. Packaging

From here on out, everything with the process should be kept clean. 

You will want another clean, sturdy table ready for packaging your chickens. At this table you’ll have chicken bags, zip ties, straws, some fresh towels, and don’t forget a pair of pliers to really draw the zip ties tight after the bags have shrunk.

Next to the table is your large pot on a burner with a propane tank for shrinking the bags. We used a turkey frier. If you are using the same pot you used for scalding make sure to dump the water, clean the pot, and start fresh. The temperature needs to remain between 190-205°F so you’ll want to monitor the temperature fairly closely. Have a thermometer on hand.

packaging chickens in shrink wrap bags

This is also your final chance to give the birds an inspection to make sure everything was properly removed or pluck any overlooked feathers. The lungs are easy to miss, so double check for those!

I also like to tip the bags upside down once the chickens are inside and give it a good shake to make sure all the liquid has drained prior to zip tying and shrinking.

Here’s a list of what to have on hand for chicken processing at home:

  • Large pot + burner + propane
  • Lighter
  • Thermometer
  • Chicken bags (or other packaging supplies)
  • Zip ties
  • Straws
  • Pliers
  • Towels

7. Weighing and Labeling

Next, you will need another clean table space with your scale and a permanent marker. We weigh each bird and like to put the weight and date on the label. Note that the bags should be dried prior to applying the label for it to stick. So have some clean towels on hand here too.

weighing and labeling chickens

Here’s a list of what to have on hand:

  • Kitchen scale
  • Labels
  • Permanent marker
  • Towels

8. To the Freezer!

From there, your birds are ready to head to the freezer (or fridge for fresh eating). Move them to the freezer as quickly as you can following the packaging. Keep in mind what we mentioned above to not overstock any one freezer with fresh chickens.

What if I don’t have chicken processing equipment?

For chicken processing at home, owning your own plucker, scalder, or even things like killing cones or a turkey fryer might not be practical. We ourselves don’t own any of those things! This is where networking in your local farming or homesteading community comes in handy. 

Give that farm you purchased chickens from in the past a call and inquire about their equipment. Or, see if they know anyone who has equipment. Check with those neighbors that you see raising their own meat chickens. Maybe you can work out a deal to rent what you need or barter something of value with them.

Even our local feed store has a plucker that they rent out at a reasonable rate for at home chicken processing. 

If you ask around about processing equipment, a good option in your local rural community is bound to pop up!

setup for processing chickens at home

Some of the above links are affiliate links. This means we earn a small commission on qualifying purchases at no cost to you. We are so appreciative of your support!

How do I find the right help for processing chicken at home?

Believe it or not, butchering chickens is not everyone’s cup of tea. But as you talk to more family, friends, and people in your community, you are sure to surface those who are fascinated by it, want to be more connected to their food, or want to learn the skill to someday butcher their own chickens.

Here are some ideas of ways to find help:

  • Offer a chicken or two in exchange for someone you know who’s interested to come help on processing day.
  • Find a fellow farmer or homesteader who processes chickens at home and offer to help with their processing in exchange for them helping with yours.
  • Better yet, talk with them before ordering chicks to line up your processing days so you can do them the same day and share equipment and help.
  • Post on a local farm Facebook or other social group to see if anyone has experience and can help, or who wants to learn and can volunteer.
having fun processing chickens at home

Many hands truly does make for light work when it comes to processing chickens at home. There is always a job to be tended to. We recommend lining up more help than you think you will actually need. For instance, when we processed around 20 chickens at a time there were 6 or 7 helping and the whole process went quick and was finished in around 2 hours. This past butchering with 60+ chickens there were only 5 of us and it was a full day job. We were exhausted after our day of processing chickens at home!

Processing Chickens at Home IS Possible!

So, remember – you are not crazy for wanting to be tied to the ways your ancestors butchered and prepared their own food for generations. In fact, it’s entirely human.

My Mother still recalls her Busia (Grandma) grabbing a chicken from their backyard in downtown Chicago, chopping off its head, butchering it, and preparing it for a meal that day. We use that same meat cleaver on our chickens today!

Think through the steps of chicken processing at home. Track down the equipment. Line up some help. You are entirely capable of figuring it out from there and having your freezer stocked full of your own homegrown chickens!

But, friend, what questions do you still have? Or what’s been your experience with processing chickens at home? Drop a note in the comments below and we look forward to connecting!


Looking for more information about raising chickens for meat? Check out these posts:

  • Cornish Cross Vs. Freedom Ranger Chickens
  • Chicken Tractor Plans For 25 Chickens
  • How To Create A Quarter Acre Self Sufficient Homestead Garden

July 14, 2022 0 comment
0 FacebookTwitterPinterestEmail
quarter acre self sufficient homestead garden
GardeningHomestead How-to'sSmall Scale Farming

How To Create A Quarter Acre Self Sufficient Homestead Garden

by From Scratch Farmstead July 10, 2022

Year-round self-sufficiency is possible! We’ll show you our homestead garden and explain how.

A home vegetable garden is lovely. Who doesn’t love fresh produce in the summer and fall. 

But what about those long winter months? How do you feed yourself then? 

On just a 1/4 acre of our property we are able to grow well over half of the food our family consumes each year. This includes meat, fruit, and a variety of energy rich storage crops that we harvested last fall and are still eating into July.

How Our Self-Sufficient Homestead Garden Began

You can read more about how we got here in our post, Beginners Guide to Self Sufficient Homesteading. 

But to give you the condensed version, after moving onto our 5 acre homestead, relying on the grocery store for our food just didn’t seem to make sense anymore. We desired a more self-sufficient, homegrown life.

Learning the secret to feeding ourselves through the winter would be key. So, we looked at how our ancestors grew, preserved, stored, and prepared food before the era of stocked supermarket shelves.

This looked like baskets full of potatoes in the cellar. Chickens on hand to butcher for a quick source of protein any given day or week. Thick skinned squash laid out in single layers that lasted until next year’s harvest. And storage varieties of apples and other fruits that stay fresh long into the winter and early spring months.

tilling up rows for three sisters garden.JPG

Was all this possible on our land? And how big of a space did we need for all of it?

In the winter of 2020-21, the design challenge was on. Here’s a breakdown of the homestead garden we came up with and how it’s worked so far.

Developing Whole Farm Systems

No one part of any farm stands alone. Instead, we see our job as creating a whole farm ecosystem. Each piece should work in harmony and be a companion with the whole.

For instance, an orchard provides diverse habitat for beneficial insects. Raising animals allows for natural forms of land management and replenishing nutrients into your soils. Growing a diverse range or crops increases your lands resilience to drought, pest, or disease. They all make up the whole.

rows of trees and rows tilled for three sisters garden

The things we were planning to grow were:

  • Fruit trees
  • Chickens for meat
  • Three sisters garden (corn, beans, squash)
  • Potatoes
  • Other storage crops (carrots, beets, turnips, garlic, etc.)
  • Honeybees

The question rolling around in our brain is how can we establish all these things on our homestead in one single space and system that works together. Some ideas started to form and it became clear that fruit trees were step one.

Starting with Fruit Trees in our Homestead Garden

The only permanent things from the list above were fruit trees. That would be our starting point! We targeted a long, rectangular part of property that was flat with full sun. It turned out to be about a 1/4 acre.

For our 30 fruit trees we had ordered, we tilled up 3 long rows. Each row was approximately 175’ long and 3-4’ wide; trees were planted about 18’ apart in each row.

self sufficient garden rows with trees

While we knew it would be years before these trees produced fruit, it was a worthwhile investment to make early in our homesteading journey. In our post, Beginners Guide to Homestead Fruit Trees, we talk all about planning out your orchard and how to source your trees. We order from Fedco and planted unique, heirloom varieties – many of which are optimized for storage through the winter.

So, our orchard was established! But what about the rest?

planting fruit trees with kids

Planting a Three Sisters Garden

We had recently been introduced to the three sisters gardening method. This brilliantly simple companion planting method produces incredible amounts of food – corn, beans, and squash – that sustained generations of Native Americans. 

So, between the three rows of fruit trees we tilled up two more long rows – each about 150’ long. Following the traditional planting technique, we created mounds every 4’ or so where we planted corn and beans with squash plants between each mound.

self sufficient garden rows for storage crops

We probably shouldn’t have been as amazed as we were given the age-old wisdom this system carried with it. But it all flourished and did exactly what it was supposed to! The corn grew tall, the beans trellised up the stalks, and the squash created a massive ground cover over all of it.

three sisters garden with irrigation

Planting Potatoes and Other Storage Crops

Remember how we tilled up those long rows for the trees? Well, that left a lot of cultivated, fertile stretches of soil between those trees. In them we planted potatoes. Lots of potatoes. 50 lbs. worth.

established three sisters garden with potato rows

In 2022 we also planted more storage crops besides potatoes. The previous fall we planted around 100 heads of garlic. In the spring we then added root storage crops like carrots, beets, and turnips. We had previously planted these root crops in our vegetable garden. However, it made sense to relocate all of these to this self-sufficient homestead garden area focused on other storage crops.

Raising Chickens for Meat

The spacing between our rows was determined by the Suscovich Chicken Tractor we built to raise our meat chickens in. The tractor measures 6’ wide. So, between each tilled row, we left a 6’ grassed alleyway.

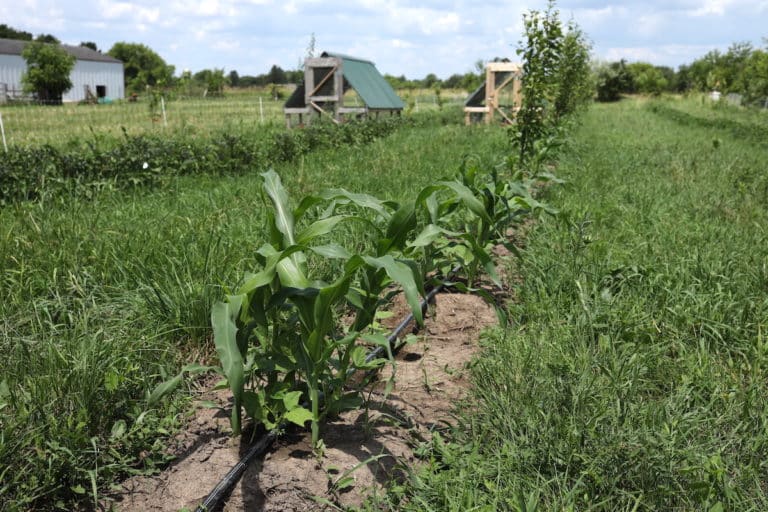
We pull the chicken tractor through those rows, moving them twice a day. This allows us to raise our meat chickens on fresh pasture. Our chickens really thrived in this system where they act out their natural foraging instincts and help offset the cost of feed.

pulling chicken tractors through garden

Moving the chicken tractor through the pastured alleyways also helps cycle nutrients and organic matter back into the soil of our homestead garden. The chickens are never in one spot for long. So, their manure is evenly distributed and not concentrated in any one area.

Adding Bee Hives

We also recently added 5 beehives to the corner of this quarter acre rectangular system. Between the trees, pasture, and crops, there is continuous flowering happening throughout the season. Since the crops growing within this system rely heavily on pollinators, we look forward to having the honeybees close by. And we can’t wait to harvest honey and beeswax!

adding honeybees to your garden

What We’ve Learned and How We Are Adapting

After one full growing season, we did make a couple changes that should help refine this system in the future:

1. Rotating Crops

We knew it wouldn’t be wise to plant the same crops in the same locations. Especially with growing crops like potatoes and squash that are susceptible to pests when not rotated. So, we planted our three sisters garden in the rows with the trees this year and flip flopped our potatoes to be in the two smaller 150’ rows. So far this seems to be working great!

2. Building a Second Chicken Tractor

Our first year went smoothly but one challenge kept popping up – fighting back the squash plants! We raised two rounds of meat chickens spanning into early August. Keeping the grassed alleyways clear of sprawling squash plants this long to pull the chicken tractor through was no simple task. To remedy this, we built a second tractor and raised a double batch of meat chickens early in the season. A less irritated gardener + happy squash plants = winning all around!

three sisters garden with chicken tractors

3. Abandoning Planting in the Tree Rows

We realize eventually we will need to stop planting in the rows with the trees. This year might be our last. The tree roots are establishing more and eventually they will get big enough to shade out whatever is growing under them. We may establish one or two more rows for planting on the outside of the current rows. Or, we may simply just plant in the two existing 150’ rows. So far, this garden system has produced more than our family needs. So, planting in less space may very well simplify things and produce an appropriate amount for our family.

The Self-Sufficient Homestead Garden Harvest

That first fall, we were blown away with how much food we produced on such a small space. Literally, we had over 1,000 lbs. of potatoes, hundreds of winter squash, buckets of beans and corn, and 40+ chickens in the freezer. This year, we already have 63 chickens in the freezer and the gardens are looking strong!

suscovich chicken tractor with metal roof

We are still in the very early stages of our homesteading journey. What we want you to know is that it’s totally possible to raise meat, fruit, and storage crops to feed your family all year round.

And it doesn’t have to look at all like what we’ve laid out. Yes, it’s possible to reproduce this exact system on some properties. But what if your property doesn’t have a full 1/4 acre for planting? Or you’re in the suburbs or even an urban setting?

young three sisters garden

You can still grow SO much food! A three sisters garden can be planted in any unused space on your property. You can build raised beds and plant root storage crops in them. You can plant potatoes in containers on your patio. Chicken tractors can be built to fit in almost any yard space. And hey, don’t limit your gardening to the backyard. As we found out when we lived in the suburbs, the front yard is a great option too 😊.

Where are you at and what steps are you taking toward self-sufficiency? We’d love to hear from you! 

Interested in more self sufficient living topics? Check out these posts:

  • Beginners Guide To Self Sufficient Homesteading
  • Cornish Cross Vs. Freedom Ranger Chickens
  • Chicken Tractor Plans For 25 Chickens
  • Beginners Guide To Homestead Fruit Trees
July 10, 2022 6 comments
3 FacebookTwitterPinterestEmail
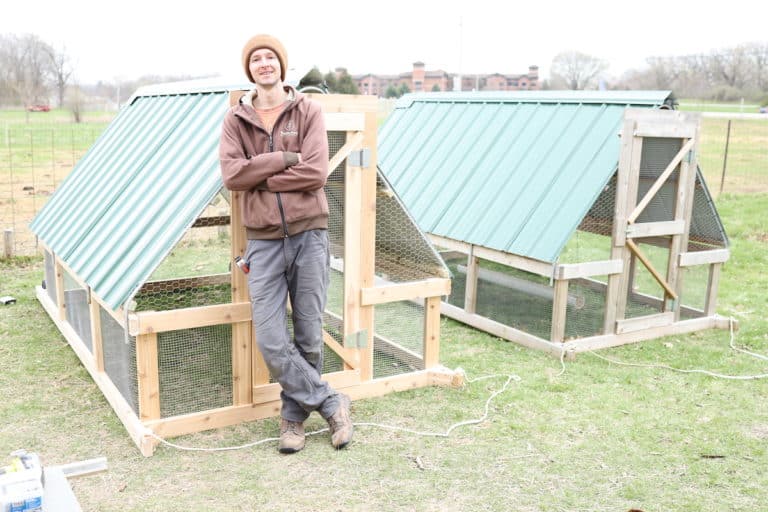
suscovich chicken tractor with added metal roof
ChickensHomestead How-to'sSmall Scale Farming

Chicken Tractor Plans for 25 Chickens

by From Scratch Farmstead May 1, 2022

Whether you’ve already built a whole fleet of Suscovich chicken tractors, or are building your first one, this step-by-step tutorial will show you how to add a metal roof to these beloved chicken tractor plans.

Why A Metal Roof?

I love the Suscovich chicken tractor plans but, in my mind, it has one flaw – the ROOF!

The plans call for a tarp to cover over the top of the tractor and act as a roof. There are two things I don’t like here: 1) tarps wear out quickly and I really didn’t like the idea of buying a new tarp each year, and 2) it leaves a weak link for predators. If a predator really wanted to get into your tractor, they could easily find a way to chew through or get under the tarp for easy access to your chickens.

A metal roof is the perfect solution to fully enclose your Suscovich chicken tractor, make it entirely maintenance free, and it will look really sweet. The metal roof will likely outlast the chicken tractor itself.

fitting metal pipe on suscovich chicken tractor

Why Build a Suscovich Chicken Tractor?

I owe a great deal of gratitude to John Suscovich in my own farming journey. John is a farmer on the east coast and started Farm Marketing Solutions. He specializes in raising meat chickens on pasture at a small scale. His podcast was one of the first entry points I had into small scale farming.

When we wanted to raise meat chickens on our homestead, I knew I needed to pick up a copy of John’s book, Stress Free Chicken Tractor Plans. In it, John walks you through his simple, yet ingenious, plans of how to build a chicken tractor for raising meat chickens on pasture.

Now, I love building things and coming up with my own designs. But spring is always a very busy time. The to-do list is a mile long. Just being able to follow a step-by-step guide and knowing you’ll have a really solid finished product in the end has been just the ticket.

stress free chicken tractor plans

The plans do leave a little room for interpretation in some areas. But they are well done and I totally recommend buying the plans if you are wanting to raise meat chickens on your farm or homestead.

In the rest of this guide, I’ll share the details of how I added a metal roof onto my Suscovich chicken tractor and how you can too, along with some other build tips when following John’s plans.

Some of the above links are affiliate links. This means we earn a small commission on qualifying purchases at no cost to you. We are so appreciative of your support!

How to Add a Metal Roof – Step-By-Step Guide

Materials

To start you’ll need to pick up the materials for your metal roof. Here’s a materials list:

(4) 10’ long sheets of metal roofing (36” wide)

(1) 10’ long metal corner and gable trim*

(1) box of metal roofing screws with rubber washers

(3) 10’ 2×4’s for exterior use (either treated or cedar lumber)**

metal roofing screws for chicken tractor

*I opted for the corner trim piece instead of a ridge cap. Both will work, but the corner trim piece is about the half the price and, in my opinion, looks a bit more size appropriate on the tractor.

** The 2×4’s will need to be ripped in half to essentially make 2×2’s or furring strips. You can buy furring strips instead to avoid needing to cut them in half, but furring strips are notorious for being twisted and you may not even be able to find them in a 10’ length. In my case, it was easier to buy straight 2×4’s and rip them in half with a table saw.

Step 1 – Cut Your Horizontal Runners or Purlins

You’ll start by cutting all three of your 10’ 2×4’s in half so they are approximately 2×2’s. I did this with a table saw. If you don’t have a table saw, you can also do it with a circular saw. It will just take some extra time with the circular saw. Note that these pieces of wood will be covered up under the roof, so the cuts don’t need to be perfect.

You should now have (6) 10’ 2×2’s.

wood to fasten chicken tractor metal roof to

Step 2 – Notch your Horizontal Runners

The next part of this step is to take one of the 2×2’s and clamp it running perpendicular to the metal pipes that make up your chicken tractor roof. Do this near the base. The 2×2 will be nearly even with front side of the tractor (door side) and will overhang the metal piping at the back side of the tractor by a few inches. With a pencil, mark where each metal pipe rests. I made my marks about 2” wide so there is some horizontal play when installing the 2×2’s.

Grab another 2×2 and repeat that same step on the other side of the tractor, so you have marked out where the pipes fall on the 2×2.

With your marked 2×2’s (one for the right side and one for the left) line them up with an additional (2) 2×2’s, so that there are (3) 2×2’s for each side. With a speed square, trace the lines you made onto each set of 2×2’s. Each 2×2 will now have four small sections marked out that represent where the metal pipes fall on each side of the tractor.

2x2s installed on chicken tractor

Measure how wide your pipe is. Mine was ¾” thick. Set the blade of your circular saw to that depth.

Using the half-lap joint method from the Stress Free Chicken Tractor Plans book, cut out notches between the roughly 2” marks you made. These notches will be wide enough for your metal roof pipes to fit into. After you have cut away what you can with the circular saw, a hammer and chisel may be needed to remove any remaining wood chunks. The notched sections do not need to be perfect. 

Step 3 – Install Your Horizontal Runners

Pick a side to start and take one of your 2×2’s and clamp it at the top of your metal roof piping on your tractor. Location does not need to exact, but it should sit roughly 5” down from the top 90 deg. bend of the pipe. Note that the notches you made in the 2×2 will be facing up toward the sky so that the metal pipe actually sits on top of the 2×2.

underside of metal roof on chicken tractor

Once level, drill holes through the metal pipe in line with where the 2×2 is located. Do this for all four pipes. Then screw through the top of the pipe into the wood so they are secured together. I used a 2” screw, which was about the right size. You can also use the 2-1/2” screws from the chicken tractor project and just take a pair of pilers and break off the tip of the screw that comes through the wood.

You’ll then repeat that step to add a bottom and middle 2×2. Again, locations don’t need to be exact. I placed the bottom one pretty low to minimize the gap between the bottom 2×2 and the top rail of the chicken tractor frame. The center 2×2 then fell approximately 24” between the top and bottom 2×2.

Repeat installing top, bottom, and middle 2×2’s for the other side.

cutting chicken wire to accomodate 2x2's

Note that you may need to do some minor trimming of your chicken wire to accommodate the 2×2’s. The front side should be fine since the 2×2’s sit pretty well flush with the front metal pipe. Since the 2×2’s overhang a bit in the back, this is where you’ll likely need to poke them through the chicken wire. I actually left my chicken wire hang loose until the 2×2’s were installed. Then I stapled them to the 2×2’s which eliminated the need for zip ties and makes it very secure.

Step 4 – Cut Metal Roofing

You will cut (7) roof panels to be 4’-6” long. Before cutting, I recommend you double check that measurement based on your tractor. Depending on how you bent and installed the conduit, your panels may need to be slightly longer or shorter. Note that you will have one half sheet of roofing leftover you can use for another project. There will also be a roughly 1’ wide piece from the center of each sheet that will be scrap.

marking metal roofing for chicken tractor

I cut the roofing by making a couple marks measuring from the ends of the sheet in and then tracing a straight line on my marks. Using a Sharpie or marker is best. I then cut along those lines using a metal cutting wheel on an angle grinder. If you don’t have an angle grinder, you will need a good pair of tin snips and good bit of time and patience.

Once your (7) 4’-6” sheets are cut, take one sheet and cut it in half along the center rib. This will be your starting piece of roofing on each side.

cutting metal roof in half for chicken tractor

Step 5 – Install Metal Roofing

The next thing to do is start adding your metal roof panels on top of your 2×2’s. Start with the half sheet on each side. Make sure the end you cut is facing upward and the rib you cut is facing toward the back of the tractor so it will be covered by the next sheet.

You’ll want to pay close attention to two things here:

(1) Make sure your first roof panel is installed level. This will assure the following roof panels stay at the same height across the whole tractor. You will have very little room for adjustment after the first piece is set. So it’s worth taking the time to make sure you’re starting with a properly aligned panel.

placing first metal roof panel on chicken tractor

(2) Make sure the roof panel is installed high enough so the corner trim piece will fit on top easily. The roofing pieces will need to sit higher than you may think. And they will only overhang an inch or so at the bottom. Again, it’s worth getting out your corner trim piece at this point.  Make sure it fits fine on top of these first two pieces before proceeding.

Screw in your metal roofing panels once you are satisfied with the angles. Use a metal roof screw just next to each rib and at each 2×2. Each full panel should have 12 screws holding it to the 2×2’s.

Once the first metal roof piece is fully fastened, place another metal roof sheet next to it so that the first rib of your next sheet overlaps the last rib of your previous sheet. Fasten the remaining (3) sheets on each side.

metal roof on chicken tractor

Step 6 – Install the Ridge Cap

Place the 10’ corner trim piece on top of the chicken tractor. The cap can overhang in the front an inch or two. Fasten the bottom lip of the angled trim piece with one screw at each rib of the metal roofing below.

metal roof and door of suscovich chicken tractor

You’ll notice the top cap does not extend the full length of the roof. Take a section of the 1’ wide cut off pieces from before and make a small roof cap for the back side. I chose one of the inner ribs and then cut just along the adjoining rib on either side. Then bend the piece at the center rib so it is somewhat close to 90 deg. Slide this piece on the back side between the roof cap and metal roof sheets. Fasten this piece with 4 screws on each side.

back cap on chicken tractor metal roof

Step 7 – Celebrate!

In true John Suscovich fashion, you should totally step back and admire your new sweet metal roof on your chicken tractor. And celebrate, because you just accomplished something amazing!

Metal Roof FAQ’s

How much does it cost to add a metal roof?

My total materials cost was between $200 – $250. It is not a cheap project, but then you also don’t have the ongoing tarp replacement cost.

How much time does it take to add a metal roof?

It took me a half day or afternoon to add the metal roof.

Can I add a metal roof to an existing Suscovich chicken tractor?

Yes! This metal roof design can work with any existing Suscovich chicken tractor build. You may just need some slight modification where the 2×2’s meet the chicken wire as is covered in the tutorial.

finishing chicken wire on suscovich chicken tractor

If building a brand new chicken tractor, is there anything I should consider that differs from the design in the book?

(1) You can save a little bit of money and omit the last 10’ metal pipe piece that runs horizontally along the top of the tractor. (2) You can wait to secure the top part of your chicken wire until the horizontal 2×2 runners are installed. This allows you to staple the chicken wire to the 2×2’s and avoid needing to secure them with zip ties.

(3) The last thing I’ll mention is that it might be helpful to be consistent with the direction in which you install the bent metal pipes to accommodate the roofing. I’ve noticed the center 90-degree bend in particular can be slightly irregular one side to the other. This shouldn’t impact the metal roof installation, but if you can bend them to be pretty close to identical and keep all bends facing the same direction, it will go smoothly for you.

What other benefits do you get from a metal roof?

Your chicken tractor will likely be outside 24-7, 365 days a year. Having a roof will also keep the elements off the tractor itself and should extend its life.

inside view of chicken tractor with metal roof

Will this design really hold up?

Yes. The fact that the roofing sheets and 2×2’s literally clamp to the metal piping make for a really solid installation. If fact, it should add to the overall structural soundness of the chicken tractor. After a full season and winter, mine looks just a good as the day I built it.

Other Tips for Building Your Suscovich Chicken Tractor

1. Slight door modifications – I would take an extra ¼” off the door length vertically. Wood can swell and the last thing you want is a door not closing properly when it’s loaded up with 25 or so birds you’ve invested in. I also like to use some of the scrap wood from the project to add extra diagonal pieces to the door. Doors sag over time and you want to make sure it stays nice and plumb to fit in the opening. A scrap cut off piece of 1×4” also makes a nice little door handle.

door modifications on chicken tractor

2. Consider using cedar – I have build both of mine out of cedar and been very happy with them. This will definitely add cost, but cedar is so much easier to work with and is lighter! This makes a huge difference when moving your tractors multiple times a day. Plus, then you don’t have to worry about the chemicals from the treated wood seeping out into your soil.

3. Use cut off wood gussets – I always have four pieces of cutoff 2×4 wood left that are the perfect size to make into a gusset. This way you can save a few bucks from buying the metal ones. You’ll need a miter saw, but you can cut two 90-degree angles with the long end being about 5” long. I would predrill holes if you do this, and put 2 long screws at each end of the gusset. Just make sure you install the gussets before installing the wheels!

wood gusset on suscovich chicken tractor

4. Use spring door hinges – I found some spring close gate hinges that are rated for outdoor use and were not that expensive. I found this to be a very helpful upgrade on my tractor last season knowing that the door on the tractor was always closed so my chickens weren’t running wild.

self closing gate hinge on chicken tractor door

5. Bend pipes right – In my opinion bending the pipes for the roof is the trickiest part of the of the Suscovich chicken tractor build and detail is somewhat lacking in the book. So, here’s my two cents to hopefully save you some headache. The center bend generally needs to go beyond 90 degrees. Work with the first pipe and fit it over the tractor until you feel it’s right and then replicate that on the rest.

bending pipe for suscovich chicken tractor

For bending the 45-degree bends on the ends, there is also not a clear measurement given in the book on where to place your bender for those. I make a mark 5” from the end and place the arrow of the bender on that mark. You also want to make sure to not bend this one too far. But 5” has been just right in my opinion. Hopefully I have saved you from having to re-bend a pipe or two, as has been my experience! 

And as I mentioned in the FAQ’s, it’s also helpful to bend your pipes consistently and install them all the same direction. You won’t have any issues if they’re slightly off, but the more consistent the pipes are the easier time you’ll have installing a metal roof.

bending end of pipe for suscovich chicken tractor

Go Raise Those Chickens On Pasture!

Now the last question remaining is which color will you choose for your metal roof? 😊

I hope this tutorial has been helpful and you enjoy having a metal roof on your chicken tractor for years to come!

If you have questions, drop them in the comments below and I’d be happy to help troubleshoot.

Happy chicken raising!

May 1, 2022 19 comments
3 FacebookTwitterPinterestEmail

About Us

About Us

So Glad You're Here!

Hi! We are Jim and Joelle. We love sharing homestead how-to’s, from scratch recipes, and natural do-it-yourself projects to help you nourish your family. To learn about our story, click the image above!

Stay Up-To-Date

Popular Posts

  • How Many Cows Per Acre On A Small Farm

    May 26, 2022
  • What Should Be Inside A Chicken Coop – Easy Guide!

    July 22, 2023
  • Chicken Tractor Plans for 25 Chickens

    May 1, 2022
  • Easy Farmhouse Cheddar Hard Cheese Recipe

    July 17, 2022
  • How To Make Quick and Natural Mozzarella Cheese with Vinegar

    August 7, 2022

Follow Along!

  • Email
  • Facebook
  • Instagram
  • YouTube

Instagram

  • Facebook
  • Instagram
  • Youtube
  • Email
  • About
  • Privacy Policy

© 2021-2023 From Scratch Farmstead | As an Amazon Associate we earn from qualifying purchases.


Back To Top
From Scratch Farmstead
  • About
  • Homestead How-to’s
    • Family Milk Cow
    • Gardening
    • Chickens
    • Small Scale Farming
    • Buying A Homestead
    • Homestead Living
  • Nourishing Recipes
    • Home Dairy
    • Food Preservation
    • Breakfast
    • Main Course
    • Sides
    • Dessert
    • Sauces & Condiments
  • Natural Living
    • Skin Care
    • Home Essentials
    • Living On A Budget
    • Our Healing Journey
    • Homestead Skills
    • DIY
    • AGA Stove