Looking for a quick, natural, and authentic mozzarella cheese recipe to try at home? This is the one! We share how to make mozzarella cheese with vinegar (or lemon juice) after years of perfecting our techniques and learning how to source the freshest and most natural ingredients!
Making Natural Mozzarella Cheese at Home
Mozzarella cheese requires few ingredients and little equipment, making it the perfect cheese for the beginning cheesemaker.
In fact, this is exactly where we began our cheesemaking journey almost a decade ago. We started purchasing raw milk from a local farm and the vast new galaxy of home dairy creations left us mesmerized.
Yogurt, ice cream, pudding, butter, and yes, CHEESE – all things we had to try!
For whatever reason though, cheese seemed like the most intimidating of all of those. But we figured a basic mozzarella recipe seemed like the right place to start.

So, we searched the internet, looked for a recipe that didn’t involve modern gadgets like microwaves or other unnatural seeming ingredients, and were so thrilled in the end to have made something that looked even remotely close to a smooth, fresh ball of mozzarella!
We’ve come a long way since then and have our own fresh dairy source now from our family milk cow. Below is our tried-and-true method of how to make mozzarella cheese with vinegar.
Can I use vinegar instead of citric acid for mozzarella?
Yes! In fact, we recommend it. In all our recipes we are committed to sourcing the best and most natural ingredients for true from scratch cooking with the tastiest results.
First, it’s important to know why we acidify the milk to make mozzarella. When a curd is formed out of acidic milk and then heated to above 110°, that curd releases its calcium. Calcium gives cheese its firmness and shape. So, without the calcium, the cheese is free to stretch giving it the plasticity that melted mozzarella is known for.

We started making mozzarella using citric acid, which is what most recipes call for. But after reading David Asher’s book, The Art of Natural Cheesemaking, we have since switched to using vinegar to acidify the milk – and with great results!
To quote Asher:
“Most cheesemaking guidebooks suggest using citric acid, a common food additive, to achieve the ideal acidity for making fast mozzarella. The addition of this ingredient, seemingly harmless, raises two concerns. First, it makes a mozzarella that’s almost completely tasteless – the citric acid adds no flavor to the cheese, which itself has only a very slight milky flavor. Second, citric acid is often a genetically modified ingredient. Using this GM ingredient, just like using GM rennet, in turn makes a cheese genetically modified.”
Our rationale with sourcing any ingredients is typically asking what would have been used to make this recipe 100+ years ago. What would cheesemakers in our area have used before citric acid was even around? The answer – vinegar! And specifically, apple cider vinegar which we’ll talk more about.
Sourcing Ingredients for the Most Natural Mozzarella
Milk
Using the freshest and least processed milk you can find will result in the best mozzarella cheese. You can use store bought milk, but be sure to find milk that’s not ultra-pasteurized. Your best bet with any cheesemaking is to find a local dairy farmer or homesteader in your community to get raw milk from. Or, if you’re interested in having a family milk cow for your own source of fresh dairy, we have several posts here that can get you going!

Vinegar (or Lemon Juice)
Apple cider vinegar, balsamic vinegar, and standard white vinegar will all work for acidifying milk to make mozzarella. This recipe is based on using apple cider vinegar, which we prefer both for taste and the fact we always have it on hand in the kitchen. To gain the most health benefits, we choose organic, raw, unfiltered apple cider vinegar that comes “with the mother.” Keep in mind you may need to play with the ratios slightly if using other forms of vinegar. Fresh squeezed lemon juice is also a great alternative.
Rennet
Rennet contains the enzyme present in the fourth stomach of a calf (or other ruminants) that naturally coagulates milk to set it into a firm curd. Coagulated milk is easier to digest making nutrients more bioavailable. We use WalcoRen tablets. They offer a pure and natural form of animal rennet that we’ve found to be well suited for home cheesemaking. Many liquid rennet options are plant based and can contain genetically modified ingredients and other preservatives.
Salt
There are special cheesemaking salts but any granulated salt will work. We recommend an unprocessed sea salt option and use Redmond Real Sea Salt as our salt of choice.
Quick and Natural Mozzarella Cheese Recipe
Yield:
About 4 medium-sized mozzarella balls.
Equipment:
- Stock pot
- Medium Sauce Pan
- Colander
- Large bowl x2
- Wooden spoon
- Long-bladed knife
- Curd spoon or large slotted spoon
- Thermometer
- Small liquid measuring cup
- Large liquid measuring cup
- Gloves

Some of the above links are affiliate links. This means we earn a small commission on qualifying purchases at no cost to you. We are so appreciative of your support!
Ingredients:
- 1 gallon fresh, good milk
- ½ cup vinegar*
- Rennet**
- 2-3 tsp salt
- unchlorinated water

*This recipe is based on using apple cider vinegar. See note above on alternative vinegar options in the section on Sourcing Ingredients. If using fresh squeezed lemon juice, also use ½ cup per gallon of milk.
**Use recommended dose or slightly above recommended dose. For mozzarella, I have had good results using a slightly higher ratio than what is listed on the packaging.
Directions:
Step 1
Pour cold milk into stock pot. Make sure your milk is COLD to start! Adding acidity directly to milk that is too warm will run the risk of curdling it.

Step 2
Dilute vinegar (or lemon juice) in 2 cups of unchlorinated water. Pour into the cold milk and stir in briskly for a minute to acidify milk.
Step 3
Warm the acidic milk slowly to 90° F on a low-med stovetop. Stir regularly and be sure to not heat milk too quickly to prevent curdling.
Step 4
While milk is warming, dissolve rennet into ¼ cup unchlorinated water. I use about ¼ cup unchlorinated water per gallon of milk. Break up tablets as needed and stir until fully dissolved into water.
Step 5
Once acidic milk has reached 90°, remove from heat and pour in dissolved rennet. Stir immediately and thoroughly for 1 minute. Then place cover on stock pot and let sit undisturbed until a clean break is achieved – approximately 15-30 minutes. Apply low heat as needed or wrap pot in towels to maintain 90°.
Step 6
While waiting for a clean break, 1) fill large bowl about ½ full with cold water and stir in 2-3 tsp of salt until dissolved – then place in fridge to chill, and 2) fill a medium sauce pan about 2/3 full with warm water.
Step 7
After you have a clean break, slice the formed curd into ¾ – 1 inch cubes using a long-bladed knife. Slice top to bottom and left to right vertically, and also do your best to slice horizontally in ¾ – 1 inch increments. Any large curd chunks missed with the knife can be made smaller during stirring.

Step 8
Stir the cubed curd with a wooden spoon for about 15 minutes. The curd will release its whey during this time and you’ll observe the edges of the curd going from sharp to rounded. Once the curd has the consistency of a poached egg, you are ready to move on.
Step 9
Scoop the curd into waiting colander atop a large bowl to catch the whey. If the holes of your colander are too large, you might consider lining it with a cheesecloth to hold the curd.
Optional – Pull curd toward center of colander with curd spoon to remove excess whey. Perform this technique around the outside of the curd keeping curd intact.
Let curd rest in colander for 15-30 minutes until curd is knit together.

Step 10
While waiting, heat hot water bath in saucepan to 160-180°.
Step 11
Once you have one solid curd, cut into thick slices that will be used to form your balls of mozzarella cheese. Place a couple slices of curd into 160-180° hot water bath. Wait 3-5 minutes.
Step 12
After waiting attempt a “stretch test” by removing a slice of curd from the hot water bath and pulling it apart slowly. The cheese should stretch freely. If it does not, place back in hot water bath for another minute or so and try again.

Step 13
Remove one slice of cheese at a time from the hot water bath shaping it into a mozzarella ball. Similar to kneading bread, work the ball with your hands tucking it back within itself establishing layers throughout the cheese. Work each ball for a short period of time, form ball into final shape, and place in waiting cold water bath with salty brine.

Step 14
Repeat steps 11-13 until all your curd is turned into fresh mozzarella balls.
Step 15
Place cold water bath back in fridge for a couple hours to continue to chill down mozzarella. Then remove mozzarella from cold water bath and store in container.

Frequently Asked Questions When Making Mozzarella Cheese
Why isn’t my curd stretching easily?
You might find that no matter how many stretch tests you perform, your curd seems to break apart rather than stretch. This unfortunately means your acidity level was off for this batch of mozzarella. You can continue with the rest of the steps and still come out with delicious balls of mozzarella cheese in the end. But they might not be smooth and pretty due to their lack of plasticity. You can dial in the amount of acidity you add over time as ratios can vary based on the type of vinegar and milk you are using.
What is the best way to store my mozzarella cheese?
Your cheese will store fresh for 1-2 weeks in the fridge. Some whey or liquid may continue to drain out of the mozzarella – pour this out of the container regularly for longest storage. We’ve also found that mozzarella freezes very well to preserve longer. Simply flash freeze the fresh mozzarella balls on a cookie sheet, then transfer to a Ziplock bag in the freezer. Remove cheese as needed a day or two before using to thaw.

Do I need to wear gloves to make mozzarella?
Technically, no. If you keep your hot water bath around 150 deg. you will likely be able to shape your cheese without the use of gloves. However, I have had best results when working with a hot water bath between 160-180°. At these temps, your hands will be quite uncomfortable without the use of gloves.
Bon Appetit!
For a truly authentic mozzarella experience, you can always skip the fridge and enjoy fresh sliced mozzarella while still a touch warm. Otherwise, there is no wrong way to enjoy this cheese. We use it on so many dishes, but especially our Deep Dish Sourdough Cast Iron Pizza!
Have other questions? Drop them in the comments below or let us know how your cheese turned out. We’d love to hear from you!
And don’t be intimidated to give hard cheese a try! Our farmhouse cheddar recipe is as basic as it gets. No fancy equipment required. Ingredients you have on hand. And the most simple of aging processes. Check out our Easy Farmhouse Cheddar Recipe!

Easy Farmhouse Cheddar Hard Cheese Recipe
July 17, 2022

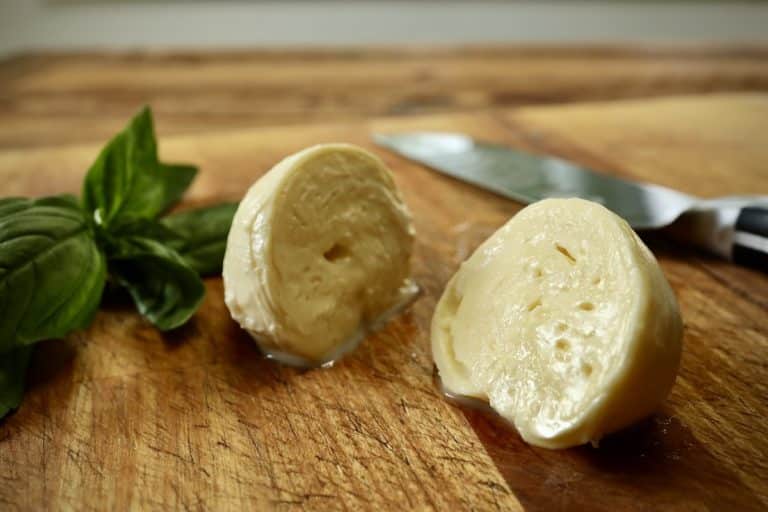
How To Make Quick and Natural Mozzarella Cheese with Vinegar
Looking for a quick, natural, and authentic mozzarella cheese recipe to try at home? This is the one! We share how to make mozzarella cheese with vinegar (or lemon juice) after years of perfecting our techniques and learning how to source the freshest and most natural ingredients!
Ingredients
- 1 gallon fresh, good milk
- ½ cup vinegar*
- Rennet**
- 2-3 tsp salt
- unchlorinated water
Instructions
- Pour cold milk into stock pot. Make sure your milk is COLD to start! Adding acidity directly to milk that is too warm will run the risk of curdling it.
- Dilute vinegar (or lemon juice) in 2 cups of unchlorinated water. Pour into the cold milk and stir in briskly for a minute to acidify milk.
- Warm the acidic milk slowly to 90° F on a low-med stovetop. Stir regularly and be sure to not heat milk too quickly to prevent curdling.
- While milk is warming, dissolve rennet into ¼ cup unchlorinated water. I use about ¼ cup unchlorinated water per gallon of milk. Break up tablets as needed and stir until fully dissolved into water.
- Once acidic milk has reached 90°, remove from heat and pour in dissolved rennet. Stir immediately and thoroughly for 1 minute. Then place cover on stock pot and let sit undisturbed until a clean break is achieved – approximately 15-30 minutes. Apply low heat as needed or wrap pot in towels to maintain 90°.
- While waiting for a clean break, 1) fill large bowl about ½ full with cold water and stir in 2-3 tsp of salt until dissolved – then place in fridge to chill, and 2) fill a medium sauce pan about 2/3 full with warm water.
- After you have a clean break, slice the formed curd into ¾ - 1 inch cubes using a long-bladed knife. Slice top to bottom and left to right vertically, and also do your best to slice horizontally in ¾ - 1 inch increments. Any large curd chunks missed with the knife can be made smaller during stirring.
- Stir the cubed curd with a wooden spoon for about 15 minutes. The curd will release its whey during this time and you’ll observe the edges of the curd going from sharp to rounded. Once the curd has the consistency of a poached egg, you are ready to move on.
- Scoop the curd into waiting colander atop a large bowl to catch the whey. If the holes of your colander are too large, you might consider lining it with a cheesecloth to hold the curd. Optional - Pull curd toward center of colander with curd spoon to remove excess whey. Perform this technique around the outside of the curd keeping curd intact. Let curd rest in colander for 15-30 minutes until curd is knit together.
- While waiting, heat hot water bath in saucepan to 160-180°.
- Once you have one solid curd, cut into thick slices that will be used to form your balls of mozzarella cheese. Place a couple slices of curd into 160-180° hot water bath. Wait 3-5 minutes.
- After waiting attempt a “stretch test” by removing a slice of curd from the hot water bath and pulling it apart slowly. The cheese should stretch freely. If it does not, place back in hot water bath for another minute or so and try again.
- Remove one slice of cheese at a time from the hot water bath shaping it into a mozzarella ball. Similar to kneading bread, work the ball with your hands tucking it back within itself establishing layers throughout the cheese. Work each ball for a short period of time, form ball into final shape, and place in waiting cold water bath with salty brine.
- Repeat steps 11-13 until all your curd is turned into fresh mozzarella balls.
- Place cold water bath back in fridge for a couple hours to continue to chill down mozzarella. Then remove mozzarella from cold water bath and store in container.
Notes
*This recipe is based on using apple cider vinegar. See note above on alternative vinegar options in the section on Sourcing Ingredients. If using fresh squeezed lemon juice, also use ½ cup per gallon of milk.
**Use recommended dose or slightly above recommended dose. For mozzarella, I have had good results using a slightly higher ratio than what is listed on the packaging.
Equipment:
- Stock pot
- Medium Sauce Pan
- Colander
- Large bowl x2
- Wooden spoon
- Long-bladed knife
- Curd spoon or large slotted spoon
- Thermometer
- Small liquid measuring cup
- Large liquid measuring cup
- Gloves