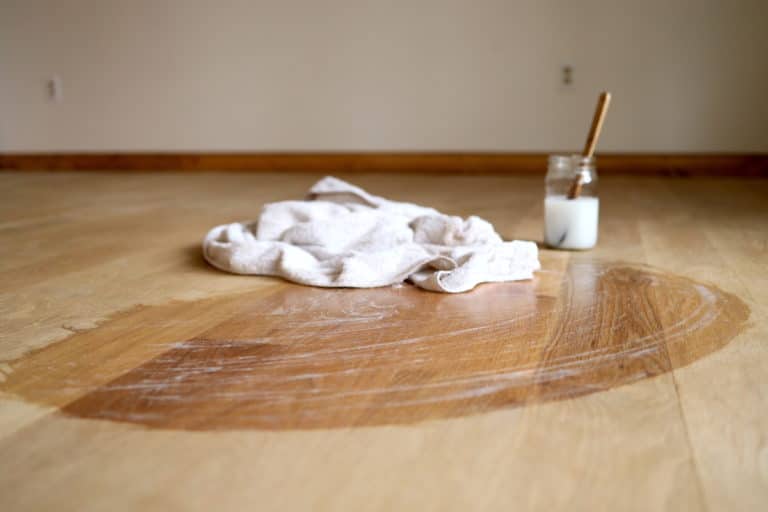
Perhaps you recall reading about Almanzo Wilder scrubbing their wood floors with lye. Perhaps you’ve seen the white wood “Nordic look” floors featured in a magazine. Or, perhaps you’re looking for the most natural and safest wood floor finish option for you family. Whatever your reason, we’ll talk all about how to apply a wood soap finish on floors along with the pros and cons we’ve seen after 2+ years of use.
Why We Chose to Soap Finish our Wood Floors
It was an exciting day.
I sat down with Felte as he worked out the totals—entirely by hand—of our white oak wood flooring purchase.
Felte ran the Amish sawmill where we currently lived in central Wisconsin. The foreclosed, 5-acre homestead property we had just purchased back in our home state of Illinois was missing a key ingredient—floors!
So before moving back, we knew the Amish mill would be our best bet for the old-growth hardwood floors we were after.

The question that loomed on our minds, however, was how we would finish them?
We wanted something safe for our growing family. No VOC’s. No off-gassing.
Going the industry standard route and coating these Amish sawn wood floors in plastic with polyurethane just didn’t seem right. And we couldn’t find another finish option out there that was both budget friendly and preserved the natural white tones of the wood without turning it yellow.
Digging deep, we came across SOAP FINISH.
Soap finish? What in the world is that?
If you’re frustrated with a lack of information out there on soap finished wood floors, we were right there with you.
But, as we’ve discovered time and time again, learning new skills and choosing the unconventional path in life often leads to the greatest joy and fulfillment.
So, in 2019 we soap finished our floors! This meant scrounging together whatever little info and advice we could gather for wood soap finish floors and going to work on all 1,700 sq. ft. of our ranch home.

The results?… Stunningly beautiful!
The practicality?… Keeping them that way is a lot of work!
The verdict?… We’ll let you come to your own conclusions.
Regardless, we’re glad we went for it. This time-tested, traditional wood finish method has added beauty, warmth, and truly safe, eco-friendly flooring to our world.
Are We Soap Finish Flooring Experts?
Before digging in much deeper on the topic, it’s best to make something clear: We are NOT necessarily experts on soap finished floors!
If you’ve researched this topic you know that information is few and far between – especially in English! There’s tutorials on soap finish for furniture, but very little exists on using it for floors.
We have had to gather as much information as we could, make some assumptions along the way, learn from mistakes, learn from more mistakes, and forge our own path.

But, being over two years in now, we feel we’ve learned enough to share our knowledge and experience so far. As we keep learning, we’ll update this post to make it as helpful as possible to anyone else considering soap finishing their floors!
If you are an expert or have experience, please share your advice!
If you’re researching wood soap finish floors, let us know your questions!
Alright, now let’s talk wood soap finish!
What is a Traditional Wood Soap Finish?
Soap finish, or Danish soap finish, is a traditional Nordic or Scandinavian wood finish method. In countries like Denmark, Norway, and Sweden, you will commonly find light wood floors finished with soap. These countries also use soap finish extensively in furniture making.
Some of the main characteristics of soap finished wood floors are the warm, organic, and smooth wood grain feel they offer, paired with a low-sheen or matte finish.
Perhaps the most standout attribute of wood soap finish is the ability to preserve, or even enhance, the beauty and character of light colored woods. Lye, a key ingredient in soap, has a whitening effect that keeps light woods from darkening or yellowing over time.

Soap acts to clog or fill the pores on wood surfaces keeping dirt and oils out. Because of the degreasing nature of soap, when reapplied it also acts to remove or release buildup of oil, dirt, and other stains on the surface.
On soap finished floors in particular, a regular reapplication of soap is required to keep the wood conditioned, resistant, and clean. Reapplying soap finish gives wood a stabilizing benefit by slowing the woods transfer of moisture with the surrounding environment.
The whitening that soap offers, combined with the buildup of soap finish layers over time, are known to produce an attractive patina to your wood floors that improves with age.
History of Soap Finished Floors
Traditional soap finish has been used on wood floors in Denmark and other Scandinavian countries for hundreds of years. Early settlers from these countries brought this tradition to the Americas and soap finished floors became common in farmhouses.
Laura Ingalls Wilder’s book, Farmer Boy, documents this trend in the mid-19th century:
”The kitchen was bright with the glitter of snow outside. The floor and tables were scrubbed bone white with lye and sand. The tin saucepans glittered silver, and the copper pots gleamed gold on the walls, the teakettle hummed, and the geraniums on the window-sill were redder than mother’s red dress.”
Our ancestors discovered soapmaking by pouring tallow (beef fat) over the ashes of wood from a fire, making wood-ash soap.

The process of making soap today is much the same; mixing lye (sodium hydroxide) with an oil. When combined, the oil neutralizes the alkali lye in a process called saponification making the resulting soap 100% safe.
Today, lye based soap can be purchased as soap flakes, which is ideal for mixing as soap finish. Your Grandma or Great-Grandma likely would have used Ivory Soap Flakes made with vegetable or plant based oils. Many soap flakes that are currently available come in the form of Sodium Tallowate, or lye mixed with tallow. This is most similar to the the traditional method and what we use for soap finish.
While soap finished floors are a rarity in the US today, traditional soap finish is making somewhat of a resurgence in woodworking as a natural wood finish option and among home designers to achieve the sought after “Nordic look.”
What Type of Soap is Best for Making Soap Finish?
There are a decent amount of Sodium Tallowate soap flake options out there. You want soap flakes that are pure with no added preservatives, chemicals, or fragrances.
After researching the options, we landed on purchasing our soap flakes from Earthborn Elements. They offer a variety of sizes depending on your needs and square footage of wood flooring you have. A 1 gallon bucket might be a good place to start, or we purchased the 5 gallon bucket and should be set for life!

Another good soap flake option we’ve come across is from Pure Organic Ingredients.
What Type Of Wood is Best For Using Soap Finish?
Light colored woods, both hard and soft, are an ideal fit for a soap finish.
Hard wood species can include: white oak, white maple, ash, and beech.
Soft wood species can include: white pine, spruce, and fir.
Soap finish can be used on any species of wood. However, you lose the whitening effect on darker woods and will likely end up muting or detracting from the innate dark or colored tones of other wood species.
Wood Soap Finish — PROS vs. CONS
Soap finish floors are not for everyone. They don’t exactly fit into the modern mold maintenance-free, quick, or convenient. These floors seem to meld best with a more old-fashioned, slow-paced way of life.
That said, there are good reasons to consider soap finished floors, and good reasons to avoid soap finished floors. Let’s look at the pros and cons.
PROS
Safe
While the construction industry is beginning to wake up to the health risks of VOC’s, off-gassing, and harsh chemicals from materials, many finishes and sealers still remain highly toxic. Flooring covers an enormous surface area in your home and you are constantly in contact with it. You want something safe, and soap finish is as safe, pure, and natural as it comes. Zero VOC’s or toxic materials. Applying it is literally the same as washing your hands!
Stunning!
The Nordic look is popular for a reason. The white, soft tones of soap finished floors give both an aura of warm and inviting along with minimalistic and simple. Whatever species of white wood you have or plan to use, the raw and organic tones and grains of the wood will really stand out. And they’ll get better with age!

Easy To Apply
We’ll talk more about application methods below, but using soap finish is not rocket science. In fact, we did it without buying any special equipment by just using old bath towels. You don’t need to be a professional woodworker to nail this one. The process is simple and forgiving no matter your skill level.
Budget Friendly
We bought a 5 gallon bucket of soap flakes for around $150 and we might just be set for life! Other oil based floor finishes can get pricey when you consider the per sq. ft. cost and multiple coats being needed. You’ll see below that the long term cost comes in maintenance time requirements, but the up-front cost is friendly to any budget!
Feels Great
The build-up or layering of soap finish is minimal, so what you feel underfoot is the raw wood of your floors. They feel soft and warm to the touch. If you’re accustomed to more high-sheen or glossy wood floors with a layer of sealer on top, soap finished floors will feel as pure as can be.
Easy To Repair
There’s a beauty to the fact that a soap finish is not a permanent finish. With many floor finishes, if an area gets stained or scratched, you may need to refinish the entire floors to cover it up. When dings or marks appear on soap finished floors, you can simply treat that spot (maybe with a light sanding) and apply more soap finish for easy flooring repairs.
Gets Better With Age
We’re only two years in, but when you look at pictures of woods floors that have been regularly maintained with soap finish for 100 years or more they look fantastic! Where most floor finishes dull, wear down, or get marred over time, you’ll continue to enjoy the natural beauty and patina your floors develop over the years as the layers of soap finish preserves and enhances them.
CONS
High Maintenance
We’re not going to lie—with young kids, a dog, and living on a farm we were a bit on-edge as we broke in our floors and learned what soap finished floors do or don’t like. Oil for instance can be its arch nemesis! Most recommend you reapply soap finish to your floors every three months after they are initially sealed. That’s no small task. Yes, there’s the multi-tasking factor that maintaining your floors and cleaning them are one-and-the-same—reapplying soap finish also cleans them. But, there’s no getting around that this can require a good bit more time than a simple vacuum, sweep, or quick mop.

Shoes Off!
Knowing that a soap finish isn’t waterproof, we started a strict no shoe policy in the house right from the start! We’ve since discovered this is also the norm in many Scandinavian countries. This con isn’t any sort of deal breaker, but it does get old needing to constantly educate every visitor that comes through your door on why shoes stay at the doormat.
Spots And Scratches
If you go with soap finish floors, you need to be ok with embracing imperfection. Like buying a new car off the lot, it’s only a matter of time before the first door-ding shows up. Except in your home, the likelihood of spills, splatters, drops, and any other number of accidents is all the more likely. And because there is no active ware layer on top, scratches happen. These floors aren’t impervious. Part of their charm is the character they’ll develop over time. The berry that smashed into our kitchen floor and then proceeded to sit there, soaking in unnoticed for some time can likely come out with enough elbow grease and sanding, but we’re still living with it. Most spots, however, can be removed or reduced with regular maintenance.
There’s A Learning Curve
If you’re in the US like us, or anywhere outside of northern Europe, it’s likely that floors with a Danish soap finish are a bit of an anomaly. Your local flooring contractor, woodworker, or lumberyard might not even be able to offer help. As we’ve learned, you’ll figure out a process that works for you over time along with some do’s and don’ts. You can’t expect to nail it the first time. For better or for worse, it’s not a one-and-done type method. You get regular opportunities to learn, adapt, and keep your floors looking great!
How To Mix Soap Finish for Wood Floors
Soap finish is very easy to make! You simply add boiling water to a specific ratio of soap flakes.
But, almost every tutorial on soap finish you find out there will have a different recommendation of soap-to-water ratio.
On the low end we’ve seen 2 tbsp per quart of water. On the high end we’ve seen a one-to-one soap-water ratio recommended.
We started on the low end and now mix somewhere between 1/2 cup to 1 cup of soap flakes per quart of water. You can try different ratios and see what you prefer. It doesn’t need to be exact. If you ask someone from Denmark, you might get a loose answer like—just throw a palm full of soap flakes into a quart of water 🙂
Here are the steps for mixing soap finish:
1. Boil your desired quantity of water.
2. Add boiling water to portioned soap flakes in a bowl or bucket and stir. At this point, the water will look like soapy bath water.


3. Let sit for 24 hours.

4. Your soap will now have formed a white, gel-like solid. Stir the soap mixture until it loosens up and becomes somewhat like a paste or cream.


After this, your soap is ready to apply to your floors! We tend to mix a gallon at a time in a 5 gallon bucket and stir with a paint stick. One gallon is about the right quantity for one solid coat in a medium to large sized room. But it depends on the soap ratio you use and how thick or thin you apply it.
How To Apply Soap Finish on Wood Floors
There are many ways soap finish can be applied to floors. One method is to use a mop. Another is use a firm bristled scrub brush on a stick, which might be the most standard traditional way of application. This Swedish site gives helpful images.
We didn’t have a mop or scrub brush, but we did have old bath towels, so that’s what we used and still use! It’s a labor of love requiring you to get down on your hands and knees. But it’s also a slow-paced and meditative process that can be refreshing to engage in.
Here’s how we initially applied our soap finish:
1. Starting in a far corner of the room, pour out a small amount of soap finish onto the floor. Work the soap into your bare flooring with the towel, applying an even coat.
(This initial soaking of the wood will likely cause the grain of the wood to stand up, so wiping up the excess soap and giving your floors a light sanding a this point is optional before moving on to additional coats.)
2. Continue applying soap row by row working your way toward the entrance to the room as an ending point.

3. Repeat steps 1 & 2 until the wood seems to no longer be absorbing the soap. We did somewhere between 3-5 coats initially, but more may be needed.
4. Leave the final coat to soak in for a period, but before it begins to dry, come back through with a dry towel and wipe up any excess soap finish on the surface.
And that’s how you apply an initial soap finish to your floors!
What We’ve Learned Applying Soap Finish to Floors
One thing to note, and we learned this the hard way—don’t let your soap dry on your floors before going back through with a dry towel and wiping it up. You either need to come back through with another fresh coat of soap right away, or wipe it down. It’s very difficult to apply a fully even layer of soap across your floors. So if it dries unevenly, it will leave a streaky finish on your floors. The streaks reduce over time. But we’ve also had the headache of needing to give the floors a light sanding and starting over.
Also, we only sanded our floors down to 80 grit, which is common for wood floors. Many soap finish tutorials call for a much finer grit sanding. We’ve found the 80 grit to work well for our floors.
When it comes to what is recommended from here, there is again variation. What seems to be recommended is to reapply your Danish soap finish weekly for the first 3 months to fully condition the wood and provide a protective layer.

To be completely honest, we didn’t do that. We did a solid initial application. But then life hit; we had to move in our furniture, had a baby, and then scarcely applied additional soap finish in our first two years living in our home.
I can see where a three month period of weekly soap finish applications would really give you the full protection that soap finish offers—especially in high-traffic and accident-prone areas like the kitchen. But even with not doing this step, or even regularly maintaining our floors as we should have, our floors still look pretty darn good two years in.
Is Anything Needed in Addition to Soap?
If you research other Danish soap finish tutorials, you may come across an extra step of an initial application of materials like oxalic acid, or even lye itself, to your bare wood before applying your layers of soap finish. This is to provide a further whitening or bleaching effect on the wood.
We did not do this. My assumption is that if using lye based soap, the soap itself should provide the whitening effect. And, so far, this has been our experience after the initial application and reapplication—the floors come out lighter after each coat of soap, not darker.
You might be able to achieve an even whiter floor finish with an additional layer of something. But we have found this unnecessary. If anyone has differing information or ideas on this, please let us know!
Maintaining Wood Soap Finish Floors
After the initial application of soap finish, your floors will benefit from regular maintenance and reapplication of soap on a scheduled basis.
Reapplying soap finish to wood floors every 3 months is most commonly recommended. You can also do it on an as-needed basis depending on the use a room receives. For instance, we’ve found our kitchen requires higher maintenance than bedrooms do.
First, you’ll want to address any marks or spots that have shown up on the floors. The first thing to try is pouring hot or boiling water on the spot and trying to remove it manually with a towel.

If that is unsuccessful, you may need to give the spot a light sanding for removal. We picked up a sander on a stick from our local hardware store and have plenty of replacement sand paper sheets on hand.
Next, to reapply soap finish, simply follow the same steps and process used for initial application. We’ve typically just done one coat of soap finish, but multiple layers can be applied if needed.
You’ll likely want to remove furniture, not just work around it, so a consistent finish is achieved. This process lends itself very well to keeping on top of regular seasonal home cleaning!
Natural Alternatives to Wood Soap Finish
If you’ve gotten this far, you’re probably either feeling excited or uneasy about trying a wood soap finish on your floors. Either is ok! We were pretty unsure ourselves when weighing the options.
If soap finishing floors isn’t for you, we thought we’d mention some of the other non-toxic floor finish options we came across in our research that can also be a safe flooring option for your family.
Tung Oil
100% Pure Tung Oil from Real Milk Paint Co. is as natural and solid of a wood sealer as you can find. It will require multiple coats, and does take some time to cure. But, once cured, tung oil provides a nearly waterproof coverage. You will get yellowing over time that is typical of any oil. In addition to standard tung oil, there is a Dark Tung Oil option that gives a natural dark pigment to your wood that is beautiful!
We have used their Dark Half blend (half Dark Tung Oil, half Citrus Solvent) to finish our butcher block countertops. Tung oil is the other option we seriously considered to finish our white oak floors with and many product reviews speak very highly of Tung Oil as a wood floor finish.
If you use promo code FROMSCRATCH you can get 10% off your order! We have been using Tung Oil from Real Milk Paint Co for years now and are happy to partner with them earning a small commission on sales at no additional cost to you!

Rubio Monocoat
Another natural floor finish I’ve come across in my research is from Denmark based Rubio Monocoat. Their Oil Plus 2C product is a promising floor finish option. To quote their website, “Oil Plus 2C is a revolutionary wood finish that colors and protects wood in one single layer. It is plant-based and contains 0% VOC. Each color can be mixed to create custom colors, allowing for endless color possibilities.”
Their color chart offers an extensive selection of colors and can show how the colors looks on different wood species. They even have colors that come close to mimicking that authentic Nordick look!
So What is it Going to Be?
Soap finished floors are truly an old world finish method that can connect us back to the simple and thoughtful life of our ancestors. But as you’ve seen, that can mean a lot of work!
So what’s it going to be for you?
We’d love for this to be a space where knowledge and expertise are shared along with questions and troubleshooting.
Drop a comment below. We so look forward to hearing from you!
Some of the above links are affiliate links. This means we earn a small commission on qualifying purchases at no cost to you. We are so appreciative of your support!