Chicken Roost Designs | Two Simple DIY Ladder Perch Ideas
Chickens don’t need much. But a place to roost or perch is a necessity! The goal of this post is to give you an overview of why chicken roosting bars are important and show you two simple chicken roost designs that you can build quickly and easily with leftover materials.
Why our chickens weren’t very happy with us
This past spring we doubled up our chickens on our farmstead!
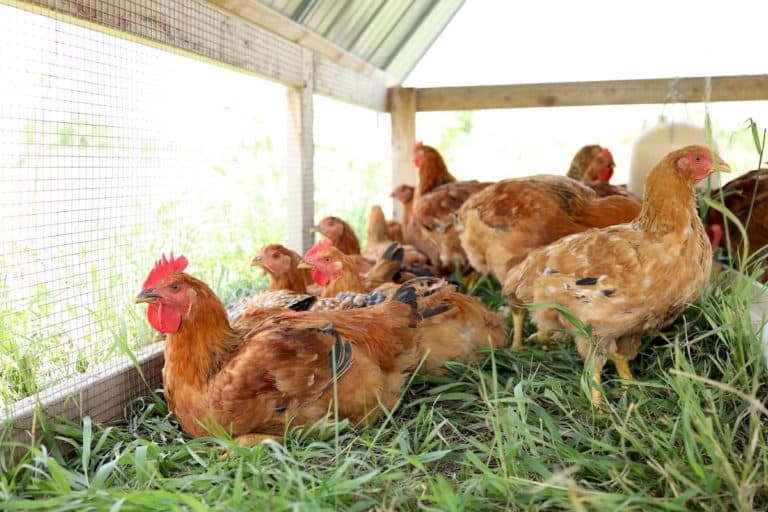
Our chicken coop inside our barn suddenly went from housing 25 chickens to around 50. There was plenty of room in there to accommodate the population growth – especially since they free-range during the day – but the roost I had built clearly wasn’t cutting it.
Their tree branch ladder roost was pretty good sized. Surely they’ll find a way to nestle in close together and make room for everyone… Uh uhh.
The pecking order was all out of whack. Chickens were disgruntled. I was nightly chasing down chickens roosting all over the barn. And when I did put them in the coop the huddled cluster of chickens in the corner on the ground told me they needed a new piece of furniture—and fast.
I’ll talk about the two types of chicken roost designs I built for our chicken coop below. They are super simple!
But first, let’s talk through the basics of chicken roost designs and why they’re a necessity!
What is a Chicken Roost or Perch?
Animals are happiest when their domesticated environment matches their wild environment.
Birds in nature roost, or perch, high up in trees on branches. You’ll find them primarily roosting through the night, but they also do so during the day.
Chickens are no different. This innate behavior is how birds keep themselves comfortable and safe from predators, especially while sleeping.
Roosting is also important for the social dynamics within a flock. Since the higher bars of a roost are safer, these spots are prized. Chickens higher up in the pecking order will claim those higher spots, leaving the more susceptible lower spots open for chickens that are lower in the pecking order.
Or, you might really be viewed as an outcast if you have no spot at all – as was the case in our coop! Let’s solve that.
Why Chickens Need a Roost
Chickens instinctually roost side-by-side in rows. Huddled close, this helps them keep warm and they also work together on a roosting bar to help keep balance.
Another, almost miraculous, ability chickens have is to shut down one side of their brain while keeping the other side fully alert. This is how chickens keep watch for predators while sleeping. The chickens on the outside of each roosting bar will sleep with one eye open, keeping that side of their brain alert to watch for predators. The other eye is shut and that side of their brain turned off to get much needed rest. They’ll likely even turn around during the night to give each side of their brain a rest!
It’s clear that chickens feel the most safe and secure when properly roosting. But here are some other ways a roost will benefit your flock:
Foot Protection. A properly designed roost will keep a chicken’s foot in tip-top shape. On freezing nights, their feet tuck warmly under their body reducing the risk of frostbite. Also, chickens are deep sleepers. When on the ground, small rodents like rats can nibble at chicken’s feet, legs, or backs while they sleep unawares. Roosting higher above ground removes that threat.
Keep Them Healthy. Let’s face it, the ground of a chicken coop gets dirty. Sleeping in those unsanitary conditions can lead to disease over time. What’s more is that ticks, mites, and lice can hide out in the bedding of your coop and come out to feast on your chickens at night.
Prevent Anxiety. Without a proper roost or enough roost space, your flock will be in turmoil. One, they’ll never feel safe leading to a perpetual lack of sleep. Two, they won’t be able to live out their social order as they desire to. This will stress your chickens out and worsen unwanted behaviors like feather pecking.
There’s no doubt chickens need a suitable roost to accommodate the whole flock. So, let’s start looking at chicken roost design considerations.
Dimensions of Chicken Roost Designs
There are two critical dimensions to any roost design:
- The roosting bar height above ground.
- The distance between roosting bars.
Most roosts are ladder style where the roosting bars, or rungs of the ladder, get gradually higher. Start with determining the height of the lowest rung. Then, layout the remaining roosting bars from there.
The lowest roosting bar should be at least 12” off the ground, but 18-24” is recommended.
The horizontal spacing between each roosting bar should be 12-18” apart. Any closer, and your birds will be within range of pooping on each other throughout the night!

In terms of the top of the roost, there should be at least 12” between the highest perch bar and the ceiling of the coop for chickens to comfortably access and use the top rung. The top roost bar should also sit a minimum of 12” off the wall to give your wall some poop clearance!
A final consideration is the angle at which your roost or ladder sits. A 45° angle is ideal. You can go steeper, but it will be tricky to achieve the horizontal spacing needed between roosting bars.
Flat vs. Rounded Chicken Roosting Bars
There is conflicting information out there about the proper size and shape of roosting bars.
Many chicken roost designs call for 2×4 roosting bars that are oriented horizontally (flat side up). The claim is that chickens actually prefer a flat perch versus a rounded one and can better protect their feet during the wintertime on a flatter, wider roost.
The case against horizontal 2×4’s is that chickens can’t properly wrap their toes around them for proper balance. Studies have shown that chickens prefer a roosting bar to be around 2” to 2-1/2” wide for optimal grip and comfort.
My philosophy tends to be that farming should follow nature. And I have a hard time visualizing what a chicken would find to perch on in nature that is flat and high enough to keep them safe from predators. My chickens naturally perch on branches in bushes during the day.
That said, I built one of each as an experiment – a round tree branch roost and a horizontal 2×4 roost. I plan to update this post over time with what my chickens tell me about each design.
Materials for Chicken Roost Designs
When it comes to a chicken roost, stick with wood.
Metal gets too cold which can increase chances of frostbite and other foot ailments. And plastic is often slick making it difficult for chickens to maneuver. Wood is the ideal fit.
Regardless of using dimensional lumber or natural branches, make sure your wood is smooth and splinter free to reduce chances of infections like Bumblefoot. Ease any sharp edges with a router, planer, or sandpaper. And select smooth tree branches without sharp corners or protruding knots.
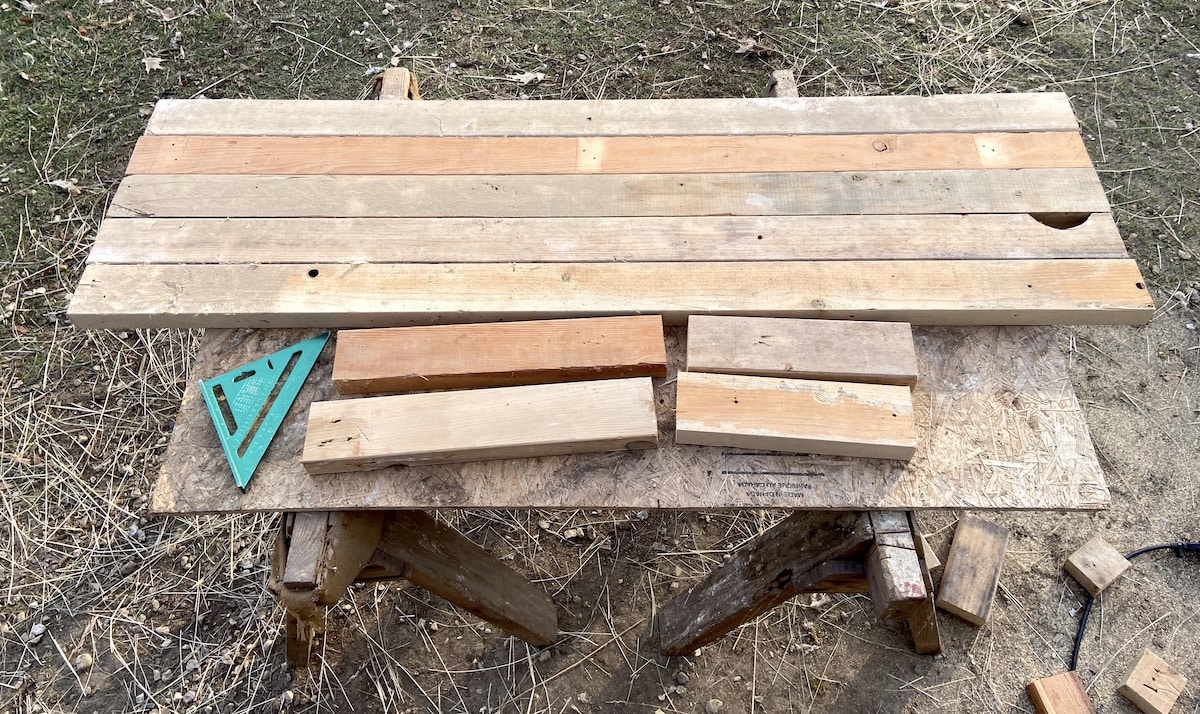
Building your own chicken roost is the perfect project to use scrap or repurposed materials for. Spare 2×4’s. An old piece of furniture. Pallets that someone left out by the curb. Downed branches around your yard or from a neighbor. As long as they are sturdy and smooth pieces of wood, about anything will do!
As a side note, I’d steer clear of pressure treated wood. Except maybe for the ladders side rails or legs that come in contact with the ground. Treated lumber contains harsh chemicals that you don’t want coming in contact with your chicken’s feet for extended periods.
Two Easy DIY Chicken Roost Designs
Building your own roost is the perfect beginner-friendly farm project! Each of these roosts took about a half hour to build and use very basic tools. Here’s a list of what you need:
- Circular saw
- Impact driver or drill
- 2-1/2” or 3” screws*
- Tape measurer
- Speed square
- Pencil
- Safety glasses
Note that each of these roosts as shown were designed for our coop. But, it is easy to modify the size or design to fit your situation. For example, both of my ladder roosts lean against the wall of the coop. If you need a freestanding roost, simply add legs to each corner of the roost or build an A-frame roost.
As a rule of thumb, one average sized chicken will require about 12” of roosting bar space. So plan out your roosting ladder based on the size of your flock and build to suit.
*My preference are coated screws with a star bit. They are so much easier to use than a standard Philips head screws and since they’re coated they last longer in high moisture applications like chicken coops!
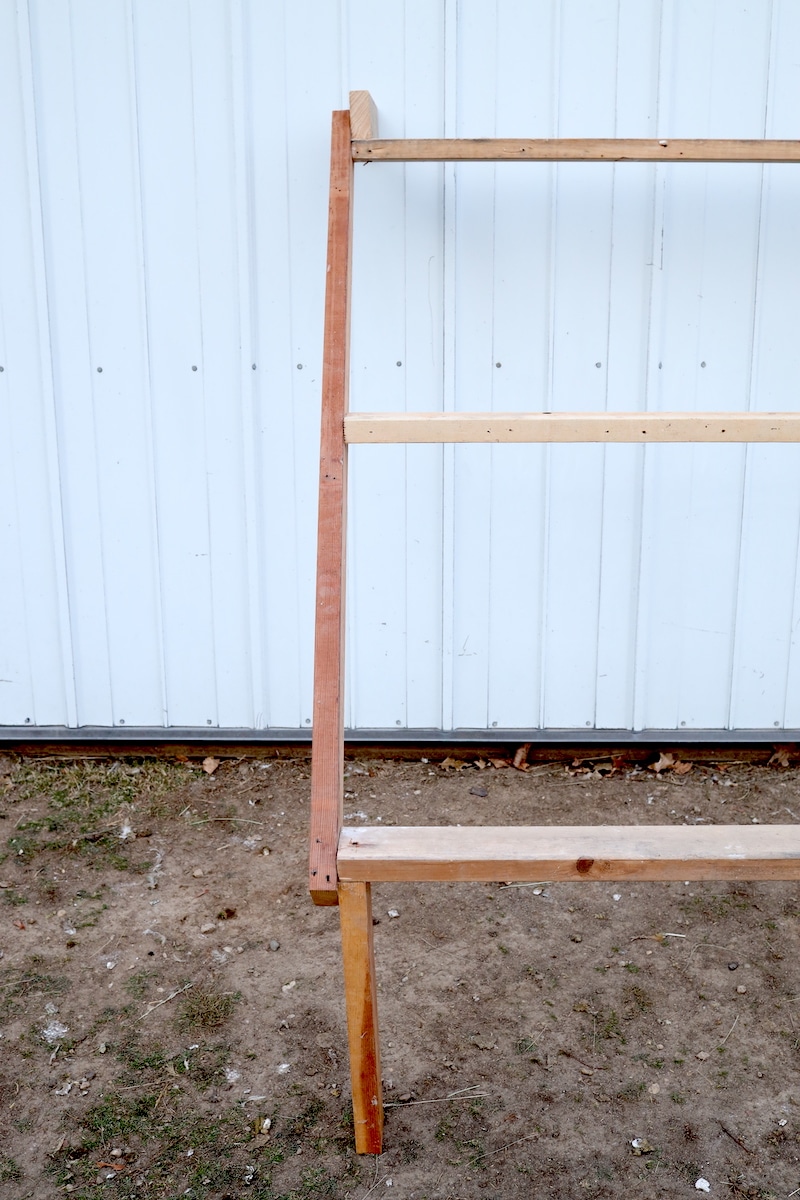
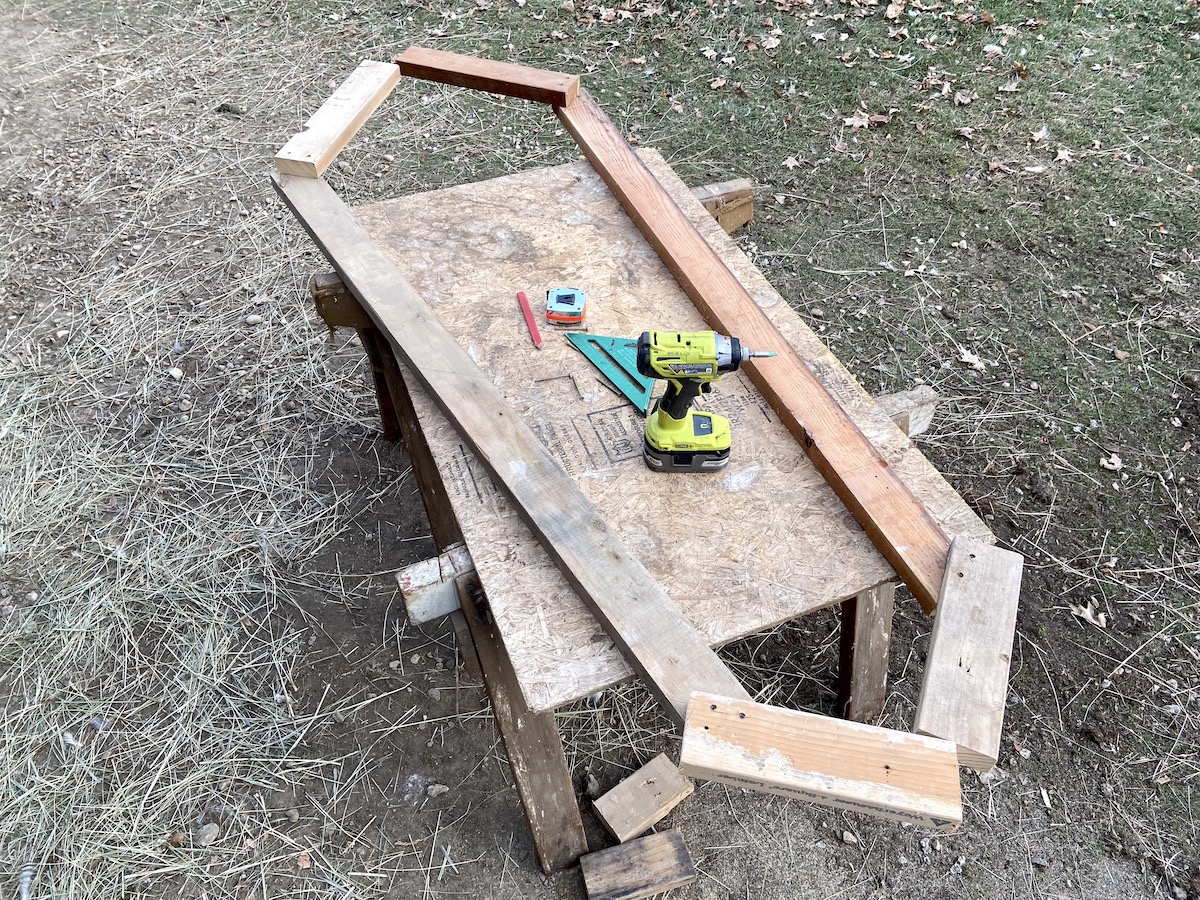
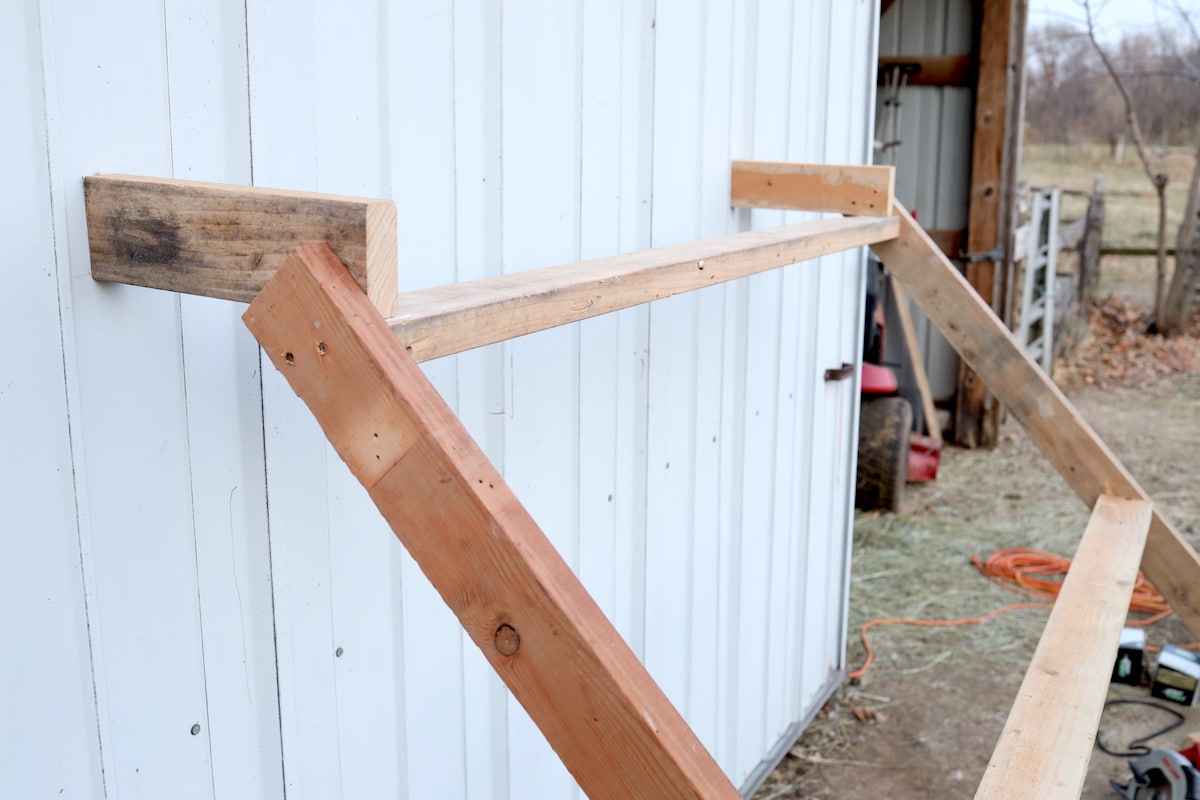
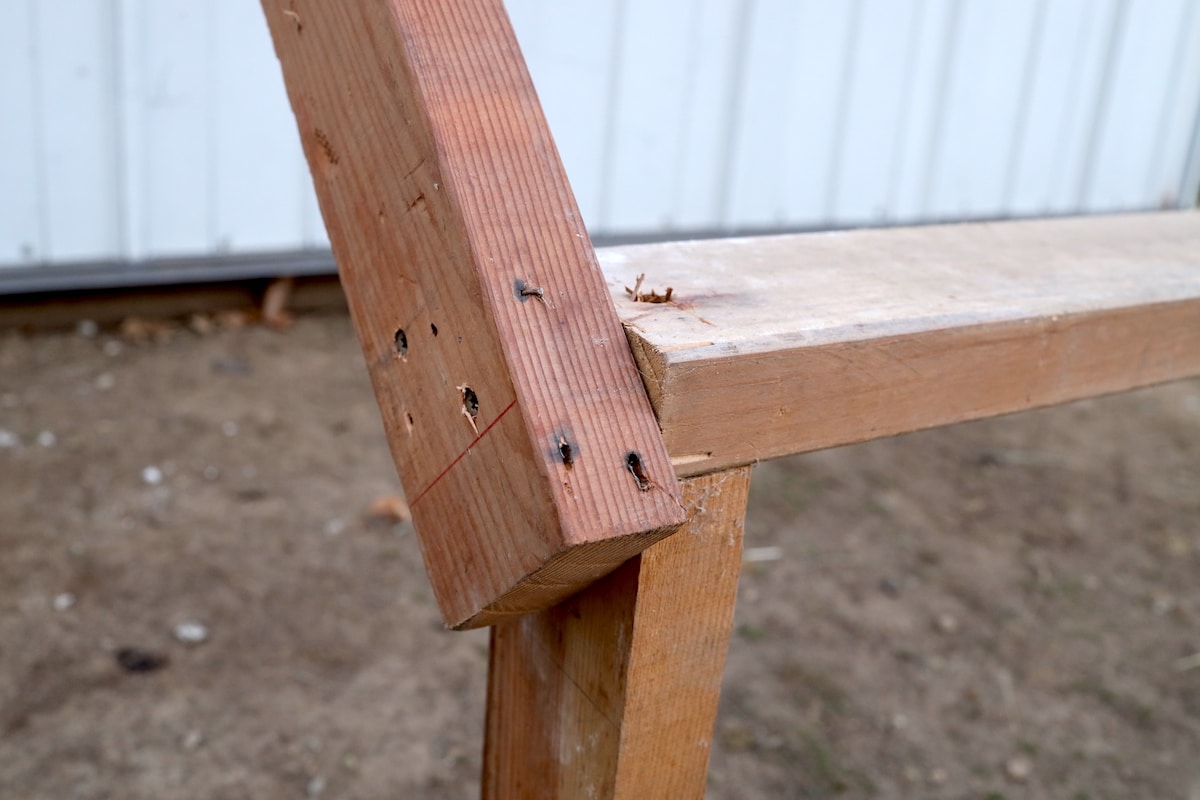
Roost Design #1 – 2×4 Ladder Roost
If you have 5 roughly 8’ spare 2×4’s lying around then you’re in business. That’s all this simple 2×4 ladder roost requires. The video below visually walks you through the build process.
Step one
Measure and cut (5) 2×4’s to 5’ long.
Step two
Take your cutoff pieces and cut (2) 18” pieces and (2) 12” pieces.
The 18” pieces are the legs of your roost allowing the bottom roosting bar to sit 18” off the ground. The 12” pieces are your standoffs at the top of the roost that lean against the wall of your coop providing 12” of clearance.
Step three
Select (2) 5’ boards as your vertical rails of the ladder. On the first rail, use your speed square to trace three 45° lines—top, middle, bottom—all facing the same direction. Repeat these three 45° lines on the second rail, but mirrored so they angle the opposite direction.

Step four
Align your 18” legs and 12” standoffs with the lines you just traced at the top and bottom of each rail. Fasten together with 2 screws. Note that the legs and standoffs should bend the same direction but at opposite angles.
Step five
Fasten the (3) 5’ rungs between the rails in line with your 45° marks. The bottom rung will sit flat on the legs and the top rung will press up against the standoffs. Fasten the end of each roosting bar with at least two screws so the bar does not twist or rock when weight is applied.
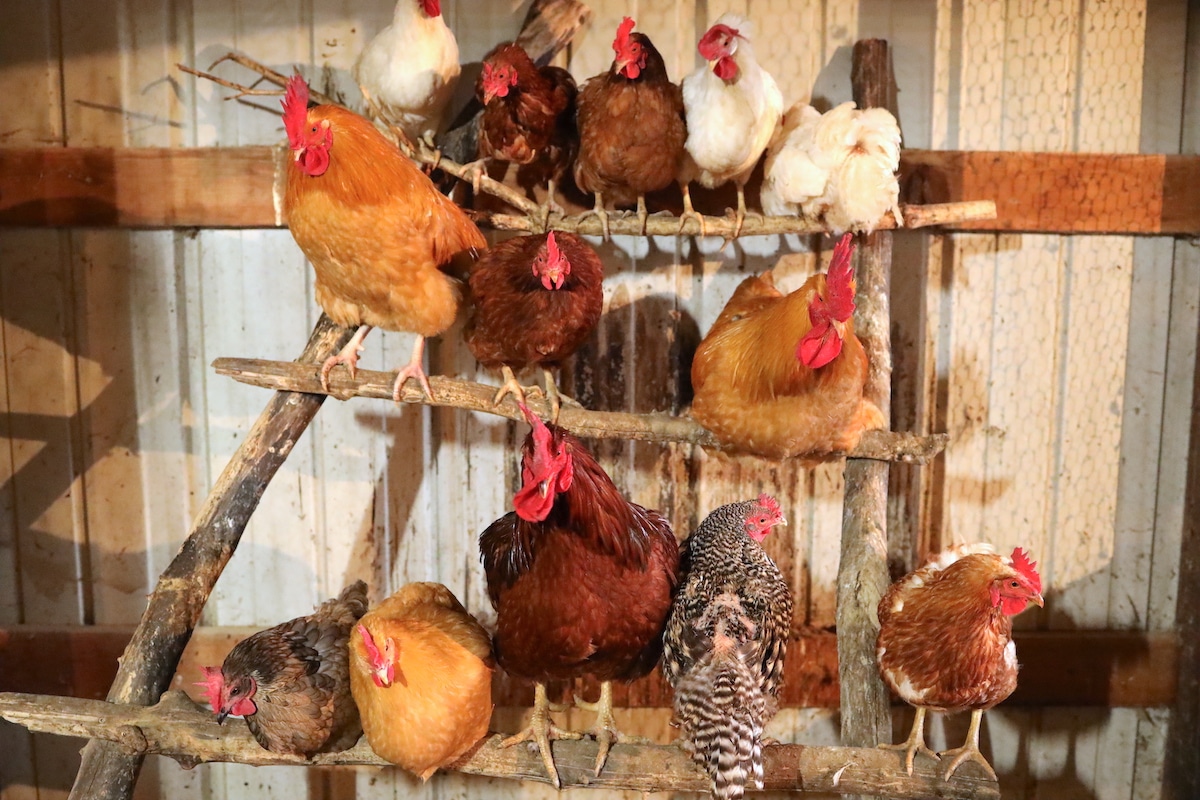
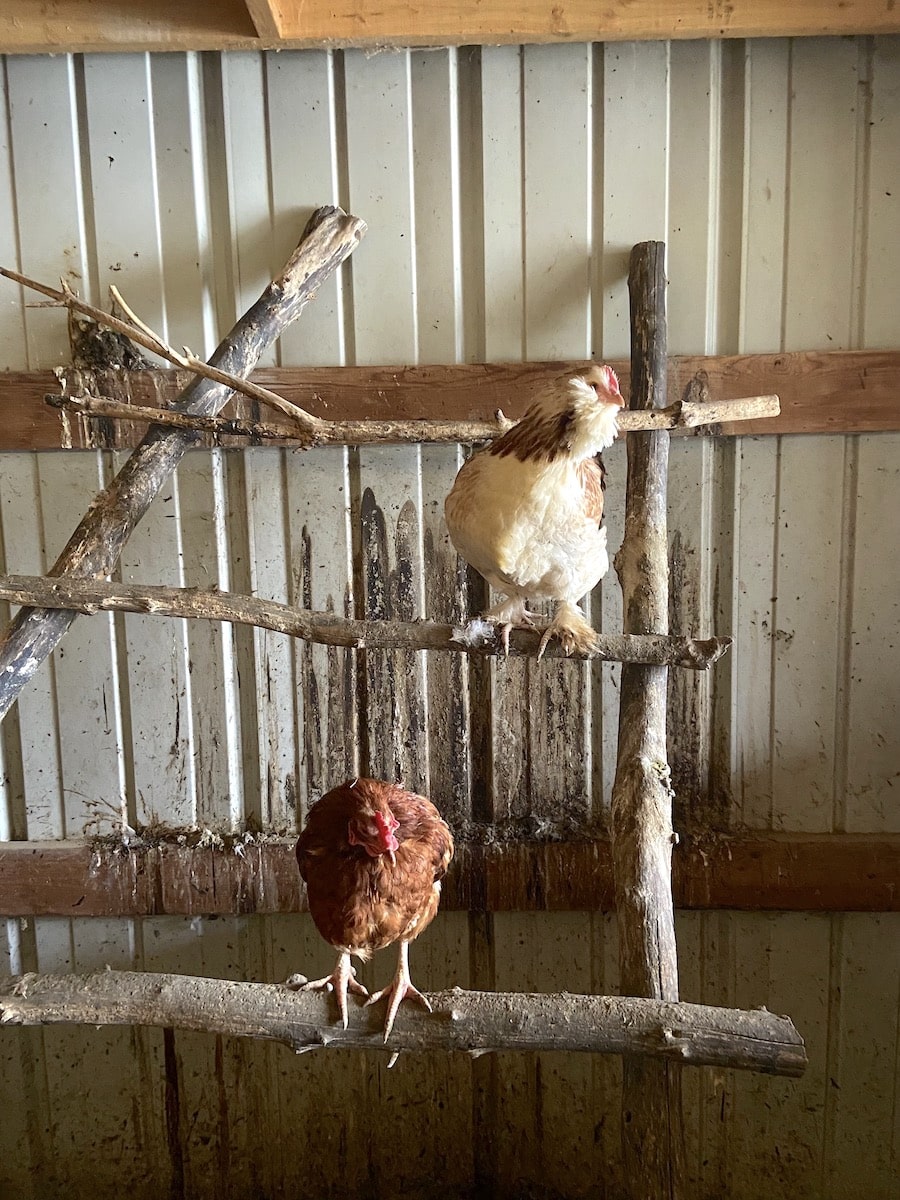
Roost Design #2 – Tree Branch Ladder Roost
This tree branch roost is as simple as it gets! Track down some downed tree branches that are sturdy and smooth. The two vertical rails should be longer and thicker—approximately 4-5” in diameter and as long as desired to fit your coop. Look for horizontal roosting bars with a 2-3” diameter at your desired width.
Step one
Lay down your vertical rails in the desired shape. Layout the horizontal roosting bars in the desired locations. Keep in mind the angle your ladder will be set at and the horizontal spacing you want to achieve between each roosting bar.
At this point, either mark and cut the horizontal rungs to the desired length, or leave as-is. Some overhang isn’t a big deal and can actually provide extra roosting space.
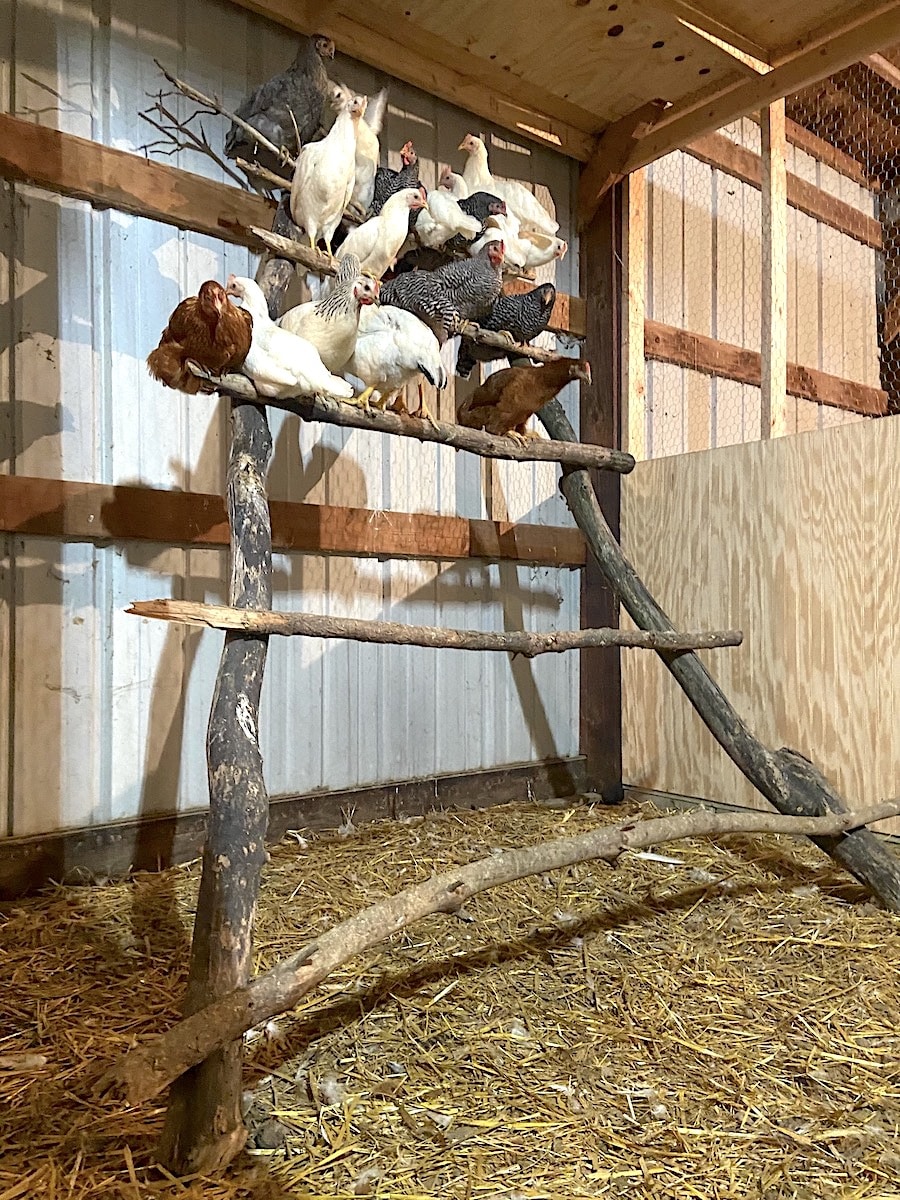
Step two
Screw horizontal roosting bars to the vertical rails. Ideally you’d fit two screws in at the end of each rung, but one secure screw should hold.
And your roost is complete!
Where should you locate your roost in the coop?
Whether you build with 2×4’s, branches, or any other scrap wood you have, you’re ready bring your new ladder style chicken roost into your coop.
But where?
Did you know chickens continue pooping while they sleep? Talk about multitasking!
This means that quite a bit of manure tends to accumulate under a roost.
Therefore, you want to keep your roost well clear of where your chickens have access to food and water. It’s also recommended you keep your roost away from laying boxes.
So find a nice unoccupied area of your coop away from the other coop functions and setup your roost!
If possible, it’s best to secure your ladder to the wall so it doesn’t fall. But, keep it easily moveable so you can clean underneath it!
Looking for other chicken raising info? Check out:
- Simple DIY Chicken Coop Inside Your Barn
- How To Care For Chickens In The Winter Basics
- Simple Outdoor Chicken Brooder Ideas
- How To Care For Baby Chicks
- Easy DIY Heated Chicken Waterer
- Chicken Tractor Plans for 25 Chickens
Pin it for later!


What style roost did your chickens prefer? The store bough wood or the branches?
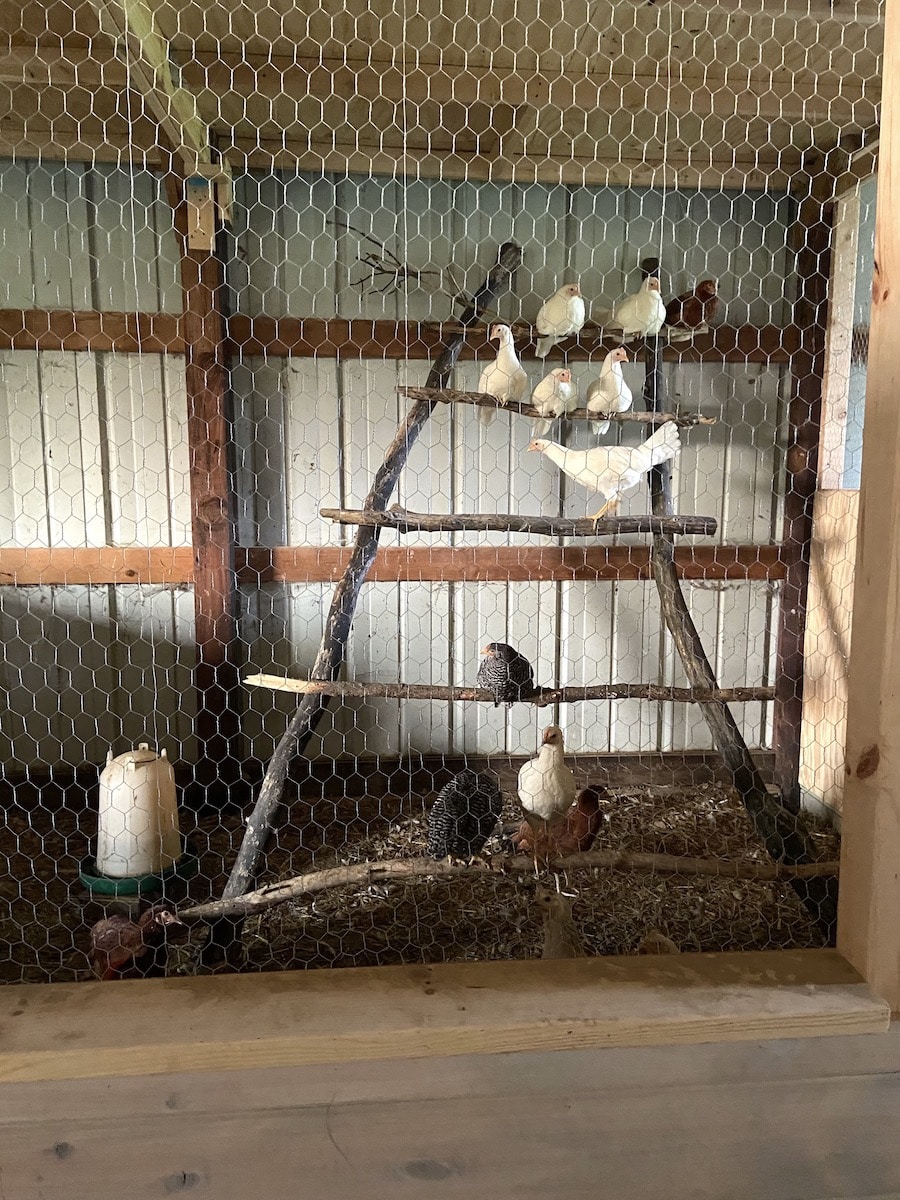
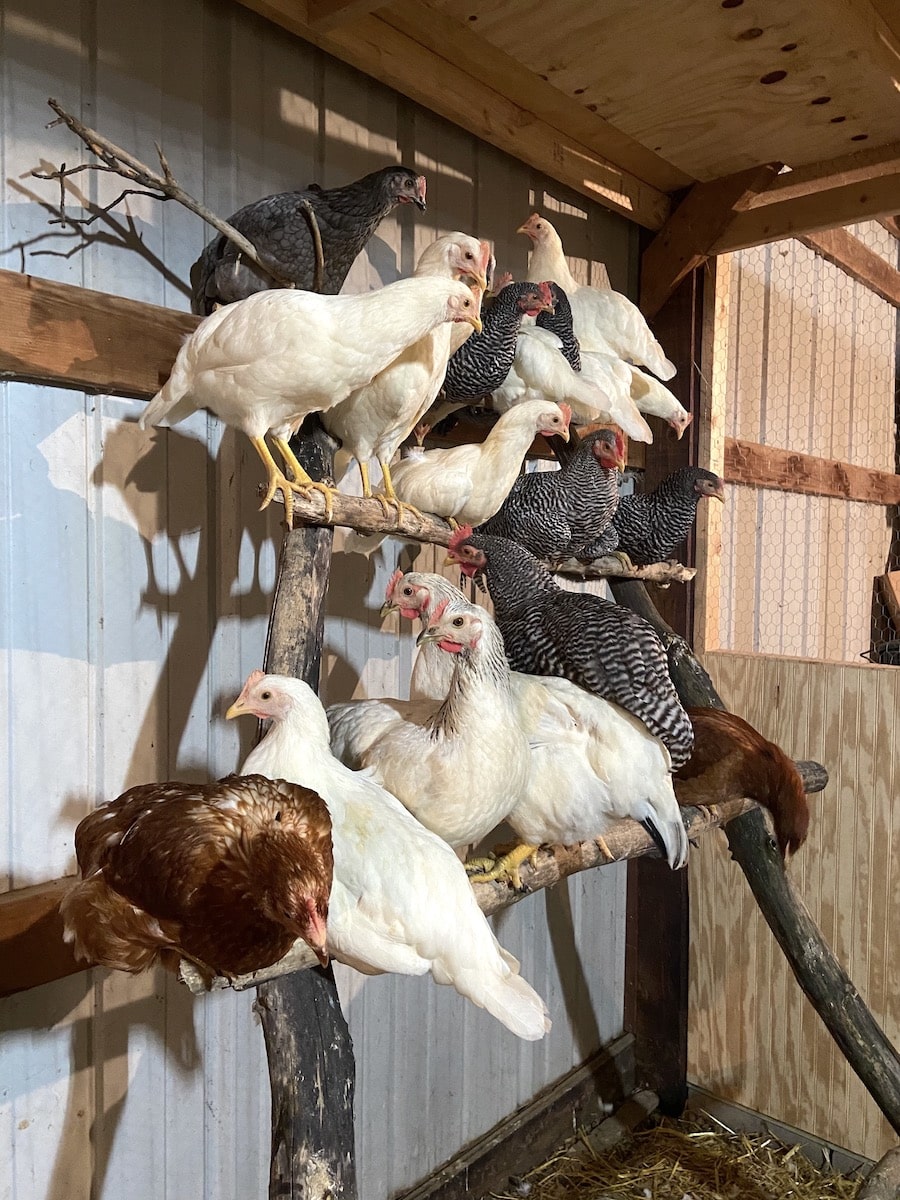
It might be a bit early yet to come to any final conclusions, but honestly it might be a tie! If I had to choose one, I’d say there’s more chickens on the natural branches each night than there are on the horizontal 2×4’s. But its hard to tell if that’s mainly because more chickens were used to that setup already since that was in there first. And it may have more to do with the pecking order than their preference of roost. Some of the older chickens have switched to the newer roost, and some of the newer chickens have worked their way up on the older, branch roost. The cold winter weather hasn’t seemed to change preference at all. One thing I can say for sure is that the higher up roost bars are packed and the lower ones are empty, so chickens definitely want to be as high up as they can!
Thanks for the informative experiment. Has it remained a tie ? Any preference shown out yet ? How about it the human side – do you find yourself having a preference for one reason or another ?
Hi there! I really haven’t been able to tell a preference from the chickens these past couple years. The two roosts are equally full daily and there isn’t a noticeable competition for one vs. the other. I do tend to lean toward the 2×4 roost bars being a better option to support the weight of the chicken and also help protect their feet from cold during the winter. But I wouldn’t say one is right and one is wrong, and I still like the idea of just mimicking nature. I did recently add one more 2×4 roost bar onto the ladder I build so now there are 4 spaced evenly. They’re tighter, but I think there’s still enough space so the chickens aren’t pooping on each other. Hope that helps!
If chickens prefer 2-2.5″ wide, why do I never see folks using 2x3s?
I’m currently working on our coop and have planned on using 2×3’s just because my gut says the 2x4s feel a little wide…but I don’t want to make a mistake if I’m overlooking something
Hey there! You’re definitely not off with your thinking. I think a 2×3 (actually 2.5″ wide) would be more ideal than a 2×4. I’ve just found that 2×3’s are sometimes hard to come by, especially straight ones. Sometimes they’re even more expensive than 2×4’s. If you had a table saw, my preference would probably be to get 2×6’s and rip those in half to be closer to 2×3’s. Just a thought. We just built a new coop with all 2×4 roosts and the chickens seem to be liking them just fine. https://fromscratchfarmstead.com/movable-chicken-coop/